


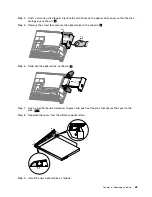


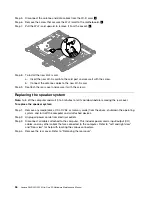

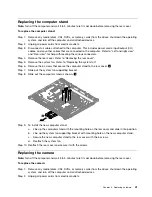


Step 4.
Push a small iron stick (paper clip) into the small hole on the optical drive cover so that the disk
springs out as shown.
1
Step 5.
Remove the screw that secures the optical drive to the chassis.
2
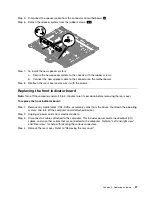
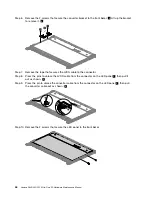
Step 6.
Slide out the optical drive as shown.
3
Step 7.
Use a small flat head screwdriver to press and push out the pins that secure the cover to the
disk.
4 5
Step 8.
Separate the cover from the defective optical drive.
Step 9.
Install the new optical drive as follows:
Chapter 8
.
Replacing hardware
29
Summary of Contents for 245
Page 2: ......
Page 6: ...iv Lenovo C240 245 255 All In One PC Hardware Maintenance Manual ...
Page 8: ...2 Lenovo C240 245 255 All In One PC Hardware Maintenance Manual ...
Page 16: ...10 Lenovo C240 245 255 All In One PC Hardware Maintenance Manual ...
Page 18: ...12 Lenovo C240 245 255 All In One PC Hardware Maintenance Manual ...
Page 24: ...18 Lenovo C240 245 255 All In One PC Hardware Maintenance Manual ...
Page 32: ...26 Lenovo C240 245 255 All In One PC Hardware Maintenance Manual ...