background image

Page 12

New or Replacement Line Set

This section provides information on new installation or
replacement of existing line set. If a new or replacement
line set is not required, then proceed to 

Brazing

Connections 

on Page 14.

If refrigerant lines are routed through a wall, seal and
isolate the opening so vibration is not transmitted to the
building. Pay close attention to line set isolation during
installation of any HVAC system. When properly isolated
from building structures (walls, ceilings. floors), the
refrigerant lines will not create unnecessary vibration and
subsequent sounds.

Also, consider the following when placing and installing a
high−efficiency air conditioner:

REFRIGERANT LINE SET

Field refrigerant piping consists of liquid and suction lines
from the outdoor unit (braze connections) to the indoor unit
coil (flare or braze connections). Use Lennox L15 (braze,
non−flare) series line set, or use field−fabricated refrigerant
lines as listed in Table 2.

Table 2. XP Refrigerant Connections and Line Set

Requirements

Model

Valve Field Connections and Recommended
Line Set

Liquid
Line

Suction
Line

L15 Line Set

−024
−030

3/8 in.

(10 mm)

3/4 in.

(19 mm)

L15 line set sizes are dependent
on unit matchup. See Engineering
Handbook to determine correct line
set sizes.

−036
−048

3/8 in.

(10 mm)

7/8 in.

(22 mm)

−060

3/8 in.

(10 mm)

1−1/8 in.

(29 mm)

Field Fabricated

NOTE  Some applications may required a field provided 7/8" to
1−1/8" adapter

NOTE − When installing refrigerant lines longer than 50
feet, contact Lennox Technical Support Product
Applications for assistance or Lennox piping manual. To
obtain the correct information from Lennox, be sure to
communicate the following points:

Model (XP) and size of unit (e.g. −060).

Line set diameters for the unit being installed as listed
in Table 2 and total length of installation.

Number of elbows and if there is a rise or drop of the
piping.

MATCHING WITH NEW OR EXISTING INDOOR COIL
AND LINE SET

The RFC1−metering line consisted of a small bore copper
line that ran from condenser to evaporator coil. Refrigerant
was metered into the evaporator by utilizing
temperature/pressure evaporation effects on refrigerant in
the small RFC line. The length and bore of the RFC line
corresponded to the size of cooling unit.

If the XP is being used with either a new or existing indoor
coil which is equipped with a liquid line which served as a
metering device (RFCI), the liquid line must be replaced
prior to the installation of the XP unit. Typically a liquid line
used to meter flow is 1/4" in diameter and copper.

LIQUID LINE FILTER DRIER INSTALLATION OR
REPLACEMENT

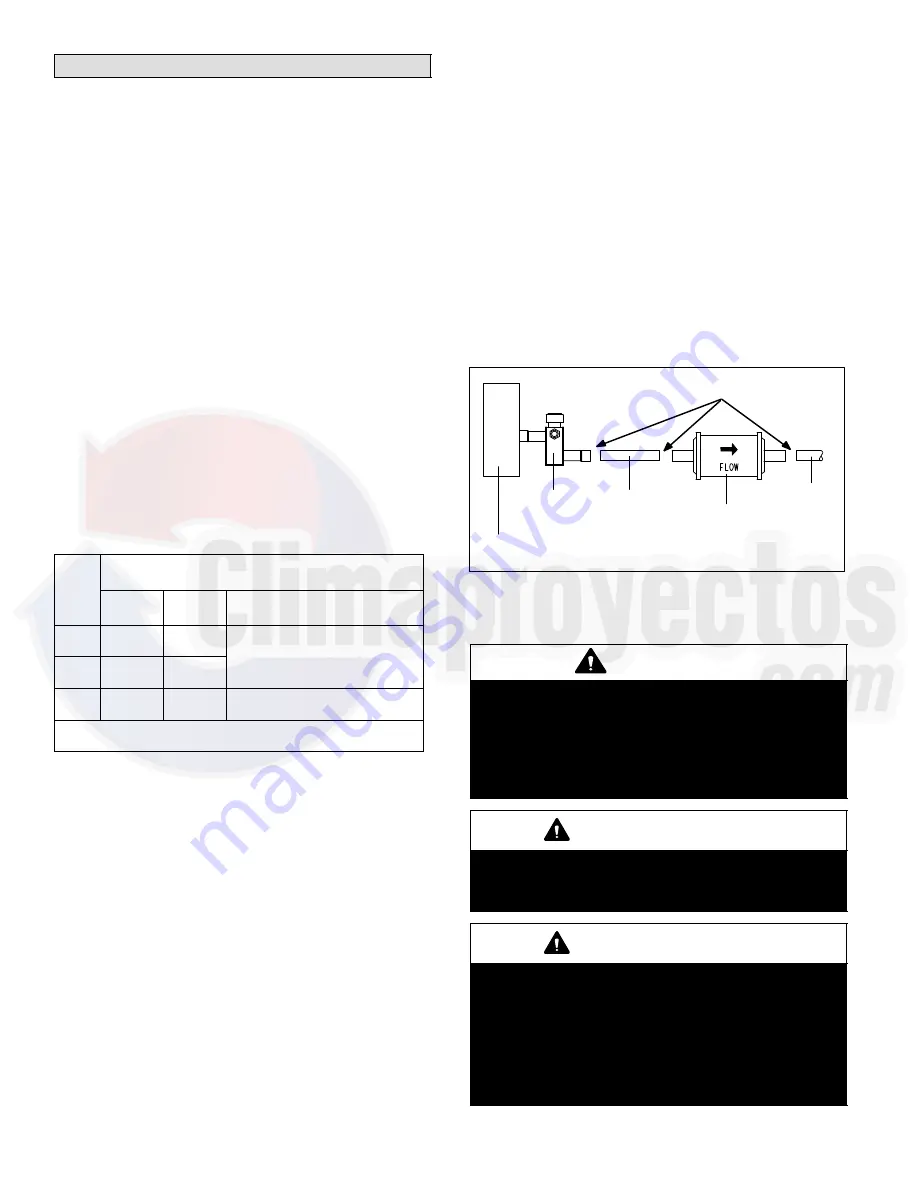
The filter drier (one is shipped with each XP unit) must be
field installed in the liquid line between the outdoor unit’s
liquid line service valve and the indoor coil’s metering
device (fixed orifice or TXV) as illustrated in Figure 12. This
filter drier must be installed to ensure a clean,
moisture−free system. Failure to install the filter drier will
void the warranty. A replacement filter drier is available
from Lennox. See 

Brazing Connections

 on Page 14 for

special procedures on brazing filter drier connections to
the liquid line.

OUTDOOR

UNIT

LIQUID LINE

SERVICE VALVE

LIQUID LINE

FILTER DRIER

LINE

LIQUID

LINE

BRAZE CONNECTION POINTS

Figure 12. Typical Liquid Line Filter Drier

Installation

LINE SET ISOLATION

CAUTION

Brazing alloys and flux contain materials which are hazardous to your
health.

Avoid breathing vapors or fumes from brazing operations. Perform
operations only in well ventilated areas.

Wear gloves and protective goggles or face shield to protect against
burns.

Wash hands with soap and water after handling brazing alloys and flux.

IMPORTANT

The Environmental Protection Agency (EPA) prohibits the intentional
venting of HFC refrigerants during maintenance, service, repair and
disposal of appliance. Approved methods of recovery, recycling or
reclaiming must be followed.

IMPORTANT

If this unit is being matched with an approved line set or indoor unit
coil which was previously charged with mineral oil, or if it is being
matched with a coil which was manufactured before January of 1999,
the coil and line set must be flushed prior to installation. Take care to
empty all existing traps. Polyol ester (POE) oils are used in Lennox
units charged with HFC−410A refrigerant. Residual mineral oil can act
as an insulator, preventing proper heat transfer. It can also clog the
expansion device, and reduce the system performance and capacity.
Failure to properly flush the system per the instructions below will
void the warranty.

Summary of Contents for TSA024S4N41M

Page 1: ...Dimensions 2 Typical Control Panel Parts Arrangement 4 Typical Unit Parts Arrangement 5 Model Number Identification 5 Unit Components 6 General Information 8 Operating Gauge Set and Service Valves 8 Recovering Refrigerant from Existing System 10 New Outdoor Unit Placement 11 New or Replacement Line Set 12 Metering Devices and Flushing the System 15 Testing for Leaks 16 Evacuating the System 17 Ele...

Page 2: ...3 4 4 4 4 Motor W hp 75 1 10 150 1 5 185 1 4 185 1 4 185 1 4 L s cfm 924 1958 944 2000 1377 2917 1443 3058 1416 3000 Rev min 842 908 688 696 692 Watts 138 154 250 246 238 Shipping Data kg lb 1 package 56 123 60 133 81 178 88 194 99 218 Electrical Data Line voltage data 50 hz 1 phase 220 240V 220 240V 220 240V 220 240V 220 240V 2 Maximum overcurrent protection amps 25 25 35 35 45 3 Minimum circuit ...

Page 3: ...6 238 Shipping Data kg lb 1 package 61 135 88 194 99 218 Electrical Data Line voltage data 50 hz 3 phase 380 420V 380 420V 380 420V 2 Maximum overcurrent protection amps 10 15 20 3 Minimum circuit ampacity 8 0 10 7 14 2 Compressor Rated load amps 6 0 7 8 10 6 Locked rotor amps 46 0 51 5 74 0 Condenser Fan Motor Full load amps 0 55 1 0 1 0 Locked rotor amps 1 1 2 3 2 3 NOTE Extremes of operating ra...

Page 4: ...Tand M 24 1 4 616 25 1 4 641 TSA030S4N41T and M 24 1 4 616 29 1 4 743 TSA036S4N41M 28 1 4 724 29 1 4 743 TSA036S4N41T 24 1 4 616 29 1 4 743 TSA048S4N41T and M 28 1 4 724 37 1 4 925 TSA060S4N41T and M 28 1 4 724 33 1 4 845 Typical Control Panel Parts Arrangement GROUND LUG CONTROL CAPACITOR C12 CONTROL WIRE LOOP CUTOUT FOR HIGH VOLTAGE CONDUIT THREE PHASE ONE PHASE OR CONTACTOR LOCATION ONE POLE TH...

Page 5: ...36 S 4 4 N Major Design Sequence A 1st Generation B 2nd Generation Brand Family T T Class Product Line Unit Type S Split System Air Conditioner 024 2 Tons 030 2 5 Tons 0036 3 Tons 048 4 Tons 060 5Tons Cooling Efficiency S Standard Efficiency Minor Design Sequence 1 1st Revision 2 2nd Revision 3 3rd Revision Voltage M 380 420V 3 phase 50hz T 220 240V 1 phase 50hz Refrigerant Type 4 R 410A Part Load...

Page 6: ...ch opens and shuts off the compressor LOSS OF CHARGE SWITCH S24 FIELD INSTALLED OPTION The loss of charge switch is N C auto re set and located on the liquid line of the compressor The switch opens when liquid line pressure drops to 25 5 psig and shuts off the compressor The switch closes on a pressure rise at 55 5 psig The settings are factory set and cannot be adjusted CRANKCASE HEATER HR1 AND O...

Page 7: ... effects of liquid return If liquid enters the scrolls the orbiting scroll is allowed to separate from the stationary scroll The liquid is worked toward the center of the scroll and is discharged If the compressor is replaced conventional Lennox cleanup practices must be used Due to its efficiency the scroll compressor is capable of drawing a much deeper vacuum than reciprocating compressors Deep ...

Page 8: ...ness 50Rc Rockwell Harness Scale minimum Fully insert the wrench into the valve stem recess Service valve stems are factory torqued from 9 ft lbs for small valves to 25 ft lbs for large valves to prevent refrigerant loss during shipping and handling Using an Allen wrench rated at less than 50Rc risks roundingor breaking off the wrench or stripping the valve stem recess See the Lennox Service and A...

Page 9: ...vice port 3 When testing is completed replace service port cap and tighten as fol lows 1 2 3 4 5 6 7 8 9 10 11 12 1 6 TURN Operating Angle Type Service Valve 1 Remove stem cap with an appropriately sized wrench 2 Use a service wrench with a hex head extension 3 16 for liquid line valve sizes and 5 16 for vapor line valve sizes to back the stem out counterclockwise as far as it will go Operating Ba...

Page 10: ...ssor stops pumping when the pressure ratio meets a certain value or when the suction pressure is as high as 20 psig Compressor suction pressures should never be allowed to go into a vacuum Prolonged operation at low suction pressures will result in overheating of the scrolls and permanent damage to the scroll tips drive bearings and internalseals Once the compressor can not pump down to a lower pr...

Page 11: ... a very high level of sound transmission For proper placement of unit in relation to a window see the provided illustration in Figure 10 INSTALL UNIT AWAY FROM WINDOWS TWO 90 ELBOWS INSTALLED IN LINE SET WILL REDUCE LINE SET VIBRATION Figure 10 Outside Unit Placement PLACING OUTDOOR UNIT ON SLAB When installing a unit at grade level the top of the slab should be high enough above the grade so that...

Page 12: ... The length and bore of the RFC line corresponded to the size of cooling unit If the XP is being used with either a new or existing indoor coil which is equipped with a liquid line which served as a metering device RFCI the liquid line must be replaced prior to the installation of the XP unit Typically a liquid line used to meter flow is 1 4 in diameter and copper LIQUID LINE FILTER DRIER INSTALLA...

Page 13: ...be used if line set is to be installed on exterior of outside wall PVC PIPE FIBERGLASS INSULATION CAULK OUTSIDE WALL VAPOR LINE WRAPPED WITH ARMAFLEX LIQUID LINE OUTSIDE WALL LIQUID LINE VAPOR LINE WOOD BLOCK BETWEEN STUDS STRAP WOOD BLOCK STRAP SLEEVE WIRE TIE WIRE TIE WIRE TIE INSIDE WALL REFRIGERANT LINE SET INSTALLING VERTICAL RUNS NEW CONSTRUCTION SHOWN INSTALLATION LINE SET NOTE Insulate liq...

Page 14: ...ection on the vapor service valve NOTE The fixed orifice or check expansion valve metering device at the indoor unit will allow low pressure nitrogen to flow through the system NITROGEN HIGH LOW USE REGULATOR TO FLOW NITROGEN AT 1 TO 2 PSIG BRAZE LINE SET INSTALL SERVICE PORT CAPS ONLY Braze the liquid line to the liquid line service valve Turn off nitrogen flow After all connections have been bra...

Page 15: ...tting to temporary reconnect the liquid line to the indoorunit s liquid line orifice housing I Reverse above order to install LOW HIGH EXISTING INDOOR UNIT GAUGE MANIFOLD INVERTED HCFC 22 CYLINDER CONTAINS CLEAN HCFC 22 TO BE USED FOR FLUSHING LIQUID LINE SERVICE VALVE INLET DISCHARGE TANK RETURN CLOSED OPENED RECOVERY CYLINDER RECOVERY MACHINE NEW OUTDOOR UNIT VAPOR LINE SERVICE VALVE VAPOR LIQUI...

Page 16: ...th a leak detector F After leak testing disconnect gauges from service ports USE REGULATOR TO FLOW NITROGEN AT 1 TO 2 PSIG LINE SET AND INDOOR COIL After the line set has been connected to the indoor unit and air conditioner check the line set connections and indoor unit for leaks Use the following procedure to test for leaks LEAK TEST A Connect an HFC 410A manifold gauge set high pressure hose to...

Page 17: ...t rise above 500 microns 29 9 inches of mercury within a 20 minute period after shutting off the vacuum pump and closing the manifold gauge valves F When the absolute pressure requirement above has been met disconnect the manifold hose from the vacuum pump and connect it to an uprightcylinder of HFC 410A refrigerant Open the manifold gauge valve 1 to 2 psig in order to release the vacuum in the li...

Page 18: ...and refer to unit nameplate for minimum circuit ampacity and maximum overcurrent protection size 24VAC TRANSFORMER Use the transformer provided with the furnace or air handler for low voltage control power 24VAC 40 VA minimum SERVICE DISCONNECT SWITCH MAIN FUSE BOX BREAKER PANEL Refer to the unit nameplate for minimum circuit ampacity and maximum fuse or circuit breaker HACR per NEC Install power ...

Page 19: ... 24VAC control wires through hole with grommet and secure with provided wire tie B Make 24VAC thermostat wire connections Locate the two wires from the contactor and make connection using field provided wire nuts Yellow to Y1 Black to C common NOTE For proper voltages select thermostat wire control wires gauge per Table above NOTE Wire tie provides low voltage control wire strain relief and to mai...

Page 20: ... Cooling demand initiates at Y1 in the thermostat 2 24VAC from indoor unit Y1 energizes contactor K1 3 K1 1 N O closes energizing compressor B1 and outdoor fan motor B4 END OF COOLING DEMAND 4 Cooling demand is satisfied Terminal Y1 is de energized 5 Compressor contactor K1 is de energized 6 K1 1 opens and compressor B1 and outdoor fan motor B4 are de energized and stop immediately NOTE The thermo...

Page 21: ... Cooling demand initiates at Y1 in the thermostat 2 24VAC from indoor unit Y1 energizes contactor K1 3 K1 1 N O closes energizing compressor B1 and outdoor fan motor B4 END OF COOLING DEMAND 4 Cooling demand is satisfied Terminal Y1 is de energized 5 Compressor contactor K1 is de energized 6 K1 1 opens and compressor B1 and outdoor fan motor B4 are de energized and stop immediately NOTE The thermo...

Page 22: ...utlined in Figure 20 Unit Start Up IMPORTANT If unit is equipped with a crankcase heater it should be energized 24 hours before unit start up to prevent compressor damage as a result of slugging 1 Rotate fan to check for binding 2 Inspect all factory and field installed wiring for loose connections 3 After evacuation is complete open the liquid line and suction line service valves to release the r...

Page 23: ...perature of air entering indoor coil ºF INDOOR COIL DRY BULB DRY BULB WET BULB B TDrop 19º A Dry bulb Wet bulb ºF A 72º B 64º C 53º air flow air flow All temperatures are expressed in ºF 1 Determine the desired DT Measure entering air temperature using dry bulb A and wet bulb B DT is the intersecting value of A and B in the Table see triangle 2 Find temperature drop across coil Measure the coil s ...

Page 24: ...MBIENT TEMPERATURE START Measure outdoor ambient temperature 64ºF 17 7ºC and BELOW 1 Check Liquid and suction line pressures 2 Compare unit pressures with Table5 or 6 3 Conduct leak check evacuate as previously outlined 4 Weigh in the unit nameplate charge plus any charge required for line set differences over feet Liquid Line Set Diameter g per 1 5 m adjust from 4 6 m line set 9 5 mm 85 g per 1 5...

Page 25: ...or cooling 7 Allow temperatures and pressures to stabilize NOTE If necessary block outdoor coil to maintain325 375 psig 8 Record liquid line temperature LIQº ______ 9 Measureliquid line pressure and use the value to determinesaturation temperature see Table 7 SATº ______ 10 Subtract to determine subcooling SCº SATº_____ LIQº _____ SCº _____ 11 Compare results with Tables 3 or 4 Figure 21 HFC 410A ...

Page 26: ...15 45 507 152 497 147 487 148 498 149 492 157 Temperature of the air entering the outside coil Table 6 HFC 410A Normal Operating Pressures Liquid 10 and Suction 5 Psig 3 Phase TSA S4 50Hz International 3 Phase XP 036 048 060 5F 5C Liquid Suction Liquid Suction Liquid Suction 65 18 269 135 247 132 269 136 70 21 290 136 269 134 289 137 75 24 311 137 290 136 310 139 80 27 334 138 312 138 332 140 85 2...

Page 27: ...____ Actual __________ 6 Inspect drain holes in coil compartment base and clean if necessary NOTE If insufficient cooling occurs the unit should be gauged and refrigerant charge should be checked Outdoor Coil Clean and inspect outdoor coil may be flushed with a water hose Ensure power is off before cleaning NOTE It may be necessary to flush the outdoor coil more frequently if it is exposed to subs...

Page 28: ...um Fuse or Circuit Breaker Electrical Connections Tight Indoor Filter clean Supply Voltage Unit Off Indoor Blower RPM S P Drop Over Indoor Dry Outdoor Coil Entering Air Temp Discharge Pressure Suction Pressure Refrigerant Charge Checked Refrigerant Lines Leak Checked Properly Insulated Outdoor Fan Checked Service Valves Fully Opened Caps Tight Thermostat Voltage With Compressor Operating Calibrate...

Reviews: