background image

Page 48

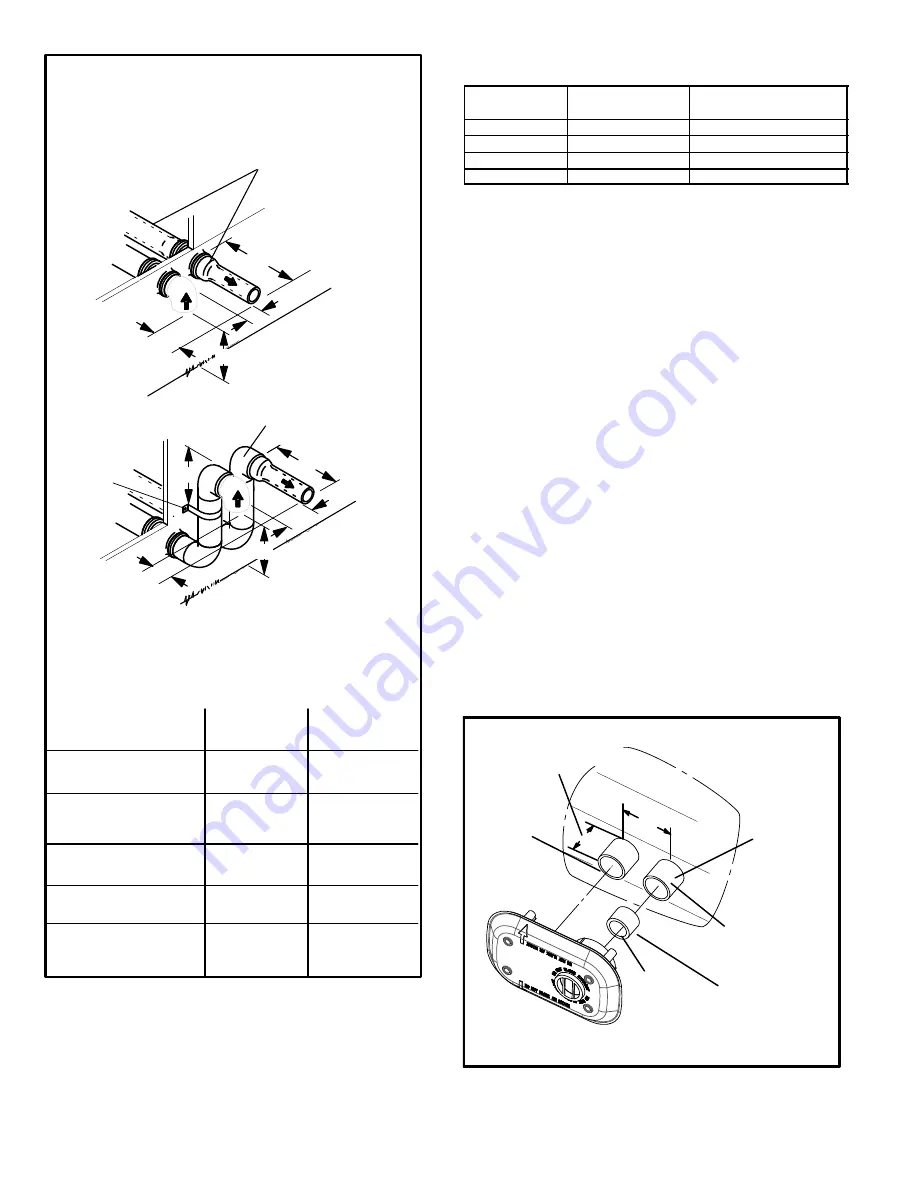
FIGURE 29

FIELD−SUPPLIED WALL TERMINATION OR

(15F74) WALL RING TERMINATION KIT

With INTAKE ELBOW

See venting table 23 for maximum venting lengths with this
arrangement.

* Use wall support every 24" (610 mm). Use two wall supports if
extension is greater than 24" (610 mm) but less than 48" (1219 mm).
NOTE − One wall support must be 6" (152 mm) from top of each pipe
(intake and exhaust).

2" (51mm)

Vent Pipe

3" (76mm)

Vent Pipe

12" (508MM)

12" (508MM)

6" (152MM)

6" (152MM)

6" (152MM)

12" (305MM)

20" (508MM)

6" (152MM)

6" (152MM)

6" (152MM)

A

−Minimum clearance

above grade or average

snow accumulation

B

−Maximum horizontal

    separation between 

    intake and exhaust

C

−Minimum from

end of exhaust to

inlet of  intake

D

−Maximum exhaust

pipe length

E

−Maximum wall support

distance from top of each

pipe (intake/exhaust)

NOTE − FIELD−PROVIDED

REDUCER MAY BE

REQUIRED TO ADAPT

LARGER VENT PIPE SIZE

TO TERMINATION.

D

B

C

SIZE TERMINATION

PER TABLE 24

1/2" (13mm) ARMAFLEX

INSULATION IN UN-

CONDITIONED SPACE

STRAIGHT

APPPLICATION

B

C

D

* WALL

SUPPORT

1/2" (13mm) ARMAFLEX INSULATION

IN UNCONDITIONED SPACE

E

EXTENDED

APPLICATION


A

A

TABLE 24

EXHAUST PIPE TERMINATION SIZE REDUCTION

SLP98UHV

MODEL

Exhaust Pipe Size

Termination Pipe Size

*070

2", 2−1/2" or 3"

1−1/2"

*090

2", 2−1/2" or 3"

2"

110

2−1/2" or 3"

2"

135

3"

2"

*SLP98UH−070 and −090 units with the flush−mount termina-
tion must use the 1−1/2"accelerator supplied with the kit.

 5. On field−supplied terminations for side wall exit, ex-

haust piping may extend a maximum of 12 inches
(305mm) for 2" PVC and 20 inches (508mm) for 3"
(76mm) PVC beyond the outside wall. Intake piping
should be as short as possible. See figures 28 and 29.

 6. On  field−supplied  terminations, a minimum distance

between the end of the exhaust pipe and the end of the
intake pipe without a termination elbow is 8" and a
minimum distance of 6" with a termination elbow. See
figures 28 and 29.

 7. If intake and exhaust piping must be run up a side wall

to position above snow accumulation or other ob-
structions, piping must be supported every 24"
(610mm) as shown in figures 28 and 29. In addition,
close coupled wall termination kits must be extended
for use in this application. See figures 36 and 37.
When exhaust and intake piping must be run up an
outside wall, the exhaust piping must be terminated
with pipe sized per table 24.The intake piping may be
equipped with a 90° elbow turndown. Using turndown
will add 5 feet (1.5m) to the equivalent length of the
pipe.

 8. Based on the recommendation of the manufacturer, a

multiple furnace installation may use a group of up to
four terminations assembled together horizontally, as
shown in figure 33.

2" EXTENSION FOR 2"  PVC PIPE
1" EXTENSION FOR 3" PVC PIPE

FIGURE 30

1−1/2" ACCELERATOR

(ALL 070 AND 090 UNITS)

FURNACE

EXHAUST

PIPE

FURNACE

INTAKE PIPE

4’’

GLUE EXHAUST END

FLUSH INTO

TERMINATION

FLAT SIDE

FLUSH−MOUNT SIDE WALL TERMINATION

51W11

Summary of Contents for SLP98UH070V36B

Page 1: ...ed in this manual are presented as recom mendations only and do not supersede or replace local or state codes In the absence of local or state codes the guidelines and procedures outlined in this manu...

Page 2: ...nd according to FTC labeling regulations Isolated combustion system rating for non weatherized furnaces SPECIFICATIONS Gas Heating Performance Model No SLP98UH090V60C SLP98UH110V60C SLP98UH135V60D 1 A...

Page 3: ...Night Service Kit 65W78 65W78 65W78 Safety Night Service Kit 51W05 51W05 51W05 TERMINATION KITS Direct Vent Applications Only See Installation Instructions for specific venting information Termination...

Page 4: ...W1 demand at 70 input W2 demand at 100 input No delay between stages icomfort Touch Communicating Thermostat Variable Rate Capacity Mode furnace automatically adjusts firing rate based on first and se...

Page 5: ...e cycle times W1 demand at 70 input W2 demand at 100 input No delay between stages icomfort Touch Communicating Thermostat Variable Rate Capacity Mode furnace automatically adjusts firing rate based o...

Page 6: ...70 input W2 demand at 100 input No delay between stages icomfort Touch Communicating Thermostat Variable Rate Capacity Mode furnace automatically adjusts firing rate based on first and second stage cy...

Page 7: ...1 demand at 70 input W2 demand at 100 input No delay between stages icomfort Touch Communicating Thermostat Variable Rate Capacity Mode furnace automatically adjusts firing rate based on first and sec...

Page 8: ...emand at 70 input W2 demand at 100 input No delay between stages icomfort Touch Communicating Thermostat Variable Rate Capacity Mode furnace automatically adjusts firing rate based on first and second...

Page 9: ...0 input W2 demand at 100 input No delay between stages icomfort Touch Communicating Thermostat Variable Rate Capacity Mode furnace automatically adjusts firing rate based on first and second stage cyc...

Page 10: ...W1 demand at 70 input W2 demand at 100 input No delay between stages icomfort Touch Communicating Thermostat Variable Rate Capacity Mode furnace automatically adjusts firing rate based on first and s...

Page 11: ...age cycle times W1 demand at 70 input W2 demand at 100 input No delay between stages icomfort Touch Communicating Thermostat Variable Rate Capacity Mode furnace automatically adjusts firing rate based...

Page 12: ...70 input W2 demand at 100 input No delay between stages icomfort Touch Communicating Thermostat Variable Rate Capacity Mode furnace automatically adjusts firing rate based on first and second stage c...

Page 13: ...includes variable capacity integrated control transformer circuit breaker and door switch VARIABLE SPEED BLOWER MOTOR BAG ASSEMBLIES shipping location COLD END HEADER BOX PRESSURE SWITCHES VARIABLE SP...

Page 14: ...eaker CB8 A 24V circuit breaker is also located in the control box The switch provides overcurrent protection to the trans former T1 The breaker is rated 3A at 32V If the current exceeds this limit th...

Page 15: ...d accordingly to provide the appropriate airflow at any rate On the initial call for low fire the furnace will operate at 35 and will remain there until the heat call is satisfied or a call for high f...

Page 16: ...S DEHUMIDIFICATION SIGNAL W2 HEAT DEMAND FROM 2ND STAGE T STAT W1 HEAT DEMAND FROM 1ST STAGE T STAT R CLASS 2 VOLTAGE TO THERMOSTAT G MANUAL FAN FROM T STAT C THERMOSTAT SIGNAL GROUND CONNECTED TO TRA...

Page 17: ...Page 17 FIGURE 5 SLP98UHV INTEGRATED CONTROL CONFIGURATION GUIDE...

Page 18: ...be adjusted by moving switches 4 and 5 on the integrated control The unit is shipped from the facto ry with a blower off delay of 90 seconds The blower off delay affects comfort and is adjustable to...

Page 19: ...ry set at option A which has the great est effect on blower motor performance Table 8 provides the cooling mode blower speed ramping options that will re sult from different switch settings The coolin...

Page 20: ...d 10 provides the heating mode blower speeds that will result from different switch settings Figure 6 indicates the effect the DIP switch set tings tables 20 21 above have upon the heating airflow at...

Page 21: ...tton is released the displayed item will be selected Once all items in the menu have been displayed the menu re sumes from the beginning until the button is released Error Code Recall Mode Select E fr...

Page 22: ...change blinking remain in field test mode Solid exit field test mode Solid c start pressure switch calibration TABLE 13 Field Test Menu Options These options are displayed when the button is used in...

Page 23: ...eriod During that period hold push button until code stops blinking disappear for 2 seconds Integrated control will store code in memory and will automatically exit Field Test Mode and reset If second...

Page 24: ...restart if the error recovers 24 voltage low Range is 18 to 30 volts Check voltage Unresponsive device Usually caused by delay in outdoor unit responding to indoor unit poling recycle power check wir...

Page 25: ...e switch calibration Check vent system and pressure switch wiring connec tions Low flame current Run mode Refer to troubleshooting in installation instruction Check micro amperes of flame sensor clean...

Page 26: ...xited Global network connection Communication link problem For Future Use No 24 Volt output on Y1 to C with non communicating outdoor unit Y1 relay Stage 1 failed Pilot relay contacts did not close or...

Page 27: ...humidification Dehumidification Call 2 On On On Demand 0 VAC High 70 PRECISION MODE operates independent of a Y1 thermostat demand Normal Operation 1 On On On Acceptable 24 VAC High 100 Dehumidificat...

Page 28: ...gh 70 Thermostat will keep out door unit energized after cooling temperature set point has been reached in order to maintain room humidity setpoint ROOM THERMOSTAT CALLS FOR FIRST AND SECOND STAGE COO...

Page 29: ...h as motor work load SLP98UHV BLOWER MOTOR COMPONENTS FIGURE 8 STATOR WINDINGS BEARING ROTOR The controller uses sensing devices to sense what position the rotor is in at any given time By sensing the...

Page 30: ...oller by momentarily turning off power to unit The DC filter capacitors inside the controller are connected electrically to the motor supply wires The capacitors take approximately 5 minutes to discha...

Page 31: ...feature of the control voltage measured with a digital meter will be slightly lower To measure correct voltage use a true RMS meter or ignitor can be ohmed Ohm value should be 39 to 70 2 Flame Sensor...

Page 32: ...burner box front panel in place Each burner uses an orifice see table 29 for orifice size that is precisely matched to the burner input Burners can be removed as a one piece assembly for service If b...

Page 33: ...e integrated control section section A subsection 4 for more details The valve is internally redundant to assure safety shut off If the gas valve must be replaced the same type valve must be used A 24...

Page 34: ...and allow ing ignition The low fire pressure switch provides this func tion Third the switch interrupts the combustion process in the event vent outlet or combustion air intake blockage Finally the s...

Page 35: ...en increase RPM by 250 Repeat this step until closed 8 Decrease RPM by 50 check after 5 seconds Repeat this step until switch is open 9 Keep this RPM as RPM2 10 Set RPM to 0 End calibration NOTE If af...

Page 36: ...d allow to cycle off 6 Remove manometer and tee s Reinstall combustion air sensing hoses to the pressure switch BLACK TUBING POSITIVE RED TUBING NEGATIVE Measuring Pressure Differential The CAI is ins...

Page 37: ...or Unit icomfort ENABLED SLP98UHV FURNACE icomfort Touch THERMOSTAT NON COMMUNICATING OUTDOOR AIR CONDITIONING UNIT 1 OR 2 STAGE icomfort Touch Thermostat icomfort Enabled SLP98UHV Indoor Furnace Non...

Page 38: ...T REQUIRED OPTIONAL OUTDOOR AIR SENSOR FOR USE WITH HU MIDIFIER IF NOT ALREADY IN THE SYSTEM FOR OTHER FUNCTIONS BUILT INTO ALL icomfort OUTDOOR UNITS icomfort ENABLED SLP98UHV FURNACE HEPA BYPASS FIL...

Page 39: ...FITTING SOLVENT CEMENT MARKING PVC CPVC Pipe and Fittings ULCS636 PVC CPVC Solvent Cement ABS to PVC or CPVC Transition Cement CAUTION Solvent cements for plastic pipe are flammable liq uids and shou...

Page 40: ...on 1 Measure and cut vent pipe to desired length 2 Debur and chamfer end of pipe removing any ridges or rough edges If end is not chamfered edge of pipe may remove cement from fitting socket and resul...

Page 41: ...ing Figures 22 and 23 11 Route piping to outside of structure Continue with installation following instructions given in piping ter mination section CAUTION Do not discharge exhaust into an existing s...

Page 42: ...added to the elbow count used to de termine acceptable vent lengths Contact the Application Department for more information concerning sizing of vent systems which include multiple pipe sizes IMPORTAN...

Page 43: ...69 6 41 19 90 43 112 93 68 64 7 36 14 85 38 107 88 63 59 8 31 n a 80 33 102 83 58 54 9 26 75 28 97 78 53 49 10 21 70 23 92 73 48 44 Concentric Termination at Elevation 0 7500 Number Of 90 Ebows Used...

Page 44: ...er to larger pipe size in horizontal runs of exhaust pipe TRAP FIGURE 23 2 TRANSITION 2 SIDE VIEW 2 2 2 2 or TYPICAL EXHAUST PIPE CONNECTIONS AND CONDENSATE TRAP INSTALLATION IN HORIZONTAL AIR APPLICA...

Page 45: ...AKE PIPE CONNECTIONS IN UPFLOW APPLICATIONS 2 TRANSITION 2 2 2 3 TRANSITION 2 3 2 Use only the factory supplied trap Trap can be installed on either side of cabinet within 5 ft of the furnace TRAP FIG...

Page 46: ...dewalk or paved driveway located on public property Clearance under veranda porch deck or balcony 12 3 feet 9m 7 feet 2 1m 3 feet 9m within a height 15 feet 4 5m above the meter regulator assembly 3 f...

Page 47: ...ust be taken to avoid recirculation of ex haust back into intake pipe FIGURE 27 UNCONDITIONED ATTIC SPACE 1 2 13mm FOAM INSULATION IN UNCONDITIONED SPACE SIZE TERMINATION PIPE PER TABLE 24 3 76mm MAX...

Page 48: ...e the 1 1 2 accelerator supplied with the kit 5 On field supplied terminations for side wall exit ex haust piping may extend a maximum of 12 inches 305mm for 2 PVC and 20 inches 508mm for 3 76mm PVC b...

Page 49: ...or provided on 71M80 44W92 kits for SL98UHV 36B 070 FIGURE 33 EXHAUST VENT INTAKE AIR 5 1 2 140mm Front View 12 305mm 5 127mm 18 MAX 457mm EXHAUST VENT INTAKE AIR OPTIONAL VENT TERMINATION FOR MULTIPL...

Page 50: ...4 but less than 48 FIELD PROVIDED REDUCER MAY BE REQUIRED TO ADAPT LARGER VENT PIPE SIZE TO TERMINATION FIGURE 37 12 305 mm Minimum Above Grade or Average Snow Accumulation 1 2 13 mm FOAM INSULATION F...

Page 51: ...rack must be installed beyond condensate trap or trap must be relocated to avoid interference Trap same on right side Plug same on left side 1 1 2 in 1 Determine which side condensate piping will exit...

Page 52: ...ndensate trap and evaporator coil must be drained separately as shown Field Provided Vent FIGURE 43 CONDENSATE TRAP LOCATIONS Unit shown in horizontal right hand discharge position 5 max to drain PVC...

Page 53: ...oximately 3 minutes 6 Adjust the thermostat to deactivate the heating demand and again wait for the combustion air inducer to stop At this point the trap should be primed with sufficient wa ter to ens...

Page 54: ...xtend outside the furnace cabinet The flexible connector can then be added between the black iron pipe and the gas supply line WARNING Do not exceed 600 in lbs 50 ft lbs torque when at taching the gas...

Page 55: ...reading shut off all other gas ap pliances connected to meter G Proper Combustion Furnace should operate minimum 15 minutes with correct manifold pressure and gas flow rate before checking com bustion...

Page 56: ...ise 1 Place plenum thermometers in the supply and return air plenums Locate supply air thermometer in the first hori zontal run of the plenum where it will not pick up radiant heat from the heat excha...

Page 57: ...t Use papers or protective covering in front of fur nace while removing heat exchanger assembly 1 Turn off electrical and gas supplies to the furnace 2 Remove the furnace access panels 3 Disconnect th...

Page 58: ...plug to gas valve 41 Replace the blower compartment access panel 42 Refer to instruction on verifying gas and electrical con nections when re establishing supplies 43 Follow lighting instructions to l...

Page 59: ...15 second pre purge in ignition speed 3 After the pre purge is complete a 20 second initial ig nitor warm up period begins The combustion air in ducer continues to operate at the ignition speed 4 Aft...

Page 60: ...is adjusted to a speed which matches the target rate A fixed 10 minute third stage on delay is initiated 6 If the heating demand continues beyond the third stage on delay the integrated control energ...

Page 61: ...rial Wait For Ignition Stabilization Delay Post Purge 20Seconds Soft Lockout Error Code Flashes YES NO NO YES Call For Heat Ends NO YES YES NO C A L L F O R 1 S T S T A G E H E A T 3A 2 1 1 OR Call Fo...

Page 62: ...Error Code Flashes NO YES Wait 5 Minutes 3A 2 1 2 1 System will always light at 70 even if 2nd stage call for heat is in place If the high pressure switch does not close within 5 attempts the system...

Page 63: ...stat 1 4 3A 3B YES OR Combustion Air Inducer switched to 70 rate speed Adjust Indoor Blower to appropiate speed Combustion Air Inducer OFF after 20 Second Post Purge Indoor Blower OFF after OFF Delay...

Page 64: ...Code Flashes YES NO NO YES Call For Heat Ends NO YES YES NO C A L L F O R H E A T 3B 1 4 Move to Mid Firing Rate and High Firing Rate after 2nd and 3rd Stage Delays based on DI P Switch selections Pr...

Page 65: ...mode High Cooling mode High Cooling mode Per Ramping Profile NO NO YES NO 5 1 2 1 2 2 2 1 Indoor Blower On After 2 second delay Energize Indoor Blower Per Ramping Profile Energize Indoor Blower Mainta...

Page 66: ...ooling Go to Call for Heat 2 StageThermostat Go to Call for Heat Single Stage Thermostat 6 1 4 5 1 1 Call for Continuous Blower Indoor Blower On Maintain Indoor Blower at set speed Maintain Indoor Blo...

Page 67: ...h 3 to set second stage heat ON delay OFF 7 minutes ON 12 minutes ON Intact Intact Intact S1 T STAT CONTROL TERM STRIP OUTDOOR UNIT 1 Heat 2 Cool NOTE Use DIP switch 3 to set second stage heat ON dela...

Page 68: ...o Stage Cooling W914 DS to R Dehumidifi cation or Harmony III W951 O to R Heat Pumps 2 Heat 2 Cool OFF Cut Intact Intact S1 T STAT CONTROL TERM STRIP OUTDOOR UNIT 2 Heat 2 Cool with t stat with dehumi...

Page 69: ...e 7000 L7724U thermostat w dual fuel capa bilities Capable of 2 stage gas heat control DIP Switch 1 OFF Intact Intact Cut L7724U T STAT CONTROL TERM STRIP HEAT PUMP 67M41 Y H L Y2 D B L Y2 T T outdoor...

Reviews: