Page 21
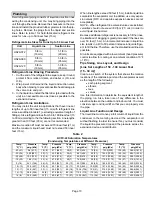
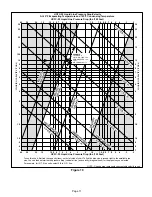
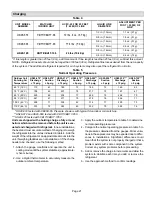
Charging
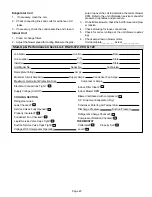
Table 4
UNIT MODEL
NUMBER
MATCHED
INDOOR UNIT
HCFC22 FOR 25 FEET
(7.62 M) OF LINE
LIQUID LINE
DIAMETER
ADJUSTMENT PER
FOOT (.305 M) OF
LINE*
HS29 072
CB17/CBH17 95
12 lbs 8 oz (5 7 Kg)
1/2 in. (13 mm)
1.1 oz. (31 g)
HS29−072
CB17/CBH17−95
12 lbs. 8 oz. (5.7 Kg)
5/8 in. (16 mm)
1.8 oz. (51 g)
HS29 090
CB17/CBH17 95
17 5 lbs (7 9 Kg)
5/8 in. (16 mm)
1.8 oz. (51 g)
HS29−090
CB17/CBH17−95
17.5 lbs. (7.9 Kg)
3/4 in. (19 mm)
2.6 oz. (74 g)
HS29−120
CB17/CBH17−135
23 lbs (10 4 Kg)
5/8 in. (16 mm)
1.8 oz. (51 g)
HS29−120
CB17/CBH17−135
23 lbs. (10.4 Kg)
3/4 in. (19 mm)
2.6 oz. (74 g)
* If line length is greater than 25 feet (8 m), add this amount. If line length is less than 25 feet (8 m), subtract this amount.
NOTE − Refrigerant line sets should not be longer than 100 feet (30 m). Refrigerant line losses deduct from the net capacity
of the system. The additional refrigerant required for such systems may also upset the refrigerant to oil ratio.
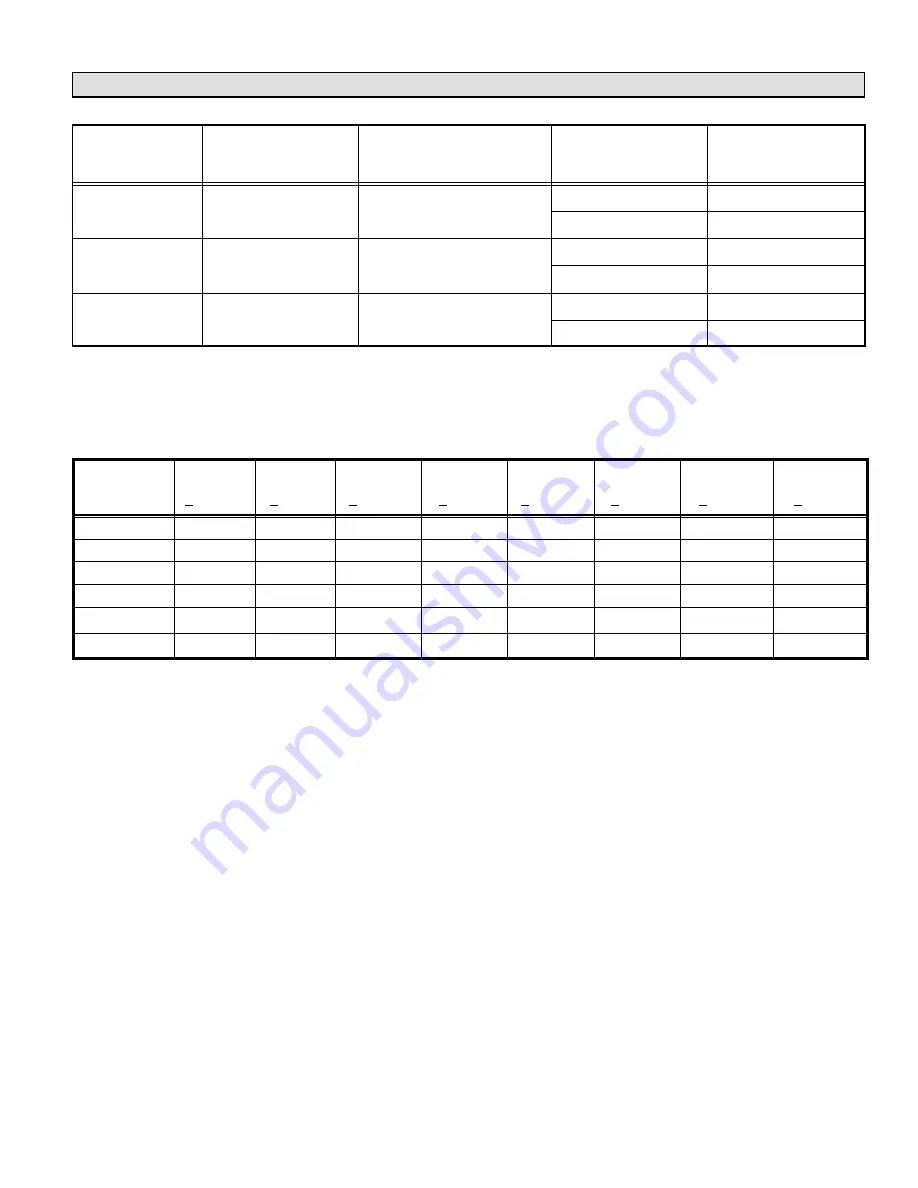
Table 5
Normal Operating Pressures
Outdoor Coil
Entering Air
Temperature
HS29−072*
Discharge
+ 10 psig
HS29−072*
Suction
+ 5 psig
HS29−072**
Discharge
+ 10 psig
HS29−072**
Suction
+ 5 psig
HS29−090**
Discharge
+ 10 psig
HS29−090**
Suction
+ 5 psig
HS29−120***
Discharge
+ 10 psig
HS29−120***
Suction
+ 5 psig
65
_
F (18
_
C)
173
61
180
73
189
72
169
63
75
_
F (24
_
C)
199
63
207
75
217
73
197
67
85
_
F (29
_
C)
229
65
238
77
245
75
226
70
95
_
F (35
_
C)
261
67
271
79
278
76
256
71
105
_
F (40
_
C)
298
71
308
82
314
77
290
73
115
_
F (46
_
C)
333
72
342
83
352
79
328
74
*HS29−072 tested with CB30U−65. Pressure shown is with typical 5ton indoor coil matchup.
**HS29−072 and HS29−090 tested with CB17/CBH17−95V.
***HS29−120 tested with CB17/CBH17−135V.
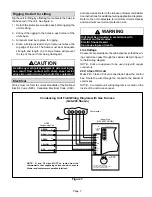
Units are shipped with a holding charge of dry air and
helium which must be removed before the unit is evac
uated and charged with refrigerant.
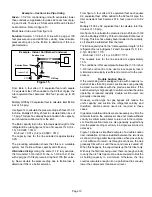
In new installations,
the best and most accurate method of charging is to weigh
the refrigerant into the unit as indicated in table 4. Add the
weight of the refrigerant or an approximate amount into the
unit. If weighing facilities are not available, or if the charge
needs to be checked, use the following method:
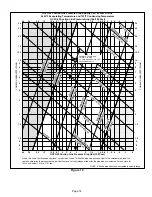
1 − Attach the gauge manifolds and operate the unit in
cooling mode until the system stabilizes (approximate
ly five minutes).
2 − Use a digital thermometer to accurately measure the
outdoor ambient temperature.
3 − Apply the outdoor temperature to table 5 to determine
normal operating pressures.
4 − Compare the normal operating pressures in table 5 to
the pressures obtained from the gauges. Minor varia
tions in these pressures may be expected due to differ
ences in installations. Significant differences could
mean that the system is not properly charged or that a
problem exists with some component in the system.
Correct any system problems before proceeding.
5 − Add or remove the charge in increments and allow the
system to stabilize each time you add or remove the
refrigerant.
6 − Use the approach method to confirm readings.


