background image

Page 16

IV-HEATING SYSTEM SERVICE CHECKS 

A-CSA Certification

All units are CSA design certified without modifications.
Refer to the EL280DF Installation Instruction.

B-Gas Piping

CAUTION

If a flexible gas connector is required or allowed by
the authority that has jurisdiction, black iron pipe
shall be installed at the gas valve and extend outside
the furnace cabinet. The flexible connector can then
be added between the black iron pipe and the gas
supply line.

WARNING

Do not over torque (800 in-lbs) or under torque (350
in-lbs) when attaching the gas piping to the gas
valve.

Gas supply piping should not allow more than 0.5”W.C. drop
in pressure between gas meter and unit. Supply gas pipe
must not be smaller than unit gas connection.

Compounds used on gas piping threaded joints should be
resistant to action of liquefied petroleum gases.

C-Testing Gas Piping

IMPORTANT

In case emergency shutdown is required, turn off
the main shut‐off valve and disconnect the main
power to unit.  These controls should be properly
labeled by the installer.

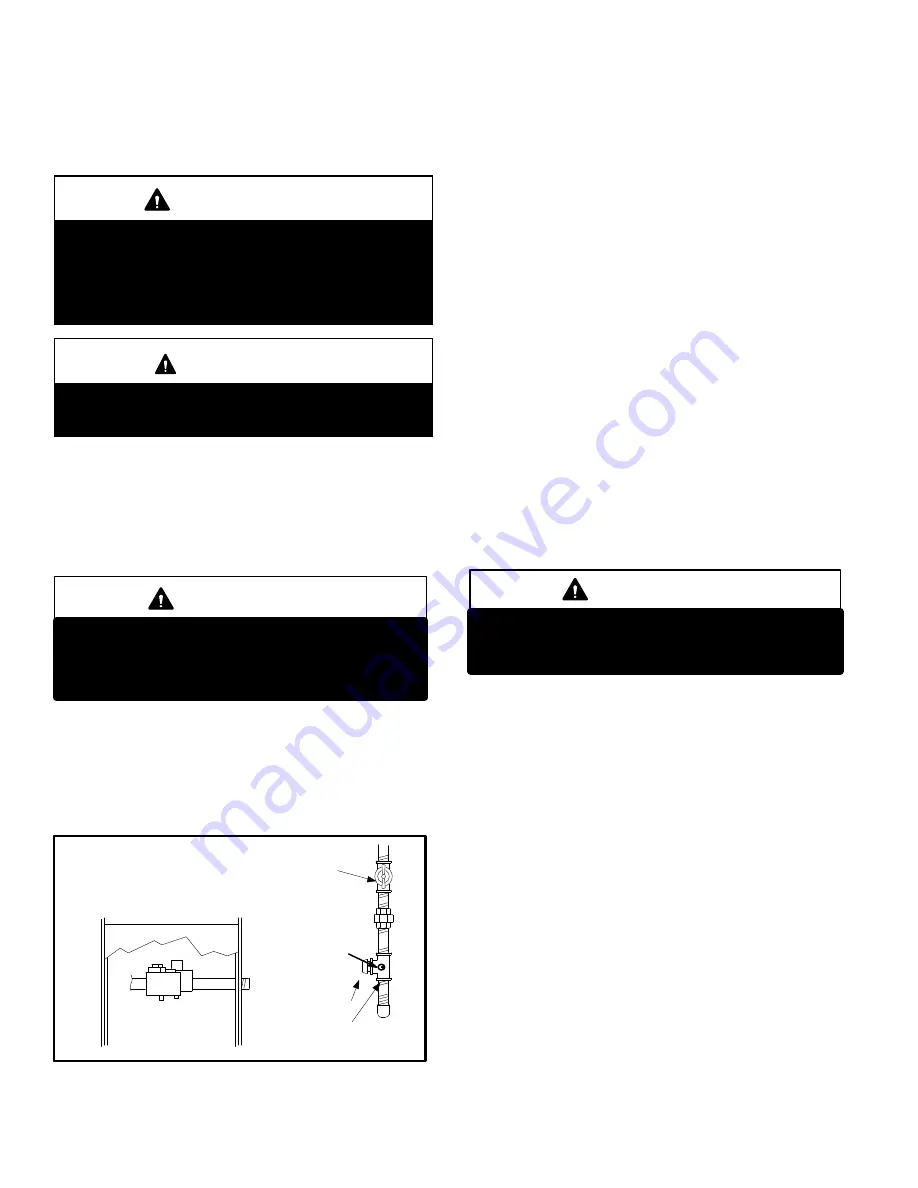
When pressure testing gas lines, the gas valve must be dis­
connected and isolated. Gas valves can be damaged if
subjected to more than 0.5 psig (14” W.C.). See figure 12

If

the pressure is equal to or less than 0.5psig (14”W.C.), use
the manual shut-off valve before pressure testing to isolate
furnace from gas supply.

FIGURE 12

MANUAL MAIN SHUT-OFF VALVE

WILL NOT HOLD TEST PRESSURE

IN EXCESS OF 0.5 PSIG (14”W.C.)

GAS VALVE

CAP

GAS PIPING TEST PROCEDURE

FIELD PROVIDED

LINE PRESSURE TAP

1/8 NPT PLUG

When checking piping connections for gas leaks, use pre­

ferred means. Kitchen detergents can cause harmful corro­

sion on various metals used in gas piping. Use of a specialty

Gas Leak Detector is strongly recommended. It is available

through Lennox under part number 31B2001. See Corp.

8411-L10, for further details.

Do not use matches, candles, flame or any other source of

ignition to check for gas leaks.

D-Testing Gas Supply Pressure

An inlet post located on the gas valve provides access to
the supply pressure. See figure 11. Back out the 3/32 hex
screw one turn, connect a piece of 5/16 tubing and connect
to a manometer to measure supply pressure. See table 10
for supply line pressure.

E-Check Manifold Pressure

After line pressure has been checked and adjusted, check

manifold pressure. Move pressure gauge to outlet pres­

sure tap located on unit gas valve (GV1). Checks of man­

ifold pressure are made as verification of proper regulator ad­

justment. Manifold pressure can be measured at any time the

gas valve is open and is supplying gas to the unit. See table

10 for normal operating manifold pressure.

IMPORTANT

For safety, connect a shut‐off valve between the
manometer and the gas tap to permit shut off of
gas pressure to the manometer.

The gas valve is factory set and should not require adjust­

ment. All gas valves are factory regulated.

Manifold Adjustment Procedure:

 1 - Connect test gauge to manifold pressure tap (figure

11) on gas valve.

 2 - Ignite unit on

 low fire

 and let run for 5 minutes to allow

for steady state conditions.

 3 - After allowing unit to stabilize for 5 minutes, record

manifold pressure and compare to value given in table
10.

 4 - If necessary, make adjustments. Figure 11 shows

location of high fire and low fire adjustment screw.

 5 - Repeat steps 2, 3 and 4 on high fire.

 6 - Shut unit off and remove manometer as soon as an ac­

curate reading has been obtained. Take care to re­
place pressure tap plug

.

 7 - Start unit and perform leak check. Seal leaks if found.

Summary of Contents for EL280DF SERIES

Page 1: ...nual except where noted are recommendations only and do not consti tute code TABLE OF CONTENTS Specifications Page 2 Blower Performance Data Page 3 Parts Identification Page 4 I Unit Components Page 5...

Page 2: ...2 x 10 Motor output hp 1 3 1 2 1 Tons of add on cooling 2 3 5 3 4 4 5 Air Volume Range cfm 717 1562 917 1929 1517 2760 Electrical Data Voltage 120 volts 60 hertz 1 phase Blower motor full load amps 6...

Page 3: ...1585 572 1332 489 0 20 1864 717 1745 623 1544 540 1321 463 0 30 1779 683 1676 588 1496 510 1296 440 0 40 1694 647 1600 558 1443 473 1265 417 0 50 1596 607 1502 511 1363 440 1212 393 0 60 1483 577 141...

Page 4: ...ION Control Box includes integrated control transformer and door switch Secondary Limit Internal Flue Pipe Assembly Gas Val ve Burner Box Assembly Combustion Air Inducer Indoor Blower Heat Exchanger P...

Page 5: ...pted 4 SureLight Integrated Control A92 EL280DF units are equipped with the Lennox two stage in tegrated SureLight control The system consists of a igni tion blower control figures 5 and 6 with contro...

Page 6: ...eration flow charts in the back of this manual for more detail DIP Switch Settings Switch 1 Thermostat Selection This unit may be used with either a single stage or two stage thermostat The thermostat...

Page 7: ...ool ing only TWO STAGE INTEGRATED CONTROL THERMOSTAT CONNECTIONS TB1 1 4 QUICK CONNECT TERMINALS DIP SWITCH FUNCTIONS DIP SWITCHES DIAGNOSTIC LEDs ON BOARD LINKS 1 ERROR CODE RECALL H 24V HUMIDIFIER O...

Page 8: ...Page 8 INTEGRATED CONTROL FIGURE 6...

Page 9: ...5 1 Hard lockout Rollout circuit open or previously opened 5 2 Control failed self check internal error control will restart if error recovers 5 3 No Earth ground control will restart if error recove...

Page 10: ...as Valve The two stage gas valve figure 11 is internally redundant to assure safety shut off If the gas valve must be replaced the same type valve must be used 24VAC terminals and ON OFF switch are lo...

Page 11: ...Page 11 EL280DF HEATING COMPONENTS FIGURE 7 Ignitor Burners Sensor Gas Valve Manifold and Gas Orifices Rollout Switch...

Page 12: ...t damage plug Check voltage during 20 second ignitor warm up period Voltage should read 120 volts or 10 If voltage is above or below these values check for correct supply voltage to furnace Test 1 Che...

Page 13: ...thermostat contacts to cycle system 7 When main burners are in operation for two minutes take reading TABLE 5 Flame Signal in Microamps Normal Low Drop Out 1 9 or greater 1 4 or less 20 FIGURE 9 Measu...

Page 14: ...f the combus tion air inducer is not operating or if the flue becomes ob structed On heat demand first or second stage the switch senses that the combustion air inducer is operating It closes a cir cu...

Page 15: ...ove access panel 4 Turn switch on gas valve to OFF Do not force See fig ure 11 5 Replace access panel Failure To Operate If the unit fails to operate check the following 1 Is the thermostat calling fo...

Page 16: ...on various metals used in gas piping Use of a specialty Gas Leak Detector is strongly recommended It is available through Lennox under part number 31B2001 See Corp 8411 L10 for further details Do not...

Page 17: ...re adjustment or replacement to ensure proper operation at higher altitudes See table 10 for manifold pressures and table 11 for pressure switch kits and gas conversion kits TABLE 10 Manifold Pressure...

Page 18: ...E 13 Return Supply TEMPERATURE RISE Supply Duct Temperature Return Duct Temperature _ Temperature Rise C External Static Pressure 1 Tap locations shown in figure 14 2 Punch a 1 4 diameter hole in supp...

Page 19: ...and unobstructed to provide combustion air 10 Inspect the furnace venting system to make sure it is in place structurally sound and without holes corrosion or blockage Vent system must be free and cl...

Page 20: ...e careful with the collector box gas ket If the gasket is damaged it must be replaced to prevent leakage 6 Disconnect gas supply piping Remove the screw se curing the burner box cover and remove cover...

Page 21: ...bustion air inducer Failure to replace all screws may cause leaks Inspect gaskets for any damage and replace if necessary 15 Reinstall burner box manifold assembly and burner box cover 16 Reconnect al...

Page 22: ...Page 22 VII Wiring and Sequence of Operation EL280DF Schematic Wiring Diagram...

Page 23: ...first stage de mand is satisfied OR a second stage heat demand is initiated 6 Second stage heat demand initiated A 30 second sec ond stage recognition period begins 7 The combustion air inducer ramps...

Page 24: ...DIP Switch 1 W915 Two Stage Cooling W951 Heat Pumps 1 Heat 1 Cool NOTE Use DIP switch 2 to set sec ond stage heat ON delay OFF10 minutes ON 15 minutes ON Intact Intact S1 T STAT CONTROL TERM STRIP OU...

Page 25: ...P Switch Settings and On Board Links See figure 6 Wiring Connections DIP Switch 1 W915 Two Stage Cooling W951 Heat Pumps 2 Heat 2 Cool OFF Cut Intact S1 T STAT CONTROL TERM STRIP OUTDOOR UNIT 2 Heat 1...

Page 26: ...OR T STAT IS CYCLED OFF ON FOR 3 SEC MINIMUM NO YES FIRST LOW STAGE PRESSURE SWITCH CONTACTS OPEN NO GAS VALVE OFF COMBUSTION AIR INDUCER OFF INDOOR BLOWER OFF CONTROL REMAINS UNTIL PRESSURE SWITCH I...

Page 27: ...NDS AFTER GAS VALVE OPENS u0 19 microamps GAS VALVE OFF COMBUSTION AIR INDUCER ON INDOOR BLOWER OFF STATUS LED HEARTBEAT HAS CONTROL FAILED TO SENSE FLAME FOR FIVE CONSECUTIVE TRIES DURING A SINGLE HE...

Page 28: ...ST STAGE HEAT DEMAND SATISFIED GAS VALVE OFF COMBUSTION AIR INDUCER OFF FOLLOWING POST PURGE INDOOR BLOWER OFF WITH DELAY STATUS LED PULSE YES SECOND STAGE HEAT DEMAND SECOND STAGE HEAT DEMAND REQUIRE...

Page 29: ...ODE DIP SWITCH SET AT SINGLE YES YES FIRST AND SECOND STAGE HEAT DEMAND SATISFIED SIMULTANEOUSLY STATUS LED HEARTBEAT YES GAS VALVE OFF COMBUSTION AIR INDUCER OFF AFTER 5 SECOND LOW SPEED POST PURGE P...

Page 30: ...ZED NO IS THERE PROPER GROUND YES NO INDOOR BLOWER ENERGIZED ON FIRST STAGE COOL SPEED AFTER 2 SECOND DELAY FIRST STAGE DEMAND FOR COOL SATISFIED NO THERMOSTAT CALLS FOR SECOND STAGE COOL COMPRESSOR A...

Page 31: ...TO LOW HEAT SPEED FIRST STAGE HEAT DEMAND SATISFIED YES NO THERMOSTAT CALLS FOR SECOND STAGE HEAT YES INDOOR BLOWER SWITCHES TO HIGH HEAT SPEED AFTER 30 SECOND RECOGNITION PERIOD SECOND STAGE HEAT DE...

Reviews: