8
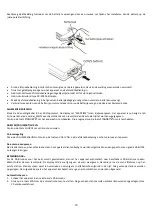
To replace a new battery, please refer to the figure shown below. When inserting a battery, be sure to do so in the proper direction.
If the remote control conflicts with other devices, the operation will be affected.
Do not simultaneously press buttons on the unit and the remote control.
Avoid using two remote controls at the same time as it will cause a malfunction.
Use only CR-2025 size batteries.
If there is battery leakage, clean the remote control thoroughly before replacing batteries
Do not short two terminals of the batteries. Dispose old batteries in a suitable place.
BASIC OPERATION
Plug the AC power cable into the AC wall socket. The display will show “SCANTIME”. The unit is now updating the time from the
broadcaster. Wait for a while until it is finished and the real time will be display.
Press the STANDBY button to turn on the unit. To turn off, press the STANDBY button again.
DAB/FM/CD/USB/BT/AUX IN
Press the SOURCE button to select from different sources.
Volume Control
Turn the VOLUME control or press the VOL-/VOL+ buttons on the remote control to change the volume.
Adjusting the Antenna
The wire antenna at the rear panel of the unit should be extended and altered to ensure a good DAB/FM reception.
DAB OPERATION
The first time the DAB mode is selected, it will automatically scan for available DAB stations. Wait until the scanning has finished. The
display will show the scanning progress. After scanning it will tune to the first station. Stations are listed in numerical then alphabetic
order. All stations scanned are stored. The next time the unit is turned on there will be no automatic scanning.
Auto Scan
1.
Turn on the unit and select DAB mode
2.
Press the SCAN button to start the automatic scanning. The stations found will be automatically stored
(Max 20 presets).
Manual DAB scanning
1.
Turn on the unit and select DAB mode
2.
Press MENU button on the remote control to access the menu control.
3.
Press the PREVIOUS
or NEXT
button until “MANUAL” is displayed and then press the ENTER button.
4.
Press the PREVIOUS
or NEXT
button to select the desired channel (Example: 5A-13F).
5.
Press the ENTER button to confirm.


