background image


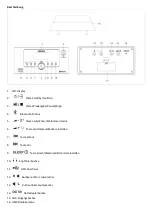
Description


1.


LCD screen


2.


  Standby/Function button


3.


  Play/Pause/Stop button


4.


  Bluetooth mode


5.


  Volume

-

/Snooze button


6.


  /Alarm set button


7.


  Backward button


8.


  Forward button


9.


  Sleep/Time set button


10.


  Earphone jack


11.


  USB port


12.


  Speaker jack right side


13.


  Speaker jack left side


14.


  AC/DC adaptor jack


15.


AUX IN jack


16.


FM ANT Radio antenna


Summary of Contents for MC-020

Page 1: ...nd USB Gebruikshandleiding Microsysteem met Bluetooth FM radio en USB Bedienungsanleitung Mikrosystem mit Bluetooth UKW Radio und USB Guide d utilisation de Micro système avec Bluetooth radio FM et USB Manual de usuario de sistema Micro con Bluetooth radio FM y USB ...

Page 2: ...Index English 3 Nederlands 10 Deutsch 17 Français 24 Español 31 Version 1 0 ...

Page 3: ... extension cords Overloading can cause fire or electric shock 18 Devices with class 1 construction should be connected to a main socket outlet with a protective earthed connection 19 Devices with class 2 construction do not require an earthed connection 20 Keep away from rodents Rodents enjoy biting on power cords 21 Always hold the plug when pulling it out of the main supply socket Do not pull th...

Page 4: ...access to plastic bags 49 Please check that the voltage on the type plate of your appliance corresponds with your house electricity supply type plate is located on the back of the unit 50 Protect the power cord from being walked on or pinched particularly at plugs convenience receptacles and the point where they exit from the apparatus 51 Only use attachments accessories specified by the manufactu...

Page 5: ...tton 4 Bluetooth mode 5 Volume Snooze button 6 Volume Alarm set button 7 Backward button 8 Forward button 9 Sleep Time set button 10 Earphone jack 11 USB port 12 Speaker jack right side 13 Speaker jack left side 14 AC DC adaptor jack 15 AUX IN jack 16 FM ANT Radio antenna ...
Page 6: ...st the sound volume from 0 to 16 TO SET THE CLOCK TIME In STANDBY OFF mode Press and hold the button 9 the digital will blink on the display then Press 7 button to set the DESIRED HOUR Press 8 button to set the DSIRED MINUTE Then press TIME SET button to confirm TO SET ALARM FUNCTION In Standby off mode Press and hold the button 6 icon AL 1 and the TIME display will blink Press 7 button to set the...

Page 7: ...ntil OFF is displayed RADIO OPERATION Press the STANDBY button 2 until the frequency shown on the display How to use the buttons for radio Press the backward 7 or forward 8 button to search for desired frequency Automatic Tuning Press hold the backward 7 or forward 8 button until the display frequency starts run When a station of sufficient strength has been found Tuning will stop or you can stop ...

Page 8: ...requency Ranges 87 5 108 0Mhz LCD Display 49 x 25 x 3mm Power Requirements DC 5V 1 5A Approx Dimensions 163 X 160 X 84mm unit 111 X 112 X 210mm speaker USB USB2 0 This product operates at 2400 2483 5 MHz and is designated only to be used inside a normal household environment This product is suited for this purpose within all EU counties Guarantee Lenco offers service and warranty in accordance wit...

Page 9: ...accordance to any applicable local laws of requirement for disposal of electrical equipment or batteries In so doing you will help to conserve natural resources and improve standards of environmental protection in treatment and disposal of electrical waste Waste Electrical and Electronic Equipment Directive Service For more information and helpdesk support please visit www lenco com Lenco Benelux ...

Page 10: ...an het netsnoer uit het stopcontact halen 14 Dit apparaat moet te allen tijde goed worden geventileerd 15 Dit apparaat moet aangedreven worden door een voedingsbron zoals aangegeven op het specificatieplaatje Als u twijfelt over het type voeding dat gebruikt wordt in uw huis raadpleeg dan a u b uw dealer of plaatselijk energiebedrijf 16 Het stopcontact moet in de buurt van de apparatuur zijn geïns...

Page 11: ... elektrische apparatuur 44 Dit product niet gebruiken of opslaan op plaatsen waar het wordt blootgesteld aan direct zonlicht hitte buitensporig veel stof of trillingen 45 Reinig dit product niet met water of andere vloeistoffen 46 Bedek of blokkeer de gleuven en de gaten in het product niet 47 Stop geen vreemde voorwerpen in de gleuven of gaten van het product 48 Geef kinderen geen gelegenheid in ...

Page 12: ...etooth modus 5 Volume Sluimertoets 6 Volume Alarminstellingstoets 7 Achteruittoets 8 Vooruittoets 9 Slaap Tijdinstellingstoets 10 Hoofdtelefoonuitgang 11 USB poort 12 Luidsprekeruitgang rechts 13 Luidsprekeruitgang links 14 AC DC adapteringang 15 AUX ingang 16 FM ANT radioantenne ...

Page 13: ...lecteerd wanneer ingeschakeld Volumeregeling Druk op de toetsen 5 en 6 om het geluidsvolume in te stellen tussen 0 en 16 DE KLOKTIJD INSTELLEN Houd in de modus STAND BY UIT de toets 9 ingedrukt en de cijfers zullen op de display knipperen vervolgens Druk op de toets 7 om de GEWENSTE UREN in te stellen Druk op de toets 8 om de GEWENSTE MINUTEN in te stellen Druk vervolgens ter bevestiging op de toe...

Page 14: ...al op de display verschijnen Druk meerdere keren op de toets SLEEP 9 om de gewenste slaaptijd in te stellen op 90 80 70 60 50 40 30 20 of 10 minuten Het apparaat zal automatisch uitschakelen zodra de slaaptijd is verlopen Druk op de toets SLEEP 9 totdat OFF Uit wordt weergegeven om de slaapmodus uit te schakelen RADIOBEDIENING Druk op de toets STANDBY 2 totdat de frequentie op de display verschijn...

Page 15: ...ntroleren tijdens de afspeelmodus druk dan eenmaal op de toets TIME SET 9 ONDERHOUD EN REINIGING Wanneer voor langere tijd niet in gebruik koppel het apparaat los en verwijder de klokbatterijen Vingerafdrukken wegvegen en afstoffen met een zacht schoon en vochtig doekje Gebruik geen agressieve producten of oplosmiddelen waardoor de oppervlakte van het apparaat kan worden beschadigd Let op Dompel h...

Page 16: ... toepassing op specifieke situaties Aan de beschrijving in dit document kunnen geen rechten worden ontleend Afvoer van het oude apparaat Dit symbool geeft aan dat het betreffende elektrische product of de accu batterij niet mag worden verwijderd als algemeen huishoudelijk afval in Europa Zorg voor een juiste afvalverwerking door het product en de accu batterij in overeenstemming met alle van toepa...

Page 17: ...zeentwicklung oder jeden anderen unnatürlichen Erscheinung sofort vom Netz 14 Das Gerät muss immer gut belüftet sein 15 Dieses Gerät ist durch eine Stromquelle wie auf dem Typenschild angegeben zu betreiben Halten Sie bei Unsicherheiten über die Art Ihrer Stromversorgung in Ihrer Wohnung Rücksprache mit Ihrem Händler oder Ihrer Stromzuliefererfirma 16 Die Wandsteckdose muss sich in der Nähe des Ge...

Page 18: ...e elektrische Geräte 44 Verwenden oder bewahren Sie dieses Produkt nicht an Orten auf in denen es direkter Sonneneinstrahlung Hitze übermäßigem Staub oder Vibration ausgesetzt ist 45 Reinigen Sie dieses Produkt nicht mit Wasser oder anderen Flüssigkeiten 46 Blockieren Sie nicht die Schlitze und Öffnungen in dieses Produkts 47 Schieben Sie keine Fremdkörper in die Schlitze und Öffnungen in dieses P...

Page 19: ...5 Taste Lautstärke Schlummermodus 6 Taste Lautstärke Wecker einstellen 7 Taste Zurück 8 Taste Vor 9 Taste Einschlafautomatik Uhrzeit einstellen 10 Kopfhörerbuchse 11 USB Anschluss 12 Buchse rechter Lautsprecher 13 Buchse linker Lautsprecher 14 Netzadapterbuchse 15 AUX Eingangsbuchse 16 UKW Radioantenne ...

Page 20: ... Drücken Sie die Tasten 5 und 6 um den Lautstärkepegel von 0 bis 16 einzustellen EINSTELLEN DER UHRZEIT Wenn Sie im STANDBY Modus die Taste 9 gedrückt halten beginnt die Digitalanzeige auf dem Display zu blinken Drücken Sie jetzt die Taste 7 um die GEWÜNSCHTE STUNDE der Uhrzeit einzustellen Drücken Sie jetzt die Taste 8 um die GEWÜNSCHTEN MINUTEN der Uhrzeit einzustellen Drücken Sie abschließend z...

Page 21: ...te Soundquelle auszuwählen Halten Sie die Taste SLEEP 9 gedrückt Auf dem Display wird 90 angezeigt Drücken Sie mehrmals die Taste SLEEP 9 um aus der gewünschten Einschlafzeit 90 80 70 60 50 40 30 20 und 10 Minuten auszuwählen Wenn diese Schlafzeit abgelaufen ist schaltet sich das Gerät selbsttätig ab Wenn Sie den Einschlafmodus ausschalten wollen dann drücken Sie die Taste SLEEP 9 solange bis OFF ...

Page 22: ...Jetzt können Sie mit der Wiedergabe Ihrer Musik beginnen Drücken Sie die Taste 7 oder 8 um den vorhergehenden oder nachfolgenden Titel auszuwählen Wenn Sie die Wiedergabe beenden haben dann halten Sie die Taste STANDBY 2 gedrückt um das Gerät auszuschalten FUNKTION UHRZEIT NACHSEHEN Wenn Sie im Wiedergabemodus die Uhrzeit sehen möchten dann drücken Sie einmal die Taste TIME SET 9 WARTUNG UND PFLEG...

Page 23: ...en Situation abweichen Alle in diesem Handbuch beschriebenen Elemente dienen nur zur Illustration und treffen auf Ihre individuelle Situation möglicherweise nicht zu Aus der in diesem Handbuch getätigten Beschreibung können keine Rechtsansprüche oder Leistungsanforderungen geltend gemacht werden Entsorgung des Altgeräts Dieses Symbol zeigt an dass das entsprechende Produkt oder dessen Batterie in ...

Page 24: ...une accumulation de chaleur excessive ou un phénomène inattendu débranchez immédiatement la fiche d alimentation du secteur 14 Une ventilation suffisante de l appareil doit être toujours assurée 15 Cet appareil doit fonctionner avec la source d alimentation indiquée sur la plaque signalétique Si vous n êtes pas sûr du type d alimentation utilisé chez vous consultez votre revendeur ou le fournisseu...

Page 25: ...appareil électrique 44 N utilisez et ne rangez pas ce produit au soleil à la chaleur à la poussière ou à des vibrations excessives 45 N utilisez pas d eau ou d autres liquides pour nettoyer ce produit 46 Ne bloquez ni ne recouvrez les fentes et orifices de ce produit 47 N insérez pas de corps étrangers dans les fentes ni dans les trous du produit 48 Ne laissez pas les sacs en plastique à la portée...

Page 26: ...larme 6 Touche Augmenter le volume Réglage de l alarme 7 Touche retour rapide 8 Touche avance rapide 9 Touche veille automatique Réglage de l heure 10 Sortie casque 11 Port USB 12 Prise pour enceinte côté droit 13 Prise pour enceinte côté gauche 14 Prise pour adaptateur d alimentation 15 Entrée auxiliaire 16 Antenne radio FM 17 Compartiment à piles ...

Page 27: ...LER L HEURE DE L HORLOGE En mode veille maintenez appuyée la touche 9 les chiffres des heures se mettent à clignoter Appuyez sur la touche 7 pour régler les heures Appuyez sur la touche 8 pour régler les minutes Puis appuyez sur la touche Réglage de l heure pour confirmer REGLAGE DE L ALARME En mode veille Maintenez appuyée la touche 6 l icône AL 1 et l heure se mettent à clignoter Appuyez sur la ...

Page 28: ...0 20 ou 10 minutes L unité s éteint automatiquement à l expiration du délai de la veille automatique Pour désactiver le mode veille automatique appuyez sur la touche Veille automatique 9 jusqu à ce que OFF apparaisse UTILISATION DE LA RADIO Appuyez plusieurs fois sur la touche VEILLE 2 jusqu à ce que la fréquence soit affichée Comment utiliser les touches de la radio Maintenez appuyée la touche re...

Page 29: ...AGE Débranchez l appareil et retirez les piles de l horloge s il ne va pas être utilisé pendant une longue période Essuyez les marques des doigts et la poussière avec un chiffon doux et humide N utilisez pas de produits agressifs ou de solvants pour éviter d endommager la surface de l appareil Attention N immergez jamais l appareil dans de l eau ou tout autre liquide Caractéristiques Description U...

Page 30: ...ons contenues dans ce manuel Mise au rebut de l appareil usagé Ce symbole indique que le produit électrique concerné ou la batterie ne doivent pas être jetés parmi les autres déchets ménagers en Europe Pour garantir un traitement correct du déchet de la batterie ou de l appareil veuillez les mettre au rebut conformément aux règlements locaux en vigueur relatifs aux appareils électriques et autres ...

Page 31: ...orriente 14 El dispositivo debe estar bien ventilado en todo momento 15 Este dispositivo debe funcionar con una fuente de alimentación que se especifica en la etiqueta de especificaciones Si no está seguro del tipo de alimentación que se usa en su hogar consulte con el distribuidor o una compañía eléctrica local 16 La salida de la toma debe instalarse cerca del equipo y debe ser fácilmente accesib...

Page 32: ...ucto en lugares expuestos a la luz solar directa a altas temperaturas a la vibración ni en ambientes excesivamente polvorientos 45 No limpie el producto con agua ni con otros líquidos 46 No obstruya ni cubra las ranuras u orificios presentes en el producto 47 No introduzca objetos extraños en las ranuras u orificios presentes en el producto 48 Mantenga las bolsas de plástico fuera del alcance de l...

Page 33: ...umen Posponer 6 Botón Volumen Fijar alarma 7 Botón Hacia atrás 8 Botón Hacia delante 9 Botón Retardo Fijar hora 10 Toma de auriculares 11 Puerto USB 12 Lateral derecho de la toma del altavoz 13 Lateral izquierdo de la toma del altavoz 14 Toma del adaptador CA CC 15 Toma de ENTRADA AUXILIAR 16 Antena de radio FM ANT ...

Page 34: ...iarse el último modo active antes de la parada del dispositivo Para fijar e volumen Pulse los botones 5 y 6 para ajustar el volume del sonido de 0 a 16 FIJAR LA HORA DEL RELOJ En modo EN ESPERA DESCONECTADO mantenga pulsado el botón 9 la pantalla digital parpadeará en la pantalla posteriormente Pulse el botón 7 para fijar la HORA QUE DESEE Pulse el botón 8 para fijar el MINUTO QUE DESEE Posteriorm...

Page 35: ... en la pantalla Pulse de forma reiterada el botón SLEEP 9 para elegir el tiempo de retardo que desee entre 90 80 70 60 50 40 30 20 y 10 minutos La unidad se apagará automáticamente cuando termine el tiempo de SLEEP Para apagar el modo retardo pulse el botón SLEEP 9 hasta que se muestre OFF FUNCIONAMIENTO DE LA RADIO Pulse el botón STANDBY 2 hasta que la frecuencia se muestre en la pantalla Cómo us...

Page 36: ...loj durante el modo REPRODUCCIÓN pulse una vez el botón TIME SET 9 MANTENIMIENTO Y LIMPIEZA Si no se ha usado durante un periodo prolongado de tiempo desconecte el aparato y retire las pilas del reloj Limpie las huellas dactilares y el polvo con un paño suave limpio y húmedo No use productos agresivos o disolventes que puedan dañar la superficie del producto Precaución Nunca sumerja el aparato en ...

Page 37: ... puede obtener ningún derecho ni derecho legal a partir de la descripción hecha en este manual Eliminación del antiguo dispositivo Este símbolo indica que no deberá deshacerse del producto eléctrico o batería en cuestión junto con los residuos domésticos en el ámbito de la UE Para garantizar un tratamiento residual correcto del producto y su batería por favor elimínelos cumpliendo con las leyes lo...

Reviews: