background image

Swap:

6ZDSWZRFKDQQHOVSRVLWLRQ

6HOHFWWKHFKDQQHODQGSUHVV

RED

EXWWRQWKHQVHOHFWWKHFKDQQHO\RXZDQWWRVZDSDQG

    press 

ENTER

EXWWRQWRVZDS

Insert:

 Insert a channel.

6HOHFWWKHFKDQQHODQGSUHVV

Green

EXWWRQWRSLFNXSWKHQVHOHFWWKHSRVLWLRQ\RXZDQWWKH

FKDQQHOWREHLQVHUWHGWRDQGSUHVV

ENTER

EXWWRQ

Copy:

&RS\DFKDQQHO

6HOHFWWKHFKDQQHODQGSUHVV

YELLOW

EXWWRQWRFRS\WKHQVHOHFWWKHSRVLWLRQ\RXZDQWWKH

FKDQQHOWREHFRSLHGWRDQGSUHVV

ENTER

EXWWRQ

Delete:

Delete a channel. 

6HOHFWWKHFKDQQHODQGSUHVV

BLUE

EXWWRQWRGHOHWHWKHFKDQQHO

5. PC menu

Channel

)UHT

6\VWHP

Name

6NLS

1

- - -

- - -

- - -

On

2

90.75

%*

- - -

On

3

- - -

- - -

- - -

On

4

- - -

- - -

- - -

On

5

- - -

- - -

- - -

On

6

- - -

- - -

- - -

On

7

- - -

- - -

- - -

On

8

- - -

- - -

- - -

On

Program Edit

6HOHFW

Back

Adjust

MENU

/ENTER

6ZDS

Insert

&RS\

Delete

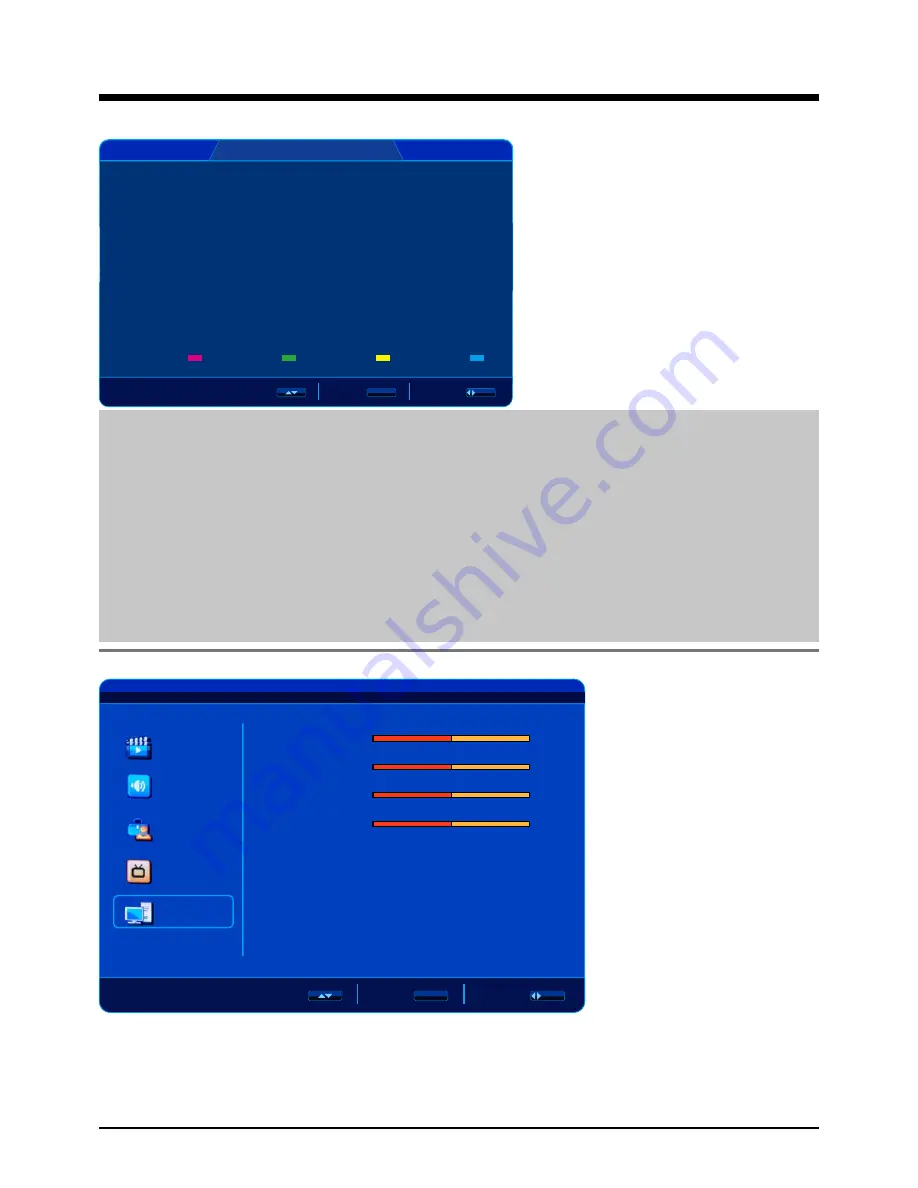
Program Edit: 

6HOHFWDFKDQQHOWRPDQXDOVFDQDVWKHSLFWXUHEHORZ

.

Video

Audio

Misc

TV

PC

6HOHFW

Back

Adjust

MENU

/ENTER

H/V Position

$GMXVWWKHWUDQVYHUVHYHUWLFDOSRVLWLRQRIWKHVFUHHQ

Clock

$GMXVWWKHSL[HOFORFNIUHTXHQF\XQWLOWKHLPDJHVL]HLVPD[LPL]HGIRUWKHVFUHHQ

Phase

$GMXVWWKHSKDVHRIWKH$'&VDPSOLQJFORFNUHODWLYHWRWKHV\QFVLJQDOXQWLODVWDEOH

LPDJHLVREWDLQHG

Auto Setting

3UHVVEXWWRQWRVHWXSWKHSDUDPHWHURIWKHVFUHHQDXWRPDWLFDOO\

H Position

0

V Position

50

Clock

50

Phase

50

$XWR6HWWLQJ

OSD Menu

 17

Summary of Contents for DVT-2621

Page 1: ...26 Wide screen LCD TV With DVD Model No DVT 2621 For information and support www lenco eu ...

Page 2: ......

Page 3: ...Introduction 1 Front View 2 Rear View 3 Remote Control Connection Basic Operation OSD Menu 1 Video menu 2 Audio menu 3 Misc menu 4 TV menu 5 PC menu Multimedia Simple Troubleshooting 2 3 4 4 5 8 5 6 7 8 11 12 13 14 18 14 15 15 16 17 18 18 20 19 23 27 28 DVD operation System operation ...

Page 4: ...FRPSDQ LQJ WKH DSSOLDQFH Correct disposal of this Product DVWH OHFWULFDO OHFWURQLF TXLSPHQW RXU SURGXFW LV GHVLJQHG DQG PDQXIDFWXUHG ZLWK KLJK TXDOLW PDWHULDOV DQG FRPSRQHQWV ZKLFK FDQ EH UHF FOHG DQG UHXVHG 7KLV V PERO PHDQV WKDW HOHFWULFDO DQG HOHFWURQLF HTXLSPHQW DW WKHLU HQG RI OLIH VKRXOG EH GLVSRVHG RI VHSDUDWHO IURP RXU KRXVHKROG ZDVWH 3OHDVH GLVSRVH RI WKLV HTXLSPHQW DW RXU ORFDO FRPPXQLW ...

Page 5: ... VZLPPLQJ SRROV 3XOO WKH SOXJ RXW LPPHGLDWHO DQG VHHN SURIHVVLRQDO KHOS LI WKH PDLQV SOXJ RU FDEOH LV GDPDJHG OLTXLG LV VSLOW RQWR WKH VHW RU LI LW LV DFFLGHQWDOO H SRVHG WR ZDWHU RU PRLVWXUH DQ WKLQJ DFFLGHQWDOO SHQHWUDWHV WKH YHQWLODWLRQ VORWV WKH VHW GRHV QRW ZRUN QRUPDOO R 127 UHPRYH WKH VDIHW FRYHUV 7KHUH DUH QR XVHU VHUYLFHDEOH SDUWV LQVLGH RX PD LQYDOLGDWH WKH ZDUUDQW 4XDOL HG SHUVRQQHO RQO...

Page 6: ...put Audio R L YPbPr VIDEO SVIDEO PC Audio Support TV mode PAL B G D K I SECAM B G D K Support NICAM and FM Stereo Search TV Auto Manual Auto shutting down Program exchange and edit Speaker output 2x8W Power AC 100 240V 50 60Hz If any of the accessories are missing then contact your dealer as soon as possible Keep all the original packaging in case you need to return the set to the dealer 3 ...

Page 7: ...y the OSD menu press again to exit the menu CH Press to scan through channels VOL Press to adjust the volume POWER Turn on standby the TV set The effective receiving range for the signal is 5 8 metres from the front of the remote control window and 300 to the left or right side and 200 above or below the remote control window Press TV AV button on the TV set or remote control to display the input ...

Page 8: ...eo output terminal of DVD L R in Connect them to the audio output terminal of DVD Shared with VIDEO S VIDEO YPbPr 7 S VIDEO Connect it to S VIDEO output terminal of DVD 8 RF Connect antenna or cable 75 Ohm coaxial to receive TV signal 9 10 USB Software update AC POWER IN Connect to an earth 100 240V 50 60Hz AC outlet with the Power Cable COAX Output to Audio amplifier 11 12 SWITCH Switch on or off...

Page 9: ...em setup MENU DVD play list Disc menu ANGLE Select DVD picture angle TITLE DVD title DVD fast reverse DVD fast forward DVD previous chapter DVD next chapter PROGRAM Edit the program and play SLOW play DVD programs at slow speed REPEAT Play the title or chapter once again Buttons for TELETEXT 17 TV TXT Teletext on off MIX Display Teletext on top of the normal TV picture CANCEL Turn off the Teletext...

Page 10: ...R EXWWRQ WR FRQ UP DQG RX ZLOO UHFHLYH WKH VLJQDO RQQHFW WKH SRZHU FRUG FRUUHFWO DV VKRZQ ZLWK WKH PDLQV FDEOH DQG WXUQ WKH VZLWFK 3DJH on KHQ RX FRQQHFW WKH SRZHU WKH 79 VHW FRPHV LQWR VWDQGE PRGH DQG WKH LQGLFDWRU 3DJH 5 lights red RX FRXOG EULQJ WKH 79 RXW RI VWDQGE PRGH E SUHVV WKH POWER EXWWRQ RQ 79 VHW SDJH RU UHPRWH FRQWURO SDJH DQG WKH LQGLFDWRU OLJKWV JUHHQ Wall jack with F Connector Exte...

Page 11: ... DQG VHOHFW AV in the input source menu RQQHFW WKH 6 9 2 RXWSXW MDFN RQ WKH 9 RU 9 5 WR WKH 6 9LGHR LQSXW MDFN RQ WKH 79 VHW ZLWK D 6 9LGHR FDEOH 7KH SLFWXUH TXDOLW LV LPSURYHG compared to a regular VCR to the video input Connect the audio output jacks on the DVD or VCR to the audio input jacks on the set with an DXGLR FDEOH 7XUQ RQ WKH 9 9 5 DQG VHOHFW S VIDEO in the input source menu R QRW FRQQH...

Page 12: ... 9 5 DQG VHOHFW SCART in the input source menu RQQHFW WKH 3E3U RXWSXW MDFNV RQ WKH 9 RU 9 5 WR WKH 3E3U LQSXW MDFNV RQ WKH 79 VHW ZLWK D 3E3U FDEOH 7KH SLFWXUH TXDOLW LV LPSURYHG FRPSDUHG WR D UHJXODU 9 5 WR WKH YLGHR input 0DWFK WKH MDFNV FRORUV Y Green Pb Blue Pr red Connect the audio output jacks on the DVD or VCR to the audio input jacks on the set with an DXGLR FDEOH 7XUQ RQ WKH 9 9 5 DQG VHO...

Page 13: ...information Connect the RGB jack on the PC to the VGA jack on the TV set with a VGA cable Connect the audio output jack on the PC to the PC IN jack on the TV set with a stereo audio cable Turn on the PC and select VGA in the input source menu If using a sound card adjust the PC sound as required Set the video resolution of your PC to 1024x768 60Hz on its original monitor Make the connections betwe...

Page 14: ...rough the available video picture modes SMODE Press to cycle through the different sound settings FREEZE Catch the current picture NICAM A2 TV Nicam A2 select Number Buttons Choose channel directly Press number buttons and press ENTER button to play the channel Return to the previous channel viewed DISPLAY Display the information of the current mode MENU Press to display the OSD menu EXIT Press to...

Page 15: ...O User 4 53 Middle 65 Middle 72 On Press MENU EXWWRQ WR GLVSOD WKH 26 PHQX DV EHORZ Use Ĥ ĥ EXWWRQ WR VHOHFW WKH PDLQ PHQX DQG SUHVV EXWWRQ WR HQWHU WKH VXEPHQX LJ Q WKH VXEPHQX XVH Ĥ ĥ EXWWRQ WR VHOHFW WKH IXQFWLRQ LWHP DQG RX FRXOG DGMXVW LJ RU select Fig 3 with EXWWRQ RU HQWHU WKH VXEPHQX LJ ZLWK EXWWRQ 3UHVV 0 18 EXWWRQ WR UHWXUQ WR WKH XSSHU PHQX 3UHVV 7 EXWWRQ WR H LW WKH PHQX GLVSOD Note1 O...

Page 16: ... IRU YLHZLQJ DPRQJ 8VHU RRO 0LGGOH DUP Note You could not operate the Contrast Brightness Saturation Sharpness and Color Temperature items when you select picture mode Vivid Normal or soft DNR I WKH EURDGFDVW VLJQDO UHFHLYHG LV ZHDN RX FDQ VHOHFW WKH 15 RSWLRQ WR UHGXFH WKH YLGHR QRLVH OHYHO EHWZHHQ 2II RZ 0LG DQG LJK Adaptive Luma Control Adjust the brightness automatically Video Audio Misc TV PC...

Page 17: ... PD VHOHFW WKH VRXQG PRGH GLUHFWO E SUHVVLQJ WKH SMODE EXWWRQ RQ WKH UHPRWH control Volume Adjust vollume Bass Adjust the level of the lower pitched sounds Treble Adjust the level of the higherpitched sounds Balance GMXVW WKH DXGLR RXWSXW EHWZHHQ OHIW DQG ULJKW VSHDNHUV Surround 7XUQ RQ RII RQ WKH VXUURXQG IXQFWLRQ AVC HHS LW RQ 9LGHR DGMXVW E LWVHOI DXWRPDWLFDOO OVH LV QRW DYDLODEOH Equalizer QWH...

Page 18: ...Q DW WKH WLPH RX VHW Start Activate Activate the on time setting Off Time 6HW WKH RII WLPH RI WKH 79 Stop Activate Activate the off time setting Channel Lock RFN WR SOD LQJ D FKDQQHO Video Lock RFN WR SOD LQJ D LQSXW VRXUFH Change Password Change the pssword You have to enter the password to enter WKH 3DUHQWDO PHQX DERYH Hotel Mode Clear All Reset all the Hotel Mode settings Description Password R...

Page 19: ... press MENU button to stop auto tunning and return to preview menu Manual Scan 6HOHFW D FKDQQHO WR PDQXDO VFDQ DV WKH SLFWXUH EHORZ PR Start 6HOHFW WKH FKDQQHO RX ZDQW WR PDQXDO VFDQ Start From 6HOHFW WKH IUHT RX ZDQW WR VWDUW IURP Start Search 3UHVV 17 5 EXWWRQ WR VWDUW VHDUFK 6WRS MENU 6HDUFKLQJ 0 0 0 35 6WDUW 6WDUW URP 6WDUW 6HDUFK 1 0 0DQXDO 6FDQ 6HOHFW Back Adjust MENU ENTER 16 ...

Page 20: ...HVV BLUE EXWWRQ WR GHOHWH WKH FKDQQHO 5 PC menu Channel UHT 6 VWHP Name 6NLS 1 On 2 90 75 On 3 On 4 On 5 On 6 On 7 On 8 On Program Edit 6HOHFW Back Adjust MENU ENTER 6ZDS Insert RS Delete Program Edit 6HOHFW D FKDQQHO WR PDQXDO VFDQ DV WKH SLFWXUH EHORZ Video Audio Misc TV PC 6HOHFW Back Adjust MENU ENTER H V Position GMXVW WKH WUDQVYHUVH YHUWLFDO SRVLWLRQ RI WKH VFUHHQ Clock GMXVW WKH SL HO FORFN...

Page 21: ...V EXWWRQ WR UHWXUQ DQG VHOHFW RWKHU GHYLFHV XWWRQV IRU PHGLD SOD LQJ RQ UHPRWH FRQWURO 3OD RU SDXVH 6WRS DVW UHYHUVH DVW IRUZDUG 3UHYLRXV FKDSWHU 1H W FKDSWHU REP 5HSHDW SOD LQJ ANGLE 6HOHFW WKH SLFWXUH DQJOH SLOW 3OD DW VORZ VSHHG SUB T 6HOHFW WKH VXEWLWOH A B 6HOHFW DQG SOD WKH SUHIHUDEOH SDUDJUDSK RI WKH SURJUDP E SUHVVLQJ WKH EXWWRQ WZLFH DW WKH EHJLQQLQJ DQG HQG RI LW GOTO 3OD RXU IDYRULWH WL...

Page 22: ...DVD Operation 19 ...

Page 23: ...DVD Operation 20 ...

Page 24: ...DVD Operation 21 ...

Page 25: ...DVD Operation 22 ...

Page 26: ...DVD System Operation 23 ...

Page 27: ...DVD System Operation 24 ...

Page 28: ...How to use the USB Connector and Card Reader 25 ...

Page 29: ...Disc Care 26 ...

Page 30: ...cture quality Check the aerial connections KHFN WKDW WKH FKDQQHO LV WXQHG LQ SURSHUO GMXVW WKH SLFWXUH VHWWLQJV EULJKWQHVV FRORXU VKDUSQHVV FRQWUDVW KXH 0DNH VXUH WKDW WKH 79 LV QRW ORFDWHG FORVH WR HOHFWULFDO DSSOLDQFHV WKDW PD HPLW UDGLR IUHTXHQF LQWHUIHUHQFH No colour Adjust the colour setting KHFN WKDW WKH SURJUDPPH LV EURDGFDVW LQ FRORXU KHFN WKDW WKH FDQQHO LV WXQHG SURSHUO TV does not respo...

Page 31: ...urce Power Consumption improving the performance Panel Size Video PC Audio 26 inch diagonal 1 AC100 240V 50 60Hz 160W 1 600 cd m2 1 3 5000 1 1 1 1366x768 1 1 1 Brightness Audio L R HDMI Contrast S VIDEO SCART Resolution VGA YPbPr RF 28 ...

Reviews: