LENCO DVP-753 User Manual Download Page 20

The setup menu system---DVD PART


Advanced Features


NOTE: 

In the DVD setup and System setting options. If you press <SETUP> 

into the


DVD setup and System setting option when playing disc, the

 some options 

have

 no effect.


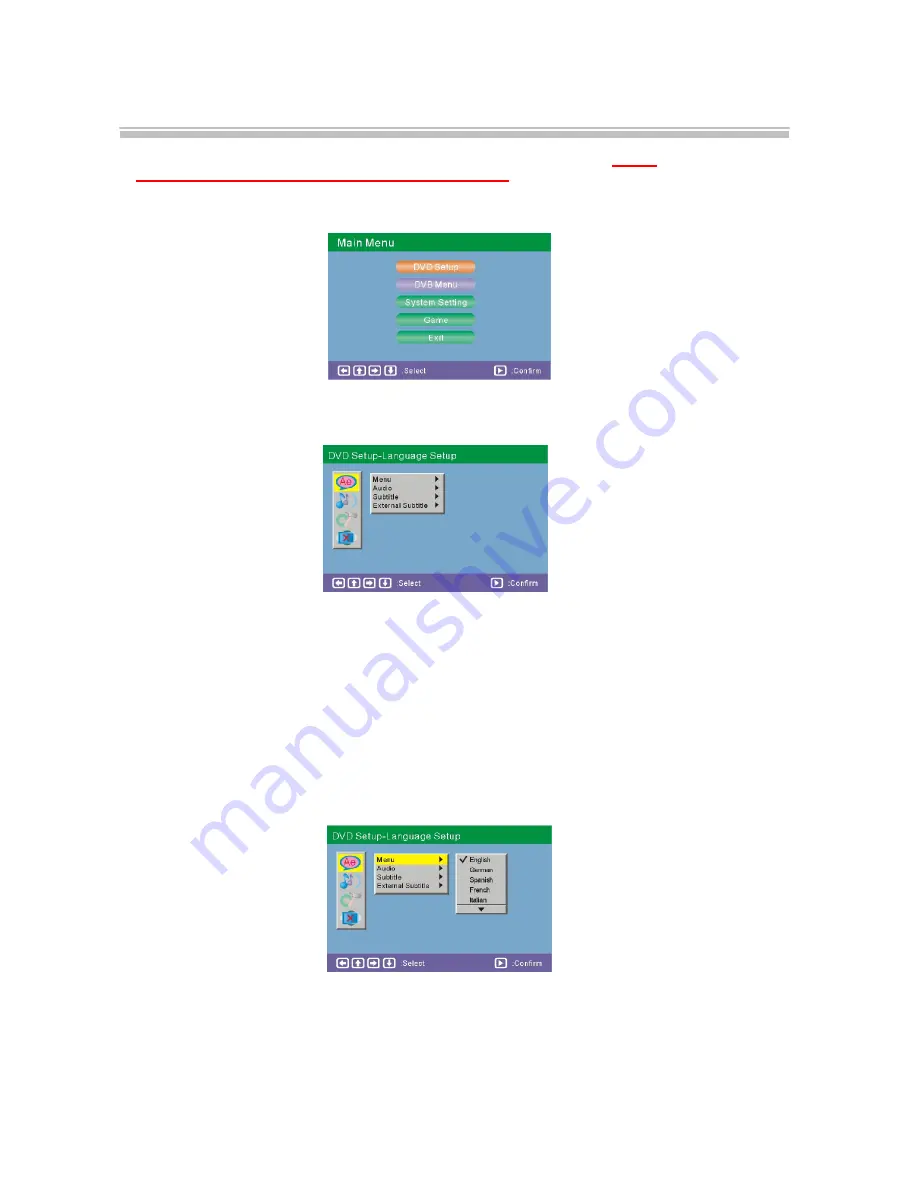
1. General Steps of setup menu


In the DVD mode, Press the <STOP> button or open mode,    Then press 

the

 <setup>


button, the DVD main setup menu appears.


A. DVD Setup-language Setup


Press the Up and Down buttons 

to highlight “DVD setup”, press “confirm”, 

the DVD Setup-language

 Setup option 

will

 appear 

on

 the screen.


In the DVD Setup-language Setup, you can setup the Menu, Audio, Subtitle and External 
subtitle. Press the <UP>, <DOWN> and <LEFT>, <RIGHT>    arrow buttons to highlight the 
icon of the desired page, then press the <DOWN >or <RIGHT> arrow button to activate that 
page. For example, if you want to setup the audio setup, press 

the

 <DOWN> button to 

highlight the Audio Option, the Audio setup page will be displayed on the screen.


1). MENU


Highlight the MENU option, and press the Arrow buttons to choose the menu language you 
prefer. Press <ENTER> to confirm. If the disc you are playing has that Language 

available,

 It 

will display the menu in 

that

 language. 


Notes:


If your preferred language is not 

available

, the 

discs

 default 

language

 will be 

played.


-18-


Summary of Contents for DVP-753

Page 1: ...DVP 753 USER MANUAL DVD CD MP3 CD RW PLAYER ATV DVB T tuner Please read this User Manual carefully to ensure properuse of this product and keep thismanual for future reference...

Page 2: ...igital Audio Input 9 Connecting to the USB 10 BASIC PLAYBACK Basic Operation 11 REMOTE CONTROL OPERATION Remote Control 12 Remote Control Operation 13 DVD PART The Setup Menu System 18 MPEG4 MP3 PLAYB...

Page 3: ...LASER RADIATION DO NOT OPEN THE CABINET VISIBLE LASER MAY RADIATE WHEN THE CABINET IS OPENED OR THE INTERLOCKS ARE DEFEATED DO NOT STARE INTO THE LASER BEAMS CAUTION THE DVD VIDEO PLAYER IS A CLASS 1...

Page 4: ...product and cart combination to overturn Symbol provided by RETAC 10 Ventilation Slots and openings in the cabinet are provided for ventilation and to ensure reliable operation of the product and to p...

Page 5: ...a fire or electric shock Never spill liquid of any kind on the product 19 Servicing Do not attempt to service this product yourself as opening or removing covers may expose you to dangerous voltage o...

Page 6: ...dust or oil smoke etc Environment Avoid this machine from dropping or impacting Do not place the device in a case together with your mobile phone because of electrostatic discharge Never extrude or sh...

Page 7: ...ase turn down the volume 3 In case of any tinnitus please tune down the volume or stop using this machine 4 It is recommended by the aurists that the earphone should not be continuously used for a pro...

Page 8: ...Accessories AC DC adapter Remote control AV line LI type batteries Car adapter Digital DTV antenna USB line BAG STRAPS 6...

Page 9: ...SOURCE 11 PAUSE 12 PREV 13 NEXT 14 PLAY 15 STOP 16 LIGHT 17 SENSOR 18 POWER ON OF 19 DC 12V INPUT JACK 20 VIDEO 21 AUDIO 22 COAXIAL 23 PHONE 24 VOLUME 25 USB 26 BATTERY INSERT REMOVE BUTTON 27 DC 12V...

Page 10: ...Connecting to a TV Set Connections 8...

Page 11: ...o an AV Amplifier with Digital Audio Input Notes 1 Select the coaxial digital audio output 2 Set the player s audio out to Raw or PCM mode 3 Set the Digital Amplifier to the AV input connected to the...

Page 12: ...work mode USB interface This unit has a USB jack when you want to play the USB DISC you can insert a USB DISC or an MP3 Player with USB Interface to play the MP3 music or and JPEG files or other file...

Page 13: ...logo appears on the TFT screen STEP 2 Push OPEN on the front panel When the tray is opened place the disc on the tray with the label side up STEP 3 Press the PLAY button on the front panel or remote c...

Page 14: ...functions you must first press the Power button on the DVD player 4 Some of the keys have multiple functions Function before can be used in DVD mode after can be used in DVB mode HOW TO REPLACE THE B...

Page 15: ...mode Press the FAVORITE button to turn on the favorite Channel Groups NOTE The FAVORITE button has no effect in DVD mode 7 SETUP In DVD mode Pressing the SETUP button will enter the DVD setup menu In...

Page 16: ...AY PAUSE Press PLAY from stop mode to start play In the DVB mode Press the PLAY button to display the TV program list In DVD mode press PAUSE to pause playback From this state press PAUSE to advance o...

Page 17: ...TFT on off Press TFT on off Key to turn on the TFT LCD display Press it again to turn off the TFT LCD 20 SPEAKER During playback Press the speaker to mute the speaker or earphones output 21 Number In...

Page 18: ...GHT CONTRAST COLOR HUE ZOOM S COLOR LANG DEFAULT options 25 SOURCE Press the SOURCE button to switch between DVD DVB and USB ATV options As below 26 EPG PROG In the DVB mode Press the EPG button to di...

Page 19: ...button displays the MENU function 31 PBC In DVD mode this button displays the PBC function NOTE The PBC button has no effect in DVB mode 32 NEXT In DVD mode Press NEXT to skip to the next chapter or...

Page 20: ...the DVD Setup language Setup you can setup the Menu Audio Subtitle and External subtitle Press the UP DOWN and LEFT RIGHT arrow buttons to highlight the icon of the desired page then press the DOWN or...

Page 21: ...it will playback that language 3 SUBTITLE Highlight the SUBTITLE option and press the Arrow buttons to choose the subtitle language you prefer Press ENTER to confirm If the disc you are playing has t...

Page 22: ...WN button to highlight the Analog Out Option the Analog Out setup page will be displayed on the screen 1 DIGITAL OUT Highlight the DIGITAL OUT option and press the Arrow buttons to choose the audio ou...

Page 23: ...Setup option on the screen In the DVD setup Custom Setup you can setup Parental Ctrl Angle Mark Press the UP DOWN and LEFT RIGHT arrow buttons to highlight the icon of the desired page then press the...

Page 24: ...sing this player for the first time just enter this code If the entered code has been confirmed the level setup menu will appear Move the cursor to choose the desired level and press the ENTER button...

Page 25: ...de of System Setting Pressing the SETUP button the DVD main setup menu will appear on the screen then press the DOWN button to highlight the system setting option A System Setting Menu language Setup...

Page 26: ...screen In the System Setting Menu Display Setup you can setup the TV Standard Display Type Video Output Brightness Contrast option Press the UP DOWN and LEFT RIGHT arrow buttons to highlight the icon...

Page 27: ...een In the System Setting Menu Preference Setup you can setup the UI Style Change PIN Default Type and Default options Press the UP DOWN and LEFT RIGHT arrow buttons to highlight the icon of the desir...

Page 28: ...The setup menu system DVD PART Advanced Features 1 UI Style Here you can choose the UI Style you can select Style1 Style2 Style3 Style4 2 Change PIN The default password is 6666 26...

Page 29: ...ser Select MODE and Last operation Type MODE NOTE In the Default Type If you choose the DVB MODE The next time you power up the PLAYER it will directly enter DVB MODE 4 Default The Default setup optio...

Page 30: ...A Press the ENTER button to confirm the Main Menu Game option will appear on the screen In the Main Menu Game Setup you can select Mine Tetris Rush Hour and Calendar four kinds of games For example I...

Page 31: ...ss to select the file when the cursor appears in the file window Press OK to play the current file selected by the cursor Press to switch between the directory window and the file window Note The play...

Page 32: ...evious or next picture Press PLAY to continue slideshow transitions Press STOP to return to root menu IMAGE ROTATION Press the DIRECTION button to rotate the image 26 Zoom function This player provide...

Page 33: ...are using the receiver for the first time a First Time Installation menu will be displayed to guide you through the initial setup Use the remote controller to finish the setup A At the First time inst...

Page 34: ...press the DOWN button to highlight the DVB Menu option A Press the UP and DOWN button to highlight the DVB Menu press the enter button to enter the DVB Menu Program list option will appear on the scr...

Page 35: ...nel which you would like to add to the group and go to the Favor column b When the Favor column of the desired channel is highlighted a red heart symbol will appear after you press the ENTER button Pr...

Page 36: ...the marked channel will be deleted d Press the ENTER button again and you will exit the deleting channel mode 2 Music Program Press the DOWN button to highlight the Music Program Then press the ENTER...

Page 37: ...d newly launched channels you can use Manual Search to scan the desired channels To manually search the target channel you must know its parameters e g the channel number After the channel is found it...

Page 38: ...use the parental control menu The default PIN is 6666 2 After you entered the correct PIN the following options are provided Channel Lock Allows you to activate or de activate the overall parental co...

Page 39: ...nguage setup 1 st 2nd Audio This option allows you to select your first and second choice for the audio language If neither of the selected languages is available on the transmitted program the main l...

Page 40: ...time zone If you prefer to set the time manually select OFF in the GMT usage item and then manually select the date and time 5 Time Zone Select an appropriate time zone to display the local time corre...

Page 41: ...and the numeric keys to enter a numeric value Mode You can repeat the task by setting the frequency as Once Daily or Weekly Or you can select Stop to disable the task Start and End Time Enter the star...

Page 42: ...om program number 0 2 If the indication frequency stoppes for a while during searching it means a new channel is found and it will be saved If a weak signal is received the channel may be skipped and...

Page 43: ...I DK BG L L NOTE 1 On the audio system carrier I stands for 6 0MHz DK stands for 6 5MHz and BG stands for 5 5MHz please select the audio system according to local broadcaster 2 Color system it will au...

Page 44: ...on to skip the channel Press the FUNCTION button to display PICTURE the screen will display as bellow A Bright Press DOWN to highlight it Press LEFT and RIGHT to adjust the screen brightness B Contras...

Page 45: ...N to highlight it Press LEFT and RIGHT to adjust the screen color D Hue Press UP and DOWN to highlight it Press LEFT and RIGHT to adjust the screen hue E Zoom Press UP and DOWN to highlight it Press L...

Page 46: ...ht it Press LEFT and RIGHT to adjust the system AUTO PAL NTSC SECAM G Language Press UP and DOWN to highlight it Press the ENTER button to change the language H Default Press UP and DOWN to highlight...

Page 47: ...r s AUDIO settings correctly Ensure you have entered the correct AV input for your TV Ensure the audio is not set to mute REMOTE NOT WORKING Ensure the remote batteries are working Point the remote co...

Page 48: ...rrectly Check if the correct Channel or Country is selected May need to reset or search No sound The volume may be turned down An earphone may be plugged in The speaker button is pressed The mute butt...

Page 49: ...nnel Sound System Screen Size Video output Audio output Power Voltage Power consumption Size Weight DP8508 NTSC PAL DVD VCD CD MP3 CD R CD RW JPEG DVD R W MPEG4 65dB 500 lines fs 96KHz 20Hz 20KHz 1dBI...

Page 50: ...this product please note that Waste electrical products should not be disposed of with household waste Please recycle where facilities exist Check with your Local Authority or retailer for recycling...

Reviews: