background image


The setup menu system---DVB PART 

Advanced Features


1. First Time Installation


After all the connections have been madeproperly, switch on your TV. 
Make sure the receiver is connected to the home antenna and press


<POWER> to switch the receiver on. If you are using the receiver for


the first time, a 

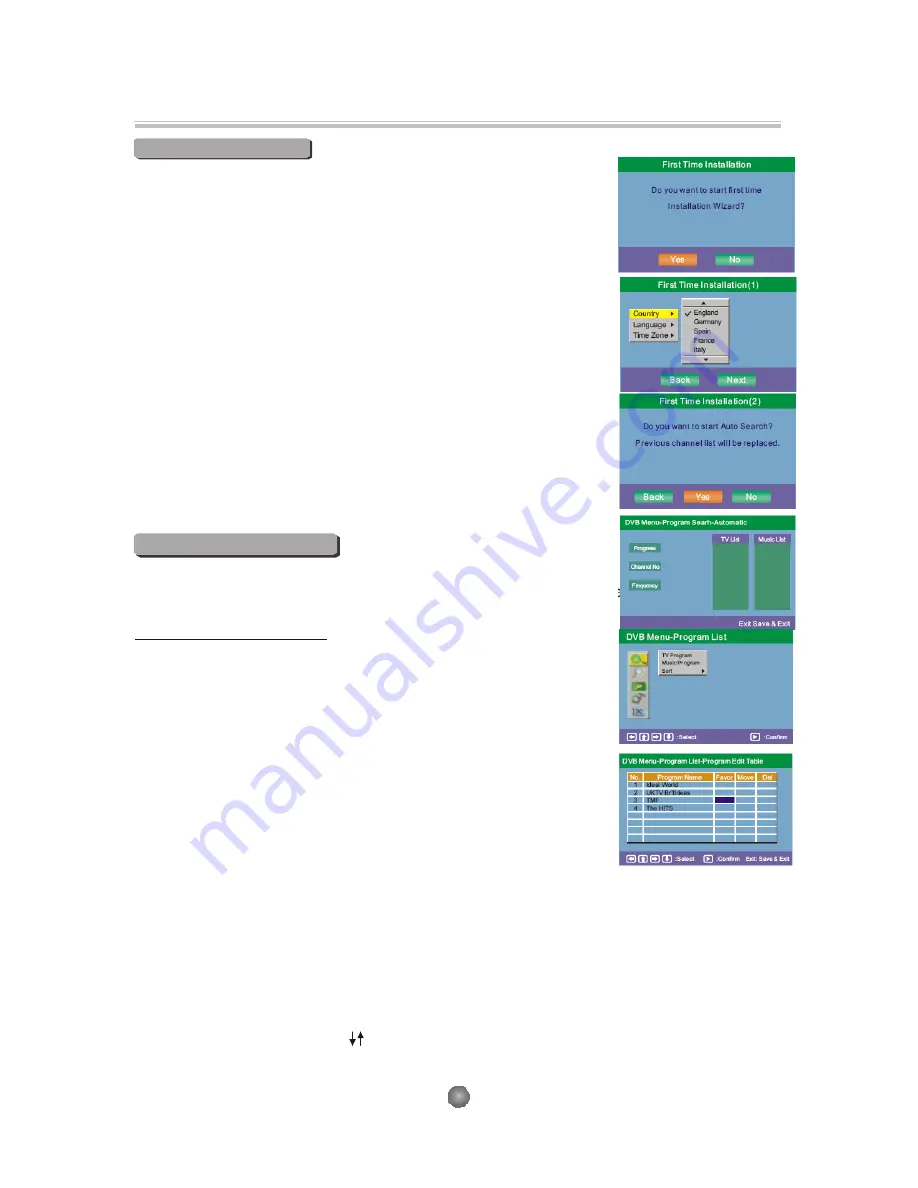
First Time Installation 

menu will be displayed to guide 

you through the initial setup. Use the remote controller to finish the 
setup.


A. 

At the 

First time installation 

menu, select 

YES 

and press<ENTER>


button on the remote controller to proceed.


B. 

Enter your regional settings, include your Country,   Language, Time 

Zone . Then select 

<NEXT> 

to proceed. 


C. 

Select 

Yes 

to start the automatic channel search. 


D. 

Wait to complete the scanning.In case you want to stop the scanning, 

press the <RETURN> button. The channels already found will still be 
stored.


E. 

When finished, all active channels found will be stored automatically. 

The last found channel will be played.


2. DVB Mode of Main Menu


Press  the  <SETUP>  button,  the  DVB  main  setup  menu  appears 
the  screen,  then  press the  <DOW N>  button to  highlight  the DVB 
Menu option.


A. DVB MENU-Program list


Press the <UP> and <DOWN> button 
move on the DVB Menu and to enter 
button to enter the DVB Menu-Program 
list option, appear the screen.


1) TV Program


Press the <RIGHT> button to highlight the TV Program, Then press the


<ENTER>button to enter the TV program options, appear the screen.


All active channels are listed in the 

Program List, 

allowing you to make 

your own Favorite channel group, move, delete channels. 


Creating Favorite Channel Groups


This feature allows you to group your favorite channels. To create your 
favorite groups:


a. Select the channel which you would like to add to the group and go to the 

Favor 

column.


b. When the 

Favor 

column of the desired channel ishighlighted, one red heart symbol will appear 

after press the <ENTER> button.Pressing the <ENTER> button again will un-select the channel


of the favorite group.


c. Once your favorite group is created, you can press the <

FAVORITE> 

keys to quickly access 

your favorite channels.


Moving a Channel


a. Select the channel which you like to move and go to the 

Move 

column. 

b. Press <ENTER> button and a          symbol will be displayed.


c. Use the 

<

UP / DOWN

key to move the channel to a desired position. 

d. Press <ENTER> button again will be exit the moving channel mode.


9


Summary of Contents for DVP-741

Page 1: ... MANUAL DVD MPEG4 CD MP3 PLAYER DVB T tuner DVP 741 Please read this UserManual carefully to ensureproper use of this product and keepthis manual for futurereference For information and support www lenco eu ...

Page 2: ...ain readily operable 3 Tobe completely disconnect the powerinput the mains plug of apparatus shall be disconnected from the mains 4 The mains plug of apparatusshould not be obstructed orshould be easily accessed during intended use Warning Do not use the mode DVB T in a moving vehicle etc The DVB T function only works when the vehicle is stationary Prolonged exposure to high volume from audio play...

Page 3: ...nel Consult your dealer if youare ever in doubt about the installation operation orsafety of this unit Ventilation The slots and openings on the portable DVD Player are for ventilation Do not cover or block them as it may cause overheating NEVER let children push anything into the holes or slots on the case Battery Disposal Please ensure batteries aredisposed of safely Never dispose of batteriesin...

Page 4: ... 5 PREV 6 NEXT 7 STOP 8 SOURCE 9 PAUSE 10 PLAY 11 MOVE 12 OK 13 SETUP 14 EXIT 15 FUNCTION 16 SENSOR 17 CHANGE INDICATOR Red charging Green full 18 POWER ON OF 19 DC 12V INPUT JACK power supply 20 PHONE JACK Maximum output voltage 150mV 21 AV OUT 22 VOLUME 23 USB 24 ANT IN 75 ohm 2 ...

Page 5: ...Connecting to a TV Set Connections 3 ...

Page 6: ...TON TOWARD LEFT STEP 2 PULL THE BATTERY LOADER OUT BATTERIES INCORRECT USE OF BATTERIES MAYCAUSE THEM TO LEAK CORRODE OR EXPLODE Be sure to place the batteries in the correct direction It is dangerous to charge heat open or short circuit the batteries Do not leave dead or expired batteries or mix old new batteries When not using the remote control for a long duration of time remove the batteries W...

Page 7: ...etup menu system DVD PART General Steps of setup menu Advanced Features In the DVD mode Pressthe STOP button Thenpress setup button the DVD mainsetup menu appears 1 DVD MENU A DVD Setup Language Setup Press the Up and Downbutton move on the DVDsetup and to enter The DVD Setup lanuage Setup option appear the screen 1 MENU Highlight the MENU option andpress the Arrow buttonsto choose the menu langua...

Page 8: ... forthis item If in the ON mode when play a disc which the content is multi angleshot you may press the ANGLE button on the remote control toenjoy the Scene in different angles D DVD Setup Exit Press the DOWN arrow button to highlight the EXIT optionon the screen In the DVD Setup Exit Choose the Exit option to return the DVD mainSetup 2 System Setting Press the SETUP button the DVD main setup menu...

Page 9: ... 4 Default The Default setup options are RESTORE factory setup Let your PLAYER work on the default state 5 System Info The system info includes model HW SW and Date 3 Game options Press the SETUP button the DVD main setup menu appears the screen then press the DOWN button to highlight the Game option Press the UP and DOWN button move on the DVD setup and press ENTER button to confirm the Main Menu...

Page 10: ...ng Kodak Picture Cd sign When your order is returned you receive your prints negatives and your full roll of pictures safely stored on your KODAK Picture CD Each KODAK Picture CD brings you the tools to enhance share and manage your pictures on your computer You also can record the JPEG picture into CD R or CD RW with the CD Rewriter yourself Note 1 The Max Sizeof JPEG Picture canbe supported 3840...

Page 11: ...on to highlight the DVB Menu option A DVB MENU Program list Press the UP and DOWN button move on the DVBMenu and to enter button to enter theDVB Menu Program list option appear thescreen 1 TV Program Press the RIGHT button to highlight the TV Program Then press the ENTER button to enter the TV program options appear the screen All active channels are listed in the Program List allowing you to make...

Page 12: ...earch or you want to add newly launched channels you can use Manual Search to scan the desired channels To manually search the target channel you must know its parameters e g the channel number After the channel is found it is appended to the current channel list a Enter the Manual Search menu via Main Menu Program Search Manual Search b Specify the appropriate channel number in the Channel No fie...

Page 13: ...edule need a correct time zone setting 5 System Schedule Press the DOWN button to highlight the System Schedule options then Press the ENTER button to into the System schedule setup This feature allows thereceiver to automatically switch on and tune to a pre specified channel for a pre set length of time Up to10 tasks can be scheduled A In the Schedule pane use the UP DOWN key to select a task and...

Page 14: ...sure the remote batteries are working Point the remote control directly at the player s IR sensor Remove any obstacles between the remote and the IR sensor NO DISC DISPLAYED Ensure you have put the disc on the tray Ensure the disc is not upside down Ensure the disc is not distorted stained or scratched POOR PICTURE OR SOUND Ensure you have set the player s AUDIO settings correctly Ensure the disc ...

Page 15: ...3 CD R CD RW JPEG DVD R W MPEG4 65dB 500 lines fs 96KHz 20Hz 20KHz 1dBI 90dB 80dB 0 01 96KHz 24bit Output characteristic Display Device Receiving Channel Screen Size Video output Audio output Power Voltage Power consumption Size Color TFT LCD DTV VHF 177 5MHz 226 5MHz UHF 474 MHz 858 Mhz 7 inches 1Vp p 75 Ω 2CH DC IN 12V 15W 206x160x40mm Weight 1 0kg Specifications are subject to change without no...

Page 16: ......

Reviews: