background image

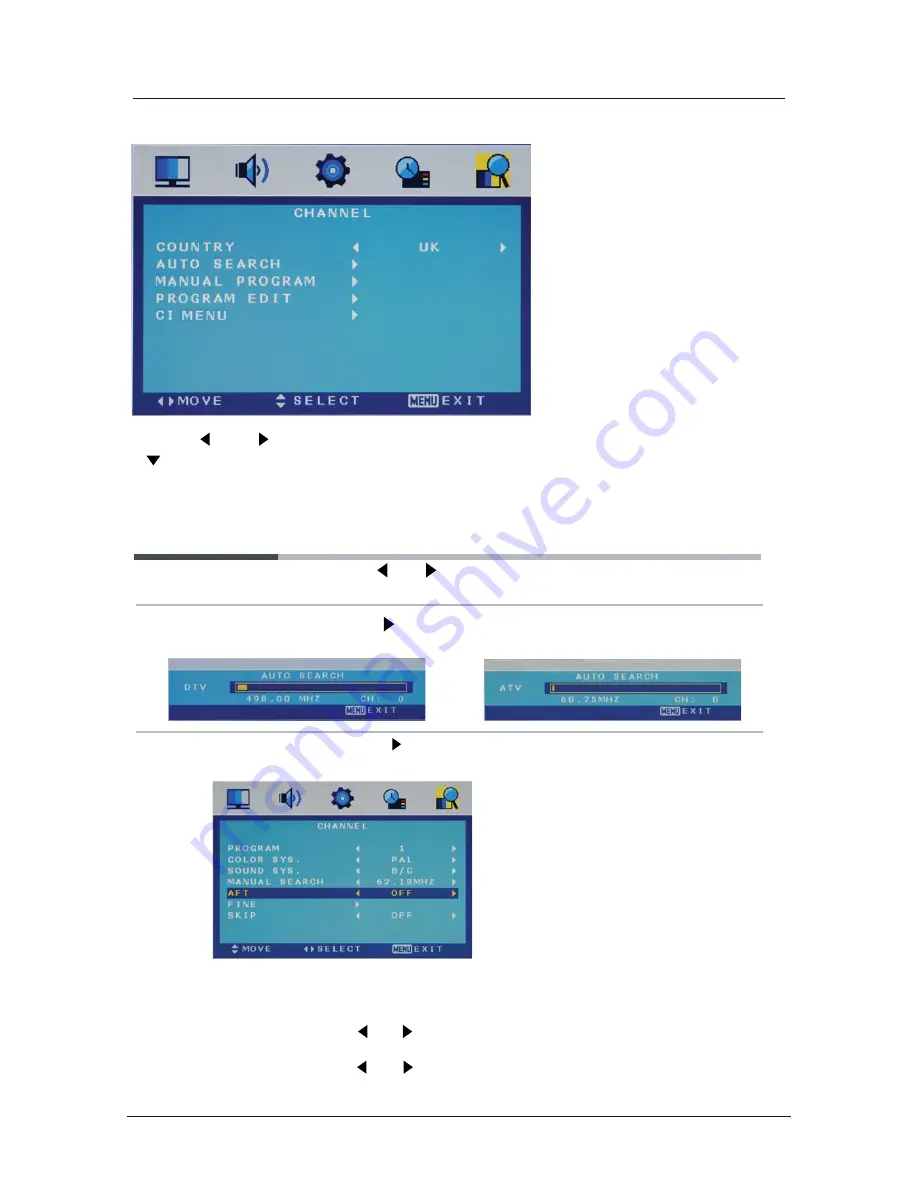
Manual Program              Press      button to enter the submenu.

The CHANNEL menu includes the following options :

Auto Search                   Press 

 button to start auto search.

Country                          Press     and     buttons to select the Country.
                                       (Can be selected in ATV mode)

Use the       and       buttons to select the

 CHANNEL 

menu (as the picture above), press

       button to enter the menu.

Program              Select the program you want to edit.
Color Sys.           Select the color system for the program you want to edit.
Sound Sys.         Select the sound system for the program you want to edit.
Manual Search   Use    and     button to manual search.
AFT                    Turn on/off the Auto Frequency Tuning function for Manual Search.
Fine                    Use    and     button to fine-tune.
Skip                    Select “Yes” to skip the program when you scan the programs by 
                           CH+/-.

Application

Menu Settings (continued)

Manual Program menu for ATV

Auto Search menu for DTV

Auto Search menu for ATV

 15

Summary of Contents for DVL-2453 BLACK

Page 1: ...24 61cm LED TV with DVD DVBT Model No DVL 2453 BLACK For information and support www lenco eu...

Page 2: ......

Page 3: ...ing external devices Common Interface slot Auto installation setup Source menu Menu settings 5 6 Unit 4 7 8 11 12 13 14 15 22 options 1 3 SAFETY INFORMATION TROUBLE SHOOTING GUIDE TECHNICAL SPECIFICAT...

Page 4: ...these instructions Do not use this TV near water Clean only with a slightly damp cloth Do not block any ventilation openings Install in accordance with the supplied Quick Start Guide and this User Gu...

Page 5: ...the mains supply socket Do not pull on the flex the flex can become overloaded and cause a short circuit x Set up the unit so that no one is able to trip over the flex x Do not place heavy items on th...

Page 6: ...way from direct sunlight and strong lights soft indirect lighting is recommended for comfortable viewing Use curtains or blinds to prevent direct sunlight falling on the screen Place the TV on a sturd...

Page 7: ...through channels They are also can be used to move down up in the OSD menu screen VOL VOL Press to adjust the volume They are also can be used to move left right in the OSD menu screen VOL button can...

Page 8: ...LANGUAGE Select DVD disc language ZOOM Adjust picture size in DVD mode SUBTITLE Turn on off the DVD subtitle display MENU DVD play list Disc menu ANGLE Select DVD picture angle TITLE DVD title GOTO D...

Page 9: ...tion LANGUAGE To select audio language EPG To show the Electronic Program Guide during no menu state only INPUT SYS MENU SYS EXIT DVD DVB FAV FAV FAV DISPLAY LANGUAGE 1 3 6 8 4 9 11 12 5 7 10 13 2 10...

Page 10: ...s This instruction manual shows the simplest and most effective way of connecting your TV to ancillary equipment Alternate methods are listed below HDMI Lead You can connect this TV to a compatible de...

Page 11: ...signal R L in Connect them to the audio output terminal of DVD shared with YPbPr VIDEO Connect it to video output terminal of DVD YPbPr Connect them to the YPbPr video output terminal of DVD used in...

Page 12: ...C VGA cable not supplied to connect the TV to your PC You can also use an HDMI cable to connect to your PC if your PC Graphic card supports HDMI When the HDMI cable is used the PC audio cable is no lo...

Page 13: ...r cables refer to the video camera instruction manual Video recorder x Connect the Scart cable to the TV and video recorder x Turn on both video recorder and the TV x Select Scart source x You can now...

Page 14: ...Switch on the DVD player x Select SCART as input source When using the HDMI cable x Select HDMI as input source HDMI to HDMI SCART All illustrated cables are not supplied Connecting external devices...

Page 15: ...INTO THE COMMON INTERFACE SLOT THEN ADD THE SMART CARD TO THE CAM 1 Turn on the TV and ensure DTV Source is selected 2 If the CAM is detected the TV will display the following message on the screen Co...

Page 16: ...Make sure your Remote is in TV mode by pressing INPUT button switch on the TV by pressing POWER You will see the first time installation menu Auto installation setup Source Menu Power On Off the LCD T...

Page 17: ...f lock time and setup options SETTING MENU Allows you to setup a variety of setup options CHANNEL MENU Allows you to search channels and set up a variety of channel options Select DTV source for examp...

Page 18: ...nu Program Select the program you want to edit Color Sys Select the color system for the program you want to edit Sound Sys Select the sound system for the program you want to edit Manual Search Use a...

Page 19: ...ency Display the frequency of the channel it found Manual Program menu for DTV Program Edit menu for DTV Program Edit menu for ATV TV List 07 05 09 00 45 No Program Name Status 001 7 Digital 002 7 Dig...

Page 20: ...uttons 2 to select between a b c and 2 and use OK button to save Use the cursor buttons to select the chan nel you want to Skip Use OK button and will be shown at the channel selected To remove the sk...

Page 21: ...be selected in ATV mode Sharpness Colour Temp Noise Reduction Increase this setting to see crisp edges in the picture decrease it for soft edges Choose from Normal Cool and Warm Reduce any interferenc...

Page 22: ...is set to User Controls the relative intensity of higher pitched sounds Balance To adjust the balance of the left and right sound track or turn off the volume of the left and right sound track AVL Con...

Page 23: ...lays on the screen Transparence Allows you to select the transparence for OSD menu displays on the screen Turn on off the overscan funciton Can be selected in HDMI mode Overscan Reset Press button to...

Page 24: ...ng ON Aspect Allows you to select the screen display mode Can be selected in DTV mode Can be selected in ATV mode Can be selected in ATV mode System Lock Press button and enter the code to enter the s...

Page 25: ...nter the menu Menu Settings continued H Position Clock Adjust the pixel clock frequency until the image size is maximized for the screen Phase Adjust the phase of the ADC sampling clock relative to th...

Page 26: ...INPUT 23...

Page 27: ...24...

Page 28: ...25...

Page 29: ...26...

Page 30: ...DVD SETUP 27...

Page 31: ...OK 28...

Page 32: ...12 3 4 5 67 8 9 5 12 3 4 5 9 8 3 2 9 6 7 9 8 8 7 4 0 1 2 3 4 67 8 9 55 5 12 3 4 6 7 8 9 8 3 2 9 A 9 9 9 F 29...

Page 33: ...MUTE button and check if Mute mode is set Switch to another channel and see if the same problem occurs Press V button to see if the problem can be solved No picture on some channels Check that correc...

Page 34: ...m the information in this table due to technical innovations TV Specifications TV System PAL BG DK I Audio System BG DK I SECAM L L Screensize 24 Diagonal Resolution 1920 x 1080Pixels RGB Aerial input...

Page 35: ......

Page 36: ......

Reviews: