background image


5

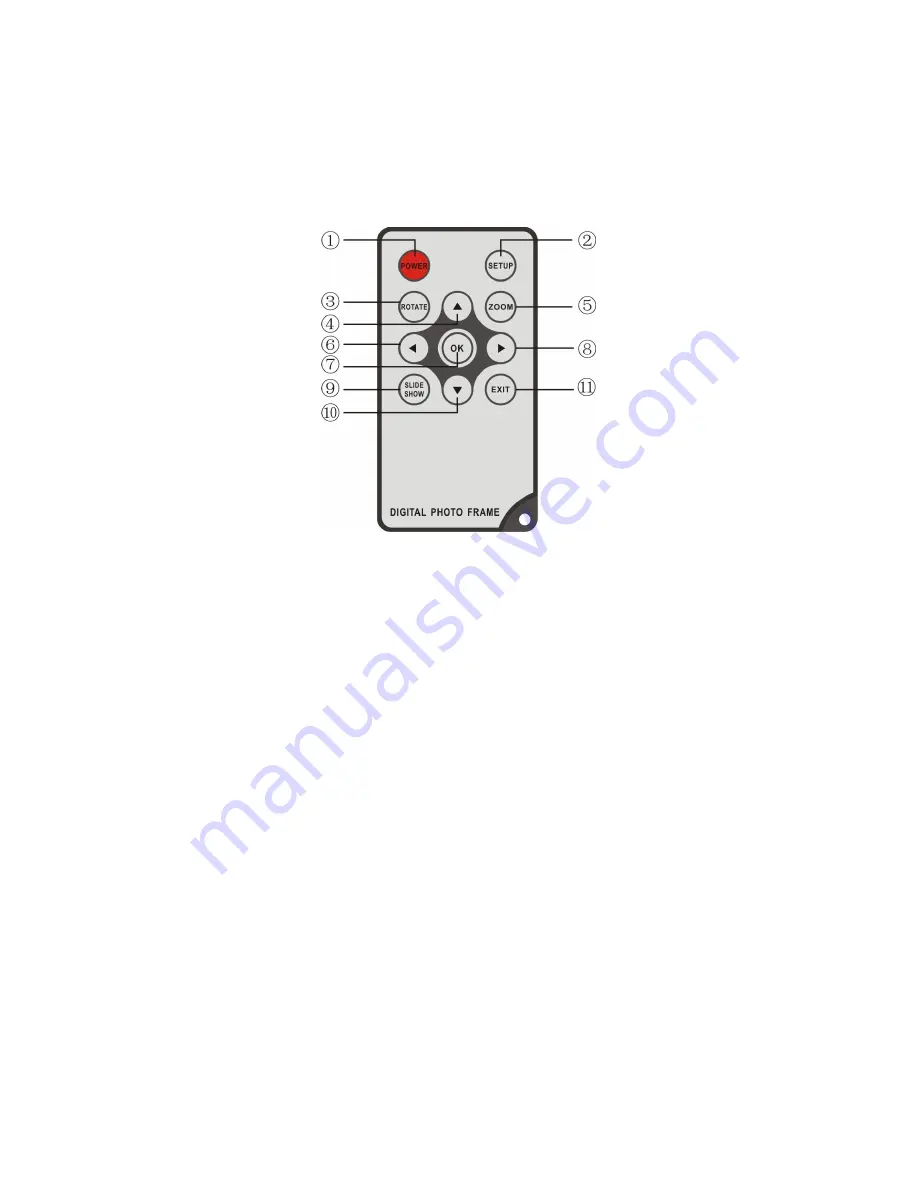
1 Product Diagram 

1.1 Remote Control     


1. POWER 

 Power On/Off   

2. SETUP


Go directly to Setup mode. 

3. ROTATE


In the pause state of single picture, press ROTATE to revolve the 

picture 90

°

in counterclockwise every time. 

4.


Functional selection button from the bottom to the top cursor. 

5. ZOOM

In the pause state of single picture, press ZOOM to magnify picture 

display size. 

6.


Functional selection button from right to left cursor. Revert to previous 

page when displaying folders. 

7. OK 

 Press to confirm. Play/pause: In the playing mode, press this button, 

it will pause; repress this button, it will play again. 

8


  Functional  selection  button  from  left  to  right  cursor.  Advance  to  next 

page when displaying folders. 

9. SLIDESHOW

 Press to start slideshow or pause when playing the picture. 

10. 


Functional selection button from the top to the bottom cursor. 

11. EXIT 

 Press to return to upper page, or enter to the main menu. 


Summary of Contents for DF-705

Page 1: ...1 DF 705 User s Manual For information and support www lenco eu English V1 0 ...

Page 2: ... inside Dismantling the Digital Photo Frame will void your warranty Cleaning the LCD Screen Treat the screen carefully Because the screen of the Digital Photo Frame is made of glass and it would easily be broken or scratched If fingerprints or dust accumulate on the LCD screen we recommend using a soft non abrasive cloth such as a camera lens cloth to clean the LCD screen Moisten the cleaning clot...

Page 3: ...ats JPEG 2 Support Memory card SD MMC MS SDHC 3 USB Connection USB2 0 HOST 4 Built in 8M Flash Memory with 1 3pcs photo storage 5 Adjustable brightness contrast saturation 6 Adjustable slideshow speed and above 10 kinds of transition slideshow 7 Unique design various frame colors and frames 8 Rotatable stand vertical and horizontal 9 OSD Language Chinese English and other languages selectable Pack...

Page 4: ...ling Replacing the Battery 5 3 Getting Started 6 4 Operating Instruction 6 4 1 Picture Mode 6 5 Setup 7 5 1 Picture Setup 7 5 2 Setup Menu Auto Playt 7 5 3 Setup Menu Display setup 8 5 4 Setup Menu custom setup 8 5 5 Setup Menu Exit 8 6 Stand Instruction 8 7 Technical Specifications 9 8 Troubleshooting Guide 9 ...

Page 5: ...ure display size 6 Functional selection button from right to left cursor Revert to previous page when displaying folders 7 OK Press to confirm Play pause In the playing mode press this button it will pause repress this button it will play again 8 Functional selection button from left to right cursor Advance to next page when displaying folders 9 SLIDESHOW Press to start slideshow or pause when pla...

Page 6: ...of the remote control down press down on the ridged area of the battery cover and pull towards you to remove the tray Place one CR2025 lithium button cell battery on the tray with the positive side facing you Reinsert the tray 1 Power on off 2 UP 3 Play Pause OK 4 Right 5 Left 6 Down 7 Menu Exit 1 SD SDHC MMC 2 USB 3 DC IN ...

Page 7: ...struction 3 2 Remove the protective film covering the LCD 3 3 Remove the plastic battery insulator from the battery compartment and make sure the remote control has a battery inside Please refer to Installing Replacing Battery if you need a new battery 3 4 Power on the unit by pressing the Power button on the remote control 4 Operating Instruction 4 1 Picture Mode After turning on the unit it will...

Page 8: ...tem you want to set up Use to show the submenu select with press OK to confirm press to return and press Setup again to back to the slideshow mode In the thumbnail mode press to select Rotate press OK to access to rotate mode use to choose the picture you want to rotate then press OK to operate Press Reset to back to the default and press Return back to the first picture When the picture is playin...

Page 9: ...enu custom setup OSD Language English French German Italian Spanish Portuguese Dutch Polish Chinese Repeat mode off one folder all USB Source SD MMC MS XD Default read 5 5 Setup Menu Exit 6 Stand Instruction Extend the bracket from the slot of the digital photo frame rotate the bracket until it is locked in place and then revolve the bracket to choose standing horizontally or vertically Please ref...

Page 10: ...ssistance please contact Technical Support No power Please check whether the plug is inserted correctly Remote control no function Please check whether the battery has power the battery can be used for half a year in normal conditions Replace with new battery if necessary Can not read the CARD or USB Please confirm whether there is storage in the card or USB device Empty devices cannot be read Can...

Reviews: