


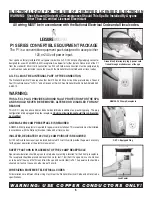


Personal Comfort Control Console
The Leisure Bay Personal Comfort Control Console is your direct link to the most sophisticated solid state spa control center available. With a simple
touch of the finger you can select any spa’s functions from turning on the lights to powering up the jets. This state of the art control console allows
you to program the spa’s various operating functions to suit your individual needs by following the user friendly directions which follow. Should you
have any questions regarding operations please contact your local Leisure Bay dealer.
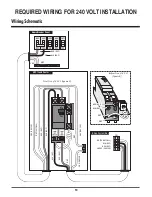
WARNING: SHOCK HAZARD! NO USER SERVICEABLE PARTS. Do not attempt service of this control. Contact your dealer or service center
for assistance. Follow all owner’s manual power connection instructions. Installation must be performed by a certified licensed
electrician and all grounding connections must be properly installed.
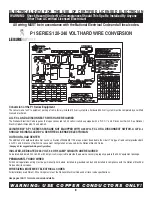
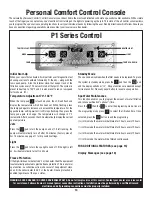
P1 Series Control
Initial Start-Up
When your spa is first activated, it will perform a self diagnostics test
showing a series of numbers followed by Pr, then by – along with the
low speed pump. Also the internal clock that keeps track of the
filtration cycles every 12 hours will start at that point. The system is
preset to heart up to 100°F and it is also preset to run on low speed
for two hours. (F2)
Temperature Adjustment 70°-104°F
When the temp pad
is touched once, the LCD will flash and
display the temperature which has been set. While flashing, press
the temp pad again to increase or decrease the temperature. For the
opposite temp. setting wait until LCD stops flashing, then press the
temp pad again to change. The temperature will change in 1°F
increments. After 5 seconds, the LCD automatically display the current
spa temperature.
Jets
Press the
pad to turn the pump on and off. If left running, the
pump will automatically turn off after 30 minutes, (Factory preset).
For 15 minutes, see page 11 for dip switch settings.
Light
Press the
pad to turn the spa light on and off. If the light is left
on, it will automatically turn off in 4 hours.
Freeze Protection
If the high-limit sensor detects 44°F at the heater, then the equipment
is automatically activated to provide freeze protection. This is a normal
spa function; no corrective action is necessary. The equipment stays
on until the sensor detects 45°F at the heater. Freeze protection is
enabled regardless of the spa’s status.
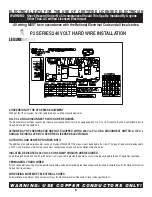
Standby Mode
The spa can be disabled when the filter needs to be replaced. To place
the system in standby mode, press the
pad then the
pad
and the display will show “
58
”. All spa functions are disabled except
for freeze control. Press any panel button to resume spa operation.
Spa Water Maintenance
This function enables you to program the amount of water filtration
and (ozone purification “optional”) time.
Press the
then the
to enter the programing mode. Once in
the programing mode press
to select the filtration time. Once
selected, press the
button to exit the programing.
(
F2
) In this mode the water will be filtered for 2 hours every 12 hours.
(
F4
) In this mode the water will be filtered for 4 hours every 12 hours.
(
F6
) In this mode the water will be filtered for 6 hours every 12 hours.
(
FC
) In this mode the water will be filtered continuously.
FOR ADDITIONAL FEATURES (see page 15)
Display Messages (see page 16)
™
LIGHT
TEMP UP & DOWN
MODE
PUMP
HEATER LIGHT
TEMP DISPLAY
13
Summary of Contents for P1Series
Page 22: ...MAINTENANCE NOTES 20...
Page 23: ...MAINTENANCE NOTES 21...
Page 24: ...MAINTENANCE NOTES 22...
Page 25: ...MAINTENANCE NOTES 23...
Page 26: ...0007100 6 06...


