


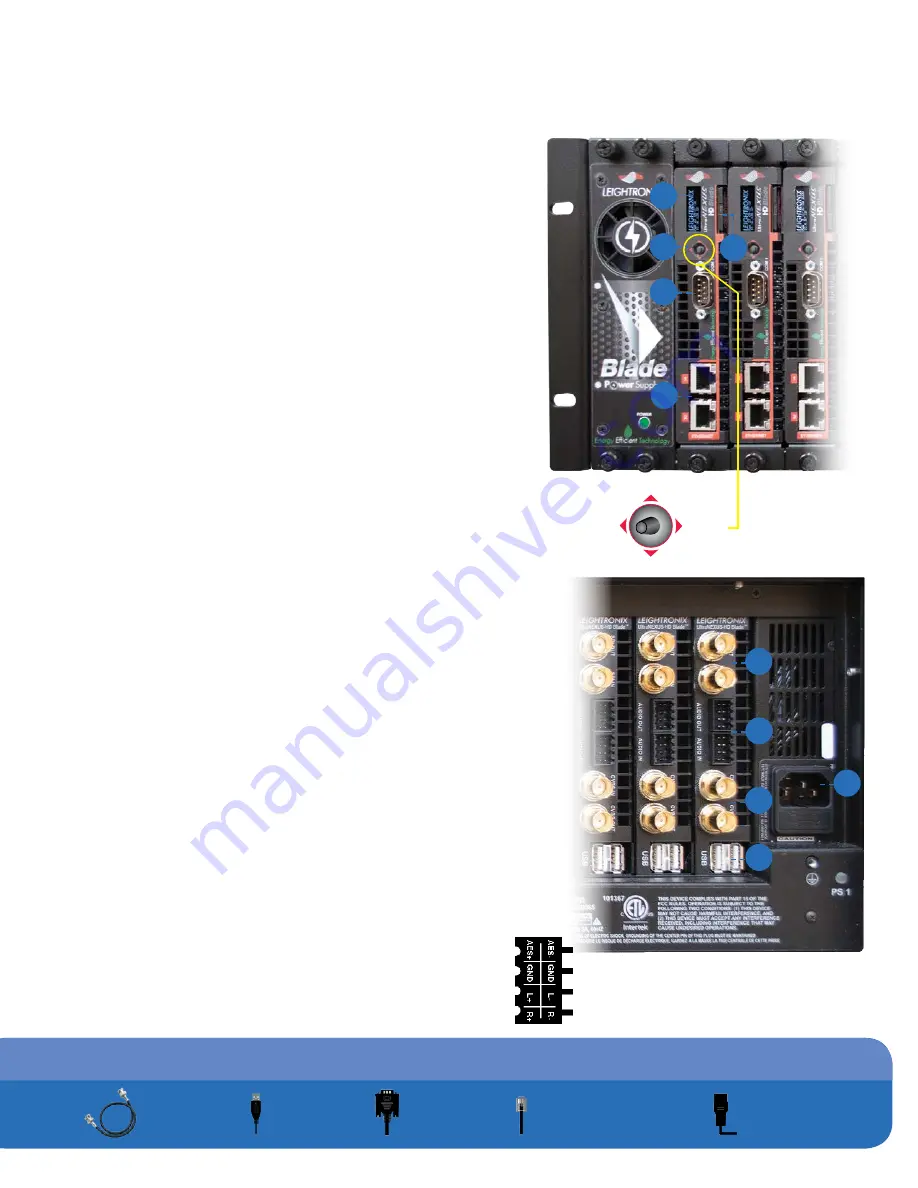
2.a
Serial Digital Interface (SDI) Input and Output Connectors
—
Connect the SDI source and destination signals to the
SDI IN
and
SDI
OUT
connectors respectively.
NOTE
: Use of HD-SDI rated coaxial cable
is highly recommended.
2.b
Audio Input and Output Terminal Blocks
— If used, connect AES or
analog audio source and destination signals to the
AUDIO IN
and
AUDIO
OUT
terminal blocks (refer to figure 2.b). Detailed information regarding
wire preparation can be found in the full product manual.
2.c
Composite Video Output Connector
— If used, connect
composite video destination signal to the
CVBS OUT
connector. The
BNC composite video outputs a scaled-down version of the high-
definition signal.
2.d
USB 2.0 Ports
— Connect up to two (2) LEIGHTRONIX external hard
drive units for up to four terabytes (4TB) of increased digital media
storage capacity.
2.e
Connect the included power cables into the power cord receptacles
of the UltraNEXUS-HD Blade’s two redundant power supplies, and
then plug the other ends into a MAINS AC power source.
NOTE
: Use of an uninterruptible power supply (UPS) with the
UltraNEXUS-HD Blade is highly recommended.
This section provides instructions for installing the UltraNEXUS-HD Blade system management software, WinLGX
™
,
along with some basic configuration steps. For more detailed configuration information, refer to the full manual. WinLGX
configurations (particularly for switch type and size) must be completed before a schedule can be created.
1.a
Display
— View system status, diagnostic information, and current
configurations.
1.b
Multidirectional Switch
— The UltraNEXUS-HD Blade
™
uses a
5-way switch for navigating system status displays and configuration
menus. The multidirectional switch can be pressed up, down, left,
right, and inward (refer to figure 1.b).
1.c
2 Ethernet Ports
— Port 1: Using the included Ethernet cable,
connect the UltraNEXUS-HD Blade directly to a 100/1000 switch on
the network. Port 2: To be used for future expansion.
1.d
COM 1 Port
— RS-232 serial port with 9-pin male connector for use
with LEIGHTRONIX supported audio/video routers with a maximum
supported matrix size of 250 inputs by 250 outputs.
1.e
Secured Digital (SD) Card
— The UltraNEXUS-HD Blade SD card
contains operating system and other system files.
WARNING
: Do not remove the SD card during operation.
Serious damage may occur.
UltraNEXUS-HD Blade Audio
Terminal Block Wire Location
(see full manual for details)
Hardware Setup
WinLGX Software Installation
3
1
WinLGX
System Management Interface
WinLGX
Site Manager
Use the WinLGX
Controller Site Manager window to store your UltraNEXUS-HD Blade server’s network IP
address information. WinLGX uses each server’s IP address to locate the server and send/receive system
information. Manage the IP address listing of your UltraNEXUS-HD Blade as follows:
WinLGX Minimum
System Requirements
•
Microsoft Windows 7 or newer
•
1.6 GHz or faster processor
•
2 GB of RAM
NOTE:
The following steps were written
for Windows 7 and 8, and may vary for
later versions.
VLC media player setup wizard:
VLC media player
is necessary in order to use the WinLGX software
preview and confidence monitor features (for more
information on these features, refer to the full
manual). If you do not intend to use the WinLGX
software monitor features, you may opt out of the
VLC installation process by clicking
Cancel
. If you
choose to install VLC media player, but do not want the
player to be automatically chosen for media playback,
deselect
Audio Files
and
Other
under the File Type
Associations settings during installation.
Microsoft Visual C++ library window:
This
window is used to install the Microsoft Visual C++
runtime components needed to run WinLGX on your
computer or network. Click
Repair
if you are using
WinLGX version 6 or older (i.e., WinLGX versions
6.0.1.48). If you are already running WinLGX 7 or
greater, click
Cancel
on the bottom of the popup
window.
NOTE:
Choosing
Cancel
does not stop the WinLGX
installation process, which will continue as a
background operation.
FACTORY-DEFAULT USERNAME AND PASSWORD FOR THE ULTRANEXUS-HD BLADE
User field
: admin
Password field
: The last six digits of the UltraNEXUS-HD Blade server’s serial number.
NOTE:
Enter any letters
in uppercase (example 102A2A).
NOTE:
The username and password are case-sensitive and may only contain letters and numbers.
How To Schedule Your
First Broadcast
Head to the Scheduling Events
section in the full manual to set up
your first broadcast!
Contact tech support
for additional assistance:
(800) 243-5589
[email protected]
BNC
Cables
USB
Cable
Ethernet
Cable
(included)
Serial
Cable
Power
Cords
(included)
Components Key
Figure 6.a
1
.b
1
.c
1
.d
1
.e
1
.a
2
.a
2
.b
2
.e
2
.d
2
.c
UP
DOWN
RIGHT
LEFT
Figure
1.b
Figure
2.b
Switch is oriented relative to
an UltraNEXUS-HD Blade’s
display.
1.
Click
Add
on the Controller Site
Manager window to open the Add New
Controller window.
2.
Enter the IP address displayed on the
server’s front panel. This address can be
viewed from the front panel display by
pressing the multidirectional switch up/
down until the IP address is shown.
3.
Enter username in the User field.
4.
Enter password in the Password field.
5.
Click
Find.
If the correct IP address has
been added, your server’s site ID, location,
serial number, and time zone display in the
Add New window.
6.
Click
OK
to enter your UltraNEXUS-HD
Blade server in the site manager database.
7.
If applicable, repeat steps 1-6 for each
additional UltraNEXUS-HD series server in
your system, otherwise click
Connect
to log
in to the UltraNEXUS-HD Blade server.
1.
Visit
www.leightronix.com/support.html
and find
your UltraNEXUS-HD series product.
2.
Click the appropriate link for your product under
the Current Client Software Version column to
download the WinLGX installer.
3.
Navigate to where the WinLGX installer (WinLGX_
v7.0.x.x_Installer.exe) is saved on your
computer.
4.
Right click the WinLGX installer and choose the
run as administrator
option to start the
installation. Follow the prompts to complete setup.
5.
As WinLGX installs, two additional windows will be
displayed.
NOTE:
Refer to Figure 6.a on the right
for a description of each window and installation
guidelines.
6.
Click
Finish
to close the WinLGX setup
wizard and return to Windows.