background image

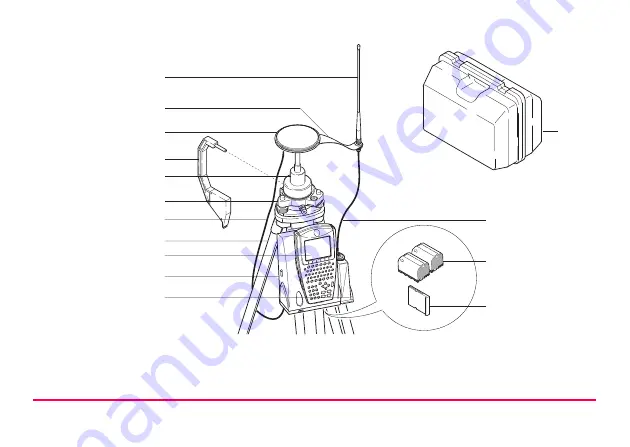
Equipment Setup

GPS1200

3-8

Equipment setup

a) Radio antenna

i)

RX1210, if required

b) Radio antenna arm 15 cm long

j)

Receiver GX1210/GX1220/GX1230

a

b

h

i

j

c

l

m

n

o                   

e

d

f

g

GPS12_016

Summary of Contents for GPS1200 Series

Page 1: ...GPS1200 System Field Manual 1 Version 1 1 English...

Page 2: ...s in the User Manual Product identifica tion The model and the serial number of your product are indicated on the type plate Enter the model and serial number in your manual and always refer to this i...

Page 3: ...tered trademark of Microsoft Corporation Bluetooth registered trademark of Bluetooth SIG Inc All other trademarks are the property of their respective owners Type Description Important paragraphs whic...

Page 4: ...1 How to Use this Manual 1 1 2 User Interface 2 1 3 Equipment Setup 3 1 4 Determining Antenna Heights 4 1 5 Manage Getting Started 5 1 6 Manage Jobs 6 1 7 Manage Data 7 1 8 Manage Codelists 8 1 9 Cod...

Page 5: ...Table of Contents GPS1200 IV 12 Manage Antennas 12 1 13 Convert Export Data from Job 13 1 14 Convert Import ASCII GSI Data to Job 14 1 Index i 1...

Page 6: ...nits page describes a specific page of a screen For example in CONFIGURE Units Formats Units page Fields and options Fields displayed on the screen are described as Coord System or Coord System Swiss...

Page 7: ...on provided is valid for the options Task Measure to Line Task Stake to Line and Task Gridstake Line Type Description Fixed keys Keys which can be pressed on the keyboard for example Function keys F1...

Page 8: ...INDIV F5 Index The index is at the back of the manual Menu tree The menu tree helps finding a topic graphically MAIN MENU SURVEY PROGRAMS MANAGE JOBS Keys fields and options on the screens which are...

Page 9: ...models This manual covers standard real time surveying applications Refer to the GPS Technical Reference Manual for information about other functionality available Available docu mentation Name of doc...

Page 10: ...nual GPS1200 Application Programs Field Manual Describes specific onboard application programs in standard use Intended as a quick reference field guide GPS1200 Technical Reference Manual Overall comp...

Page 11: ...How to Use this Manual GPS1200 1 6...

Page 12: ...2 1 GPS1200 User Interface 2 User Interface In this chapter Topic Page 2 1 Keyboard 2 2 2 2 Screen 2 5 2 3 General Operating Principles 2 7 2 4 Icons 2 13 2 5 Symbols 2 25...

Page 13: ...c CAPS d Hot keys F7 F12 e SPACE SHIFT f ENTER g Arrow keys h CE ESC USER PROG i Numeric keys GPS12 010 a b g f e c d h F2 F1 F3 F4 F5 F6 F7 A S D F G H J K L W Q E R 7 8 9 4 5 6 1 2 3 0 T Y U I O P Z...

Page 14: ...ot keys F7 F12 User definable keys to execute chosen commands or access chosen screens SPACE Enters a blank SHIFT Switches between the first and the second level of function keys ENTER Selects the hig...

Page 15: ...ges made USER Calls the user defined menu PROG ON If the receiver is off to turn the receiver on If the receiver is on press at any time to access menu to select an application program Numeric keys To...

Page 16: ...tion c Title d Screen area e Message line f Icons g ESC h SHIFT icon i CAPS j Softkeys a g h j i b c d e k f GPS12 129 Element Description Time The current local time is shown Caption Shows location e...

Page 17: ...one Scroll bar Scrolls the screen area up and down SHIFT icon Shows the status of the SHIFT key either first or second level of softkeys is selected Can be used with touch screen and has the same func...

Page 18: ...tered Operation by keyboard Information is selected and entered using the keys Refer to 2 1 Keyboard for a detailed description of the keys on the keyboard and their function Operation by touch screen...

Page 19: ...tside of the input field Operation Description Appearance Description To select an item from a menu do one of the following Move the focus to the item ENTER or CONT F1 OR Type the complete selection n...

Page 20: ...acter can be inserted or overwritten The proce dure is the same for both cases 1 Highlight the field 2 For the keyboard ENTER The edit mode is acti vated where additional functions like insert and ove...

Page 21: ...wn arrow keys 4 Press the function key assigned to the required character group 5 Press the function key with the required character 6 Repeat step 4 and 5 for entering more special characters of the s...

Page 22: ...ls either a simple listbox or a comprehensive listbox dialogue Simple listbox Appearance Description Selection Choicelist shows items to select Highlight an item and ENTER A search field is shown if n...

Page 23: ...ole screen A search field is shown A scroll bar is shown if necessary Highlight an item and CONT F1 or tap an item To exit without changes press ESC or tap The functionalities comprise adding editing...

Page 24: ...eceiver configuration Allocation of icons Position status Displays the status of the current position Touch screen Tapping the icon leads to STATUS Position a Position status b Number of visible satel...

Page 25: ...g to the current almanac Touch screen Tapping the icon leads to STATUS Satellites Icon Description No icon No position available Autonomous solution available Code solution available Phase fixed solut...

Page 26: ...llites being tracked MaxTrack mode is active The number of satellites being tracked Receiver is configured to accept an external oscillator input Icon Description Icon Description When an accuracy sta...

Page 27: ...icate if the device is working The arrow flashes when a real time message is sent When two real time devices are configured then the icon for the real time 1 device is shown The number of contributing...

Page 28: ...ion The arrow flashes when real time messages are received Digital cellular phone transmitting Radio transmitting RS232 transmitting Bluetooth enabled device attached and transmitting A digital cellul...

Page 29: ...g RS232 receiving Bluetooth enabled device attached and receiving A digital cellular phone is shown as an example The Wide Area Augmentation System European Geosta tionary Navigation Overlay Service o...

Page 30: ...ition mode icon when raw data logging or logging of auto points is configured As soon as this icon becomes visible the receiver is in a stage where practical operation can commence Touch screen Tappin...

Page 31: ...s Yes No No Moving No No No Yes Moving No Yes No Yes Moving No Yes By time Yes Moving No Yes By distance or height Yes Moving No Yes By stop go Yes Icon Position mode Point occupation Raw data logging...

Page 32: ...on or off Refer to 9 3 Quick Coding Icon Description Quick coding is turned on Quick codes with one digit are used from the active codelist Quick coding for quick codes with one digit is turned off Qu...

Page 33: ...rd and internal memory are displayed For the CompactFlash card the capacity of used space is shown in seven levels For the internal memory the capacity of used memory is shown in nine levels Touch scr...

Page 34: ...ed If two external power supplies are attached then the system uses the one which is configured as the preferred power supply Touch screen Tapping the icon leads to STATUS Memory Battery Battery page...

Page 35: ...l battery in battery compartment A is in use One internal battery in battery compartment B is in use Two internal batteries one in each battery compartment A and B Black indicates the battery currentl...

Page 36: ...hown on the Point Line Area or Map page if a point line or area filter is active Symbol Description Example The attribute symbol is displayed in MANAGE Codes to indicate codes that have attributes att...

Page 37: ...to indicate the largest residual in DET C SYS Step 4 Check Residuals Symbol Description Example This symbol is used in MANAGE Data Job Name to indicate points which have been staked out Symbol Descri...

Page 38: ...pment Setup In this chapter Topic Page 3 1 Receiver Ports 3 2 3 2 Post Processed Static Reference on Pillar 3 5 3 3 Real Time Reference Single Tripod 3 7 3 4 Real Time Rover Pole and Minipack 3 10 3 5...

Page 39: ...iption All receiver ports on the GPS1200 are located on the receiver front panel Ports at the receiver front panel GX1210 GX1220 GX1230 GX1200 with PPS Event option and GRX1200 a b c d e f g h i j k l...

Page 40: ...d LED indicators j Port RX RX1200 in out or remote interface in out 8 pin LEMO e Port P3 Power out data in out or remote interface in out 8 pin LEMO k Port P2 Power out data in out or remote interfac...

Page 41: ...Equipment Setup GPS1200 3 4 Radio in a System 500 housing using a cable Port P1 port P2 or port P3 External power Port PWR Equipment Port...

Page 42: ...Equipment Setup 3 2 Post Processed Static Reference on Pillar Use The equipment setup described below is to be used for static operations on fixed surveying pillars Equipment setup GPS12_012 b a c d...

Page 43: ...00 3 6 a GPS antenna AX1201 AX1202 AT504 f Receiver GX1210 GX1220 GX1230 b Carrier g Two batteries c Tribrach h 2 8 m antenna cable d Pillar plate if required i CompactFlash card e RX1210 if required...

Page 44: ...Setup 3 3 Real Time Reference Single Tripod Use The equipment setup described below is to be used for real time reference stations with normal radio coverage Raw observation data may also be collecte...

Page 45: ...Equipment Setup GPS1200 3 8 Equipment setup a Radio antenna i RX1210 if required b Radio antenna arm 15 cm long j Receiver GX1210 GX1220 GX1230 a b h i j k c l m n o e d f g GPS12_016...

Page 46: ...AX1202 k Radio in housing d Height hook l Transport container e Carrier m 1 2 m antenna cable to connect radio housing to radio antenna f Tribrach n Two batteries g 1 2 m antenna cable to connect rece...

Page 47: ...10 3 4 Real Time Rover Pole and Minipack Use The equipment setup described below is to be used for a real time rover during extended periods of use in the field Raw observation data may also be colle...

Page 48: ...3 11 GPS1200 Equipment Setup Equipment setup a GPS antenna AX1201 AX1202 j 1 8 m 8 pin LEMO cable GPS12_018 a b c d r q o p n j i g h k l m e f...

Page 49: ...p for pole l Two batteries d RX1210 m CompactFlash card e Holder for RX1210 on pole n Radio antenna f Lower half aluminium pole o Radio antenna arm 3 cm long g 1 2 m antenna cable p 1 2 m antenna cabl...

Page 50: ...3 13 GPS1200 Equipment Setup Position of cables in the minipack a 1 6 m antenna cable b 1 8 m 8 pin LEMO cable c 1 2 m antenna cable to connect radio housing and radio antenna c GPS12_036 a b...

Page 51: ...etup GPS1200 3 14 3 5 Real Time Rover All on Pole Use The equipment setup described below is to be used for a real time rover during short periods of use especially where there are many obstacles such...

Page 52: ...3 15 GPS1200 Equipment Setup Equipment setup a GPS antenna AX1201 AX1202 g 1 2 m antenna cable b Upper half aluminium pole with screwh Lower half aluminium pole GPS12_022 a b c d g f e h k i j l...

Page 53: ...pment Setup GPS1200 3 16 c Grip for pole i Radio antenna d Holder for receiver together with RX1210 on pole j Radio in housing e RX1210 k Two batteries f Receiver GX1210 GX1220 GX1230 l CompactFlash c...

Page 54: ...ining Antenna Heights Pillar setup a Mechanical reference plane b Vertical phase centre eccentricity for L1 c Vertical phase centre eccentricity for L2 d Vertical height reading An AX1201 AX1202 anten...

Page 55: ...mining Antenna Heights GPS1200 4 2 Carrier and adapter dimensions GRT144 carrier with GAD31 screw to stub adapter GRT146 carrier 36 5 mm 145 5 mm 99 7 mm 9 3 mm GPS12_038 36 5 mm 145 5 mm 109 mm GPS12...

Page 56: ...anical reference plane b Vertical phase centre eccentricity for L1 c Vertical phase centre eccentricity for L2 d Vertical offset For Leica standard antenna plus accessories 0 36 m e Vertical height re...

Page 57: ...eccentricity for L2 d Vertical height reading For Leica standard pole consisting of an upper and a lower half 2 00 m For Leica standard pole consisting of an upper and a lower half with an additional...

Page 58: ...nsists of several pages The objects listed and their order depend on the active sort and filter settings An active filter for a page is indicated by shown to the right of the name of the page On the L...

Page 59: ...To select an option and to return to the previous screen For MANAGE Codelists the codes from the high lighted codelist are copied to the active job NEW F2 To create an option EDIT F3 To edit the optio...

Page 60: ...ween the options in the Open column for the highlighted line area The options are Yes The line area is open Measured points are assigned to the line area No The line area is closed Meas ured points ar...

Page 61: ...ge between viewing jobs stored on the CompactFlash card or internal memory SHIFT LOG F4 Available for MANAGE Data Job Name Points page To view points lines areas and free codes stored with the job sor...

Page 62: ...configuration set into a user defined default coordinate system configuration set stored in the receiver SHIFT FILT F5 Available for MANAGE Data Job Name To define sort and filter settings SHIFT DEFL...

Page 63: ...an option THEN is to be selected highlight the desired option CONT F1 closes the screen and returns to the screen from where MANAGE XX was accessed is to be created or edited highlight the option and...

Page 64: ...6 1 GPS1200 Manage Jobs 6 Manage Jobs In this chapter Topic Page 6 1 Overview 6 2 6 2 Creating a New Job Editing a Job 6 3...

Page 65: ...all points lines areas and codes that are recorded and stored can be downloaded to LGO for post processing or for data transfer to a further program can be uploaded from LGO for example for real time...

Page 66: ...ns are called MANAGE XX Job and differences are clearly outlined Step Description 1 Refer to 5 Manage Getting Started to access MANAGE Jobs Device 2 In MANAGE Jobs Device highlight a job When creating...

Page 67: ...or editing a job To view edit and delete points lines and areas stored with the job Points lines and areas are shown on sepa rate pages Selected sort and filter settings apply SHIFT LOG F5 Available f...

Page 68: ...nput required Descrip tion User input Two lines for a detailed description of the job This can be for example work to be performed or the classes contained in the job Input optional Creator User input...

Page 69: ...diting a job To view edit delete sort and group codes currently stored in the job The func tionality of this screen is mainly the same as for MANAGE Codes SHIFT EXPRT F2 Available for editing a job To...

Page 70: ...n this screen are output fields They depend on the transformation type of the selected coordinate system Next step PAGE F6 changes to the Avge page Output Available for editing a job if codes are stor...

Page 71: ...raging Mode Defines the averaging principles for multiple measured points Average Computes the average for the position and the height Points exceeding the defined limits are marked with in MANAGE Edi...

Page 72: ...and Avge Limit Ht User input Available for Averaging Mode Average The acceptable difference for the position and height components From Easting to Cartesian Z User input Available for Averaging Mode...

Page 73: ...Manage Jobs GPS1200 6 10...

Page 74: ...7 1 GPS1200 Manage Data 7 Manage Data In this chapter Topic Page 7 1 Overview 7 2 7 2 Point Management 7 3 7 3 Line Area Management 7 18 7 4 Point Sorting and Filters 7 26...

Page 75: ...with their related information editing data creating new data deleting existing data filtering existing data Objects Objects are points lines and areas have a unique identification ID This is the poin...

Page 76: ...7 3 GPS1200 Manage Data 7 2 Point Management In this chapter Topic Page 7 2 1 Creating a New Point Editing a Point 7 4 7 2 2 Mean Page 7 12...

Page 77: ...ences are clearly outlined If editing a point then the visible pages and softkeys on this screen depend on the properties of the point being edited Step Description 1 Refer to 5 Manage Getting Started...

Page 78: ...view other coordinate types NORTH F3 or SOUTH F3 Available for local geodetic or WGS 1984 geodetic coordinates when Local Lat or WGS 1984 Lat is highlighted To change between North and South latitude...

Page 79: ...oint ID different to the defined ID template and the running point ID according to the ID template Field Option Description Point ID User input The name of the new point The configured point ID templa...

Page 80: ...e point ID for a point of any class applies this new point ID to all other points with the same original name regardless of class Output Points of Class REF cannot be renamed Coordinates User input Ne...

Page 81: ...e Refer to the relevant paragraph below MANAGE XX Point Code page The setting for Thematc Codes in CONFIGURE Coding Settings determines the availability of the subsequent fields and softkeys For Thema...

Page 82: ...To highlight Attribute n or the field for the attribute value The name of Attribute n can be edited and an attribute value can be typed in LAST F4 To recall the last used attribute values which were...

Page 83: ...ut field The attributes are shown as output input or choicelist fields depending on their definition User input Available for Thematc Codes Without Codelist The code to be stored with the point A chec...

Page 84: ...tep STORE F1 stores the changes and returns to MANAGE Data Job Name IF THEN creating a point STORE F1 stores the point and all associated information and returns to MANAGE Data Job Name Points page ed...

Page 85: ...ble in MANAGE Edit Point Point ID and accessible from the Survey application program SURVEY Survey Job Name Survey page Averaging Defining the averaging mode and configuring the limits The averaging m...

Page 86: ...bsolute Diffs Additionally the absolute difference between two points selected from a list of measured points which are all stored with the same point ID are computed Off Averaging functionality is tu...

Page 87: ...sed USE F2 To include or exclude the highlighted coordinate triplet in or from the calcu lation of the average EDIT F3 To view and edit the highlighted measured coordinate triplet DEL F4 To delete the...

Page 88: ...n a local coor dinate system is active Differences exceeding the defined limit are indi cated by Column Description Use The use of a measured coordinate triplet in the averaging Auto The coordinate tr...

Page 89: ...ically set by the system USE F2 changes between the options dPos The horizontal distance from the measured coordinate triplet to the average dHt The height distance from the measured coordinate triple...

Page 90: ...te triplet THEN is not to be viewed STORE F1 stores the changes and returns to MANAGE Data Job Name is to be viewed highlight a measured coordinate triplet and EDIT F3 Codes cannot be changed A change...

Page 91: ...Manage Data GPS1200 7 18 7 3 Line Area Management In this chapter Topic Page 7 3 1 Overview 7 19 7 3 2 Creating a New Line Area Editing a Line Area 7 20...

Page 92: ...any application program These can be all points except auxiliary points Points can be simultaneously assigned to one or more lines and or areas A line area can have a style for display in MapView a c...

Page 93: ...apter Access step by step Editing lines areas is similar to creating a new line area For simplicity the screens are called MANAGE XX Line and differences are clearly outlined Step Description 1 Refer...

Page 94: ...existing lines and areas which are open are closed MORE F5 Available on MANAGE Edit Line Line ID To display additional fields with more information SHIFT INDIV F5 or SHIFT RUN F5 To change between ent...

Page 95: ...O For Line Code None on the Code page a line style can be selected from a choicelist Otherwise the line style as defined for the selected line code on the Code page is shown No of Pts Output The numbe...

Page 96: ...ng MORE F5 The time date when the last point was added to the line The values do not change after deleting the last added point or after editing unless an additional point is added to the line IF THEN...

Page 97: ...the top of the list Next step PAGE F6 changes to the Code page ADD F2 To add an existing point from the active job to the line A new point is added before the point which was highlighted when ADD F2 w...

Page 98: ...ANAGE XX Line Code page The functionality is very similar to MANAGE New Point Code page Refer to 7 2 1 Creating a New Point Editing a Point Next step STORE F1 stores the changes and returns to MANAGE...

Page 99: ...Manage Data GPS1200 7 26 7 4 Point Sorting and Filters In this chapter Topic Page 7 4 1 Sorting and Filters for Points Lines and Areas 7 27 7 4 2 Point Line and Area Code Filter 7 31...

Page 100: ...nd side of the page name Access step by step The functionality on the Lines X and Areas X page is similar to that on the Points page For simplicity only the Points page is described Step Description 1...

Page 101: ...lter Description of fields CONT F1 To close the screen and to return to the screen from where this screen was accessed STAKE F5 To filter points for the Stakeout appli cation program Field Option Desc...

Page 102: ...sorted by the first digit Pt ID Wildcard Shows points with point ID s matching the wild card and are supported replaces an unde fined number of characters replaces a single character Time Shows point...

Page 103: ...s attached Radius From Pt Shows points within the defined radius from a particular point The radius is the horizontal distance Individual Line Shows points forming a selected line This may for example...

Page 104: ...ntical For simplicity only the point code filter is explained Access step by step MANAGE Point Code Filter This screen shows the point codes from the active job and codes currently used as filter Step...

Page 105: ...d GROUP F4 To activate and deactivate code groups Codes belonging to a deacti vated code group are not displayed in MANAGE Code Filter USE F5 To activate and deactivate the filter for the highlighted...

Page 106: ...8 1 GPS1200 Manage Codelists 8 Manage Codelists In this chapter Topic Page 8 1 Creating a New Codelist Editing a Codelist 8 2 8 2 Creating a New Code Editing a Code 8 5...

Page 107: ...stem RAM of the receiver using the CompactFlash card Access step by step Editing codelists is similar to creating a new codelist For simplicity the screens are called MANAGE XX Codelist and difference...

Page 108: ...E Codes where codes can be created edited or deleted and code groups can be accessed Field Option Description Name User input A unique name for the codelist The name may be up to 16 characters long an...

Page 109: ...e Codelists GPS1200 8 4 Next step STORE F1 stores the codelist and returns to MANAGE Codelists Creator User input The person s name who is creating the new codelist Input optional Field Option Descrip...

Page 110: ...ss MANAGE Edit Codelist 4 CODES F4 to access MANAGE Codes 5 MANAGE Codes Codes from currently active code groups are shown The indicates codes which have attributes attached MORE F5 displays informati...

Page 111: ...d differences are clearly outlined MANAGE XX Code If a code is to be edited then highlight the code 7 NEW F2 EDIT F3 to access MANAGE New Code MANAGE Edit Code Step Description STORE F1 To add the new...

Page 112: ...of value type real or integer must be created in LGO Up to twenty attributes can be created NAME F3 or VALUE F3 Available for attributes for which an attribute name can be typed in To highlight the f...

Page 113: ...f the code This can be for example the full designation if Code is an abbreviation Input optional Group Choicelist The code group to which the code is to be assigned Code Type Choicelist Defines the u...

Page 114: ...the code to the codelist stores the changes and returns to MANAGE Codelists Line Style Choicelist Available for Code Type Line or Code Type Area The style in which lines areas using this case are rep...

Page 115: ...Manage Codelists GPS1200 8 10...

Page 116: ...9 1 GPS1200 Coding 9 Coding In this chapter Topic Page 9 1 Thematical Coding 9 2 9 2 Free Coding 9 10 9 3 Quick Coding 9 16 9 4 Code and Attribute Mismatch 9 19...

Page 117: ...Coding GPS1200 9 2 9 1 Thematical Coding In this chapter Topic Page 9 1 1 Thematical Coding with Codelist 9 3 9 1 2 Thematical Coding without Codelist 9 8...

Page 118: ...h Codelist in CONFIGURE Coding Settings A display mask with an input field for point codes must be configured Access Open the choicelist for Point Code in a display mask of an application program to a...

Page 119: ...IB F3 To type in attribute values for the selected code and or add new attributes for the selected code LAST F4 Available if a point code has been previously used in the active job To select from a li...

Page 120: ...es of type MORE F5 To display information about the code description the code group and the quick code if codes with quick codes exist in the job SHIFT GROUP F4 To view create delete activate and deac...

Page 121: ...ct Point Code was accessed The point code and any associated attribute values are stored when the point is stored NEW A F2 To add a new attribute of type normal and of value type text Attributes of ty...

Page 122: ...essed NAME F3 or VALUE F3 Available for attributes for which an attribute name can be typed in To highlight Attribute n or the field for the attribute value LAST F4 To recall the last used attribute v...

Page 123: ...th an input field for point codes must be configured Thematical coding in the Survey application program is explained A typical config uration set with a display mask for coding called Code is used Ac...

Page 124: ...9 9 GPS1200 Coding OCUPY F1 To start the point occupation...

Page 125: ...Coding GPS1200 9 10 9 2 Free Coding In this chapter Topic Page 9 2 1 Free Coding Using a Codelist 9 11 9 2 2 Free Coding with Direct Input 9 14...

Page 126: ...ress a hot key configured to access the screen FREECODING Select Free Code OR Press USER and select Select Free Code to access the screen FREECODING Select Free Code FREECODING Select Free Code All fr...

Page 127: ...ttribute values are available Type in the attribute values Attribute values for attributes of type normal can be typed in STORE F1 To store the free code and any asso ciated attribute values and to re...

Page 128: ...le for thematical coding with codelist Refer to 9 1 1 Thematical Coding with Codelist for information on the iden tical softkeys STORE F1 To return to the screen from where FREECODING Select Free Code...

Page 129: ...o display the option Enter Free Code Access Press a hot key configured to access the screen FREECODING Enter Free Code Attributes OR Press USER and select Enter Free Code to access the screen FREECODI...

Page 130: ...s accessed LAST F4 Available if a free code has been previously used in the active job Accesses FREECODING Last Used Free Codes To select from a list of last used free codes The free codes are sorted...

Page 131: ...E Coding Settings deter mines how quick coding is activated Quick coding can be activated at any time For Quick Code On in CONFIGURE Coding Settings Quick coding is active and can be used For Quick Co...

Page 132: ...can be occupied OCUPY F1 must be visible For example this can be SURVEY Survey Job Name 2 Type in the one two or three digits of the quick code The current setting for Digits in CONFIGURE Coding Sett...

Page 133: ...Free Code in CONFIGURE Coding Settings determines if the free code is stored before or after the point Attribute values for attributes of type normal cannot be typed in Depending on the setting for A...

Page 134: ...th the same point ID exists in the job the codes the attribute names and the attribute values of the new and the existing point must be identical Should they not be identical a screen opens where the...

Page 135: ...o display information about the code description the code group and any attributes associated with the high lighted code Pressing CURNT F5 XX Attributes Being Stored The code and attributes of the new...

Page 136: ...Systems 10 Manage Coordinate Systems In this chapter Topic Page 10 1 Overview 10 2 10 2 Creating a New Coordinate System Editing a Coordinate System 10 3 10 3 Transformations Ellipsoids Projections 10...

Page 137: ...s allows the conversion from WGS 1984 geodetic or cartesian coordinates to local cartesian geodetic or grid coordinates and back Elements of coordi nate system The five elements which define a coordin...

Page 138: ...system the transformation type of the selected coordinate system determines the availability and the options of the subsequent fields Most fields are identical with those for the creation of a new coo...

Page 139: ...ions with control points The method by which residuals are distributed throughout the transformation area None No distribution is made Residuals remain with their associated points 1 DistanceXX Distri...

Page 140: ...ormation which is used together with the selected projec tion to obtain preliminary grid coordinates to be used for a final 2D transformation Ellipsoid Choicelist Available unless projection Type Cust...

Page 141: ...ms GPS1200 10 6 10 3 Transformations Ellipsoids Projections In this chapter Topic Page 10 3 1 Accessing Transformation Ellipsoid Projection Management 10 7 10 3 2 Creating Editing a Transformation Ell...

Page 142: ...ems 2 In MANAGE Coordinate Systems highlight a coordinate system to be edited 3 EDIT F3 4 In MANAGE Edit Coordinate System highlight Transform Ellip soid or Projection 5 ENTER to access MANAGE XX The...

Page 143: ...red transformation ellipsoid projection CONT F1 closes the screen and returns to the screen from where MANAGE XX was accessed atransformation an ellipsoid projection is to be created or edited highlig...

Page 144: ...ed Access step by step Editing a transformation is similar to creating a new transformation For simplicity the screens are called MANAGE XX Transformation and differences are clearly outlined Step Des...

Page 145: ...MANAGE XX Transformation Parameters page Enter the known values of the transformation parameters Next step PAGE F6 changes to the More page Field Option Description Name User input A unique name for t...

Page 146: ...sformation and returns to MANAGE Transformations Field Option Description Height Mode Choicelist or Output The type of heights to be computed When editing a transformation the option cannot be changed...

Page 147: ...odels stored in the database DB X are listed Any unavailable information is shown as for example if the geoid field file which was associated to the geoid model is not available on the CompactFlash ca...

Page 148: ...2 To create a new geoid model For each geoid field file on the Compact Flash card one geoid model is auto matically created EDIT F3 To view the highlighted geoid model None of the fields can be edited...

Page 149: ...Manage Coordinate Systems GPS1200 10 14 MORE F5 To display information about the geoid field file used and the device on which the geoid field file is stored...

Page 150: ...11 1 GPS1200 Manage Configuration Sets 11 Manage Configuration Sets In this chapter Topic Page 11 1 Overview 11 2 11 2 Creating a New Configuration Set 11 3 11 3 Editing a Configuration Set 11 5...

Page 151: ...easuring technique are combined in a configuration set Default configura tion sets Default configuration sets exist on the instrument They use standard settings for the majority of application program...

Page 152: ...hlight a configuration set A copy of this configuration set is taken for further configurations 3 NEW F2 to access MANAGE New Configuration Set Field Option Description Name User input A unique name f...

Page 153: ...Manage Configuration Sets GPS1200 11 4 Next step STORE F1 accesses the next subsequent screen in the configuration wizard Refer to the chapters Config XX for information on the screens...

Page 154: ...creens to edit the configuration set Select Main Menu Config OR From inside an application program press USER and then CONF F2 OR In CONFIGURE Wizard Mode press LIST F6 Step Description 1 Refer to 5 M...

Page 155: ...Manage Configuration Sets GPS1200 11 6...

Page 156: ...12 1 GPS1200 Manage Antennas 12 Manage Antennas In this chapter Topic Page 12 1 Overview 12 2 12 2 Creating a New Antenna Editing an Antenna 12 3...

Page 157: ...eosystems antennas are predefined as default and can be selected from a list Additional antennas can be defined Default antennas contain an elevation dependent correction model New antenna correction...

Page 158: ...Leica default antennas For simplicity the screens are called MANAGE XX Antenna Step Description 1 Refer to 5 Manage Getting Started to access MANAGE Antennas 2 In MANAGE Antennas highlight an antenna...

Page 159: ...ew antenna and to return to MANAGE Antennas Field Option Description Name User input A unique name for the new antenna Hz Offset User input Horizontal offset of measurement reference point V Offset Us...

Page 160: ...Description of fields L2 PhOffset User input Offset of L2 phase centre Copy Addi tional Correc tions Yes or No Allows additional corrections to be copied from the antenna which was highlighted when MA...

Page 161: ...0 12 6 Next step STORE F1 stores the antenna and returns to MANAGE Antennas Set Up Number User input The set up number of the antenna This identi fies the version number of the current calibra tion Fi...

Page 162: ...13 1 GPS1200 Convert Export Data from Job 13 Convert Export Data from Job In this chapter Topic Page 13 1 Overview 13 2 13 2 Exporting Data 13 3...

Page 163: ...view filter and sort settings are applied The points that are exported are those that are visible in MANAGE Data Job Name Data can be exported to a file on the CompactFlash card to a file on the inter...

Page 164: ...om Job EXPORT Export Data from Job CONT F1 To export the data FILT F4 To set the sort and filter settings for export The setting for Sort on the Points page defines the order in which points lines and...

Page 165: ...ten Directory Data or GSI Available for Export To CF Card The data can be exported to the Data or to the GIS direc tory Data must be stored to the GSI directory in order to read it in a TPS1100 For Ex...

Page 166: ...ntly available in the System RAM File Name User input Available for Export To CF Card and Export To Internal Memory The name of the file to which the data should be exported Port Output Available for...

Page 167: ...Convert Export Data from Job GPS1200 13 6...

Page 168: ...14 1 GPS1200 Convert Import ASCII GSI Data to Job 14 Convert Import ASCII GSI Data to Job In this chapter Topic Page 14 1 Overview 14 2 14 2 Importing Data 14 3...

Page 169: ...he settings on this screen define the data that can be imported The data to import must be stored on the CompactFlash card Data can be imported to a job on the CompactFlash card on the internal memory...

Page 170: ...file extension is stored in the DATA directory of the CompactFlash card For GSI files At least one ASCII file in GSI format with the file extension gsi is stored in the GSI directory of the CompactFla...

Page 171: ...if the variables are delimited by one or multi spaces For Import GSI Data Coordi nates can be switched for left handed coordinate systems All WI 81 data normally Easting is then imported as Northing a...

Page 172: ...rectory on the CompactFlash card can be selected For Import GSI Data all files in the GSI directory on the CompactFlash card can be selected To Job Choicelist Choosing a job as destination for import...

Page 173: ...Convert Import ASCII GSI Data to Job GPS1200 14 6...

Page 174: ...de filter 7 32 Code group 8 5 Adapter 4 2 Add point to line 7 24 Antenna Create 12 3 Edit 12 3 Recall deleted default 5 5 Antenna height determine 4 1 Antennas Default 12 2 Reset default settings 5 5...

Page 175: ...ude exclude coordinate triplet 7 14 Averaging mode define 7 12 B Battery 2 13 Icon 2 23 C CAPS 2 3 Carrier 4 2 CE 2 3 Choicelist 2 10 Close Area 5 3 Line 5 3 Code Create 8 5 Edit 8 5 Code filter for l...

Page 176: ...er defined default 5 5 User defined 11 2 Configuration set wizard 11 2 Configuration sets Reset default settings 5 5 Connect equipment and ports 3 3 Coordinate system 10 1 Create 10 3 Edit 10 3 Turn i...

Page 177: ...Data management 7 1 Deactivate Code filter 7 32 Code group 8 5 Default Recall deleted Antenna 5 5 Configuration set 5 5 Coordinate system 5 5 Delete Area 5 4 Code group 8 5 Coordinate triplet 7 14 Geo...

Page 178: ...14 Option 5 2 Point 7 4 Projection 10 9 Transformation 10 9 Value in input field 2 8 Ellipsoid management access 10 7 Ellipsoid create edit 10 9 Ellipsoids 10 6 End date 7 23 End time 7 23 ENTER 2 3...

Page 179: ...2 25 Filter settings define 5 5 Format Export 13 2 Import 14 2 Format file export ASCII 13 2 Front panel 3 2 G Geoid model 10 12 Create from CompactFlash card 10 13 GROUP 8 5 Coding 9 5 GSI16 14 2 GSI...

Page 180: ...2 4 Fixed 1 2 Function 2 3 Hot 2 3 Numeric 2 4 Softkeys 1 2 L Left arrow key 2 10 Length 7 22 LGO Download jobs 6 2 Upload jobs 6 2 Limit exceeded Absolute coordinate difference 7 15 Average 7 16 Symb...

Page 181: ...1 Configuration sets 11 1 Coordinate systems 10 1 Data 7 1 Getting started 5 1 Jobs 6 1 Line 7 18 Points 7 3 Manual GPS1200 Application Programs Field 1 5 Technical Reference 1 5 User 1 4 How to Use T...

Page 182: ...Pillar setup 4 1 Point Add to line 7 24 Create 7 4 Delete from line 7 24 Edit 7 4 Point code filter 7 31 Point management 7 3 Points filter Stakeout application program 7 28 Points sorting and filter...

Page 183: ...5 5 Configuration set 5 5 Coordinate system 5 5 Last used attribute values 7 9 Remote interface Port 3 3 Remove point from line 7 24 Reset default antenna settings 5 5 Residual largest symbol 2 26 Ri...

Page 184: ...8 5 Data management 7 32 Points line and areas 7 27 Sort settings define 5 5 SPACE 2 3 Staked out symbol 2 26 Stakeout filter points 7 28 Start date 7 23 Start time 7 23 Status Position 2 13 Symbols 2...

Page 185: ...2 V Value edit in input field 2 8 Vertical offset antenna 4 3 View Code group 8 5 Geoid model 10 13 Logged data 5 4 Points lines areas free code Stored in job 5 4 W Wake up sessions Symbol 2 26 Wildca...

Page 186: ...l Management Systems ISO standard 14001 733504 1 1 0en Printed in Switzerland Copyright Leica Geosystems AG Heerbrugg Switzerland 2004 Original text Total Quality Management Our commitment to total cu...

Reviews: