


3
Push-to-Pair in a room with multiple LMRC-611s
In a room with multiple loads, there may be more than one LMRC-611. They can all be paired to the same room network, allowing the
scene switch to set each load to different levels per scene. One of the room controllers will become the master, determining the Network
ID and channel settings for all the devices in the network.
1.
Enter wireless Push-to-Pair (PtP) mode
on all room controllers.
Press the Config button three times on each LMRC-611 to put
them all in PtP mode. The green LEDs will flash on all room controllers. The first room controller placed into PtP will become the
master.
2.
Pair the room controllers together.
Press the Config button once on each room controller. This indicates to the rooms controllers
that they will be paired with each other.
The master room controller’s LED blink rate will double once the first device is paired to it. This faster blink rate is convenient when
multiple room controllers are present on the same network.
3.
Enter PtP mode on the LMSW-605.
Using a pointed tool, press the Config button three times. As with the room controller, the
LED on the switch will flash green.
4.
Pair the LMSW-605.
Press the Config button on the LMSW-605 once to pair it to the room controllers. The loads connected to the
room controllers will toggle once (if the load is OFF, it will turn ON; if ON, it will turn OFF) to indicate that pairing was successful.
NOTE: If there are any wireless sensors, dimmers, or additional switches in the room, repeat steps 3 and 4
for each of
those devices so that all devices are paired together in the same network. For each device, the load will toggle during step
4.
5.
Exit PtP mode.
From any device, press the Config button 3 times. The LED on the room controller will flash blue while it
completes the pairing process. The default Network ID on all devices will change to a new number, based on the last four digits of
the Mac address on the room controller, and now those devices will communicate only with each other and not any devices which
have not been paired. Once complete, the switches and sensors will automatically exit PtP mode. The LED on each switch or
sensor will flash white at least once before resuming normal operation.
NOTE:
It is important to exit PtP mode within the three minute time limit mentioned above. If you do not, none of the device
pairings will be remembered and you have to start the process over from the beginning.
Pairing a device to an existing network
If you need to add the LMSW-605 to an existing in room network, follow the procedure below:
1.
Enter wireless Push-to-Pair (PtP) mode
on the room controller.
Press the Config button three times (within three seconds)
until the LED on the room controller flashes green.
2.
Enter PtP mode on the LMSW-605.
Using a pointed tool, press the Config button three times. As with the room controller, the
LED on the switch will flash green.
3.
Pair the devices.
Press the Config button on the LMSW-605 once to pair the LMSW-605 to the room controller. The load
connected to the room controller will toggle once (if the load is OFF, it will turn ON; if ON, it will turn OFF) to indicate that pairing
was successful and its config LED will turn solid green.
4.
Exit PtP mode.
Exit PtP on the room controller, by pressing the Config button 3 times. The LED on the room controller will flash
blue while it completes the pairing process. The Network ID of the LMSW-605 will change to the value used by the previously
paired devices and the room controller also returns to that value.
DEVICE PAIRING AND UNIT ADJUSTMENT USING THE DLM CONFIG APP
The DLM Config App is available for both iOS® and Android® devices. Search “DLM Config” on
your device to download.
The app provides the ability to pair various devices in a room. Additionally, you can modify load
binding and edit various DLM parameters for each device.
For details on the features and operation, download the DLM Config App User Guide from the Wattstopper web site at :
https://www.legrand.us/wattstopper.aspx
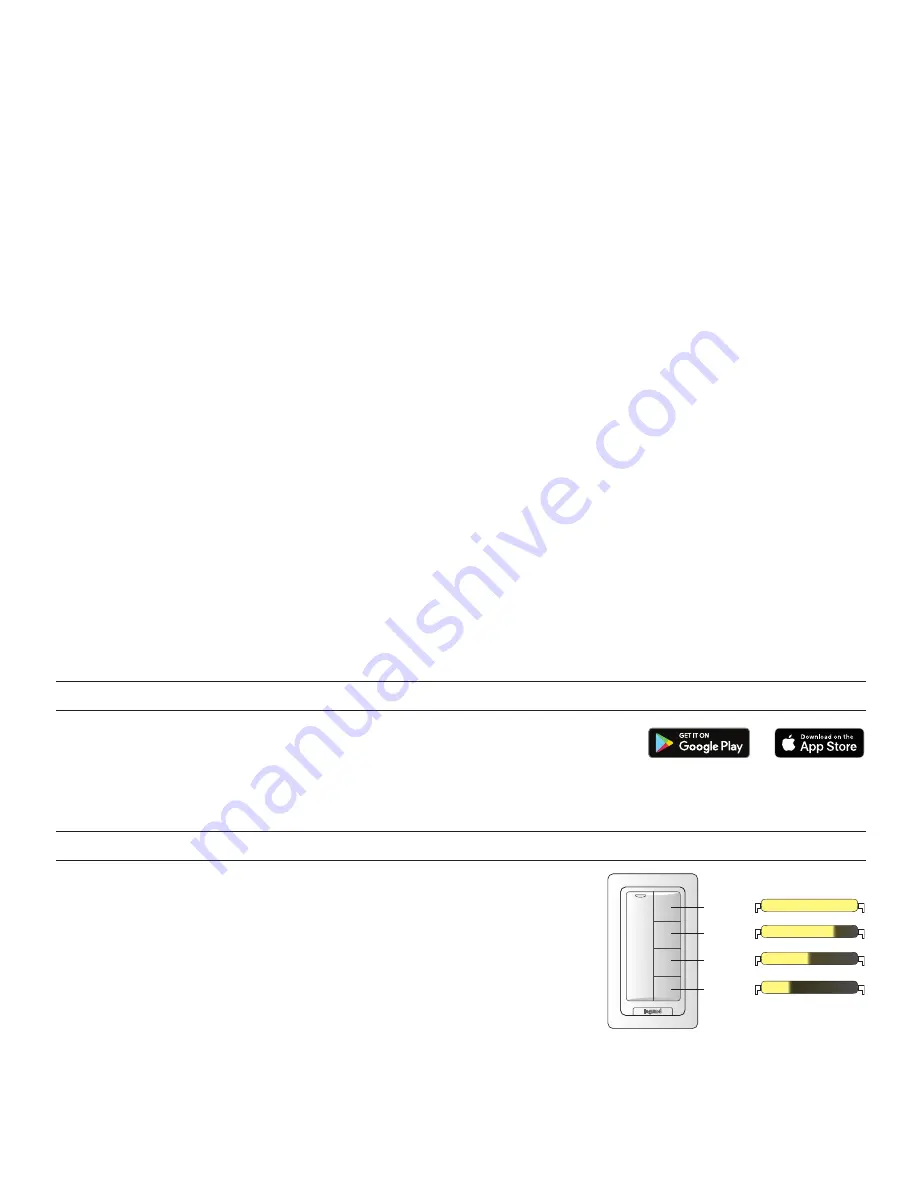
PLUG N’ GO OPERATION (PNG)
Once paired to the switch, all loads are bound to all buttons and the dimmer paddle on
the LMSW-605. The scene buttons are set at the factory to recall scenes 1-4. Dimmable
loads dim (ramp up or down) in response to pressing and holding either the top or bottom
of the paddle. Switched loads turn OFF when ramped down below 50% and turn ON when
ramped up above 50%.
To change the preset light levels for any scene simply adjust the lights in the room to the
desired levels and then press and hold the desired scene button for 5 seconds.
NOTE:
If there are lights that you want turned OFF for a scene, make sure that those lights
are OFF when you record the scene. If there are lights in the room that you want
to be unaffected by the scene, then you must unbind those lights from the scene
button using Push n’ Learn.
Default light
level
100%
75%
50%
25%
Scene 1
Scene 2
Scene 3
Scene 4
Summary of Contents for Wattstopper LMSW-605
Page 5: ...5...


