background image

- 26 - 

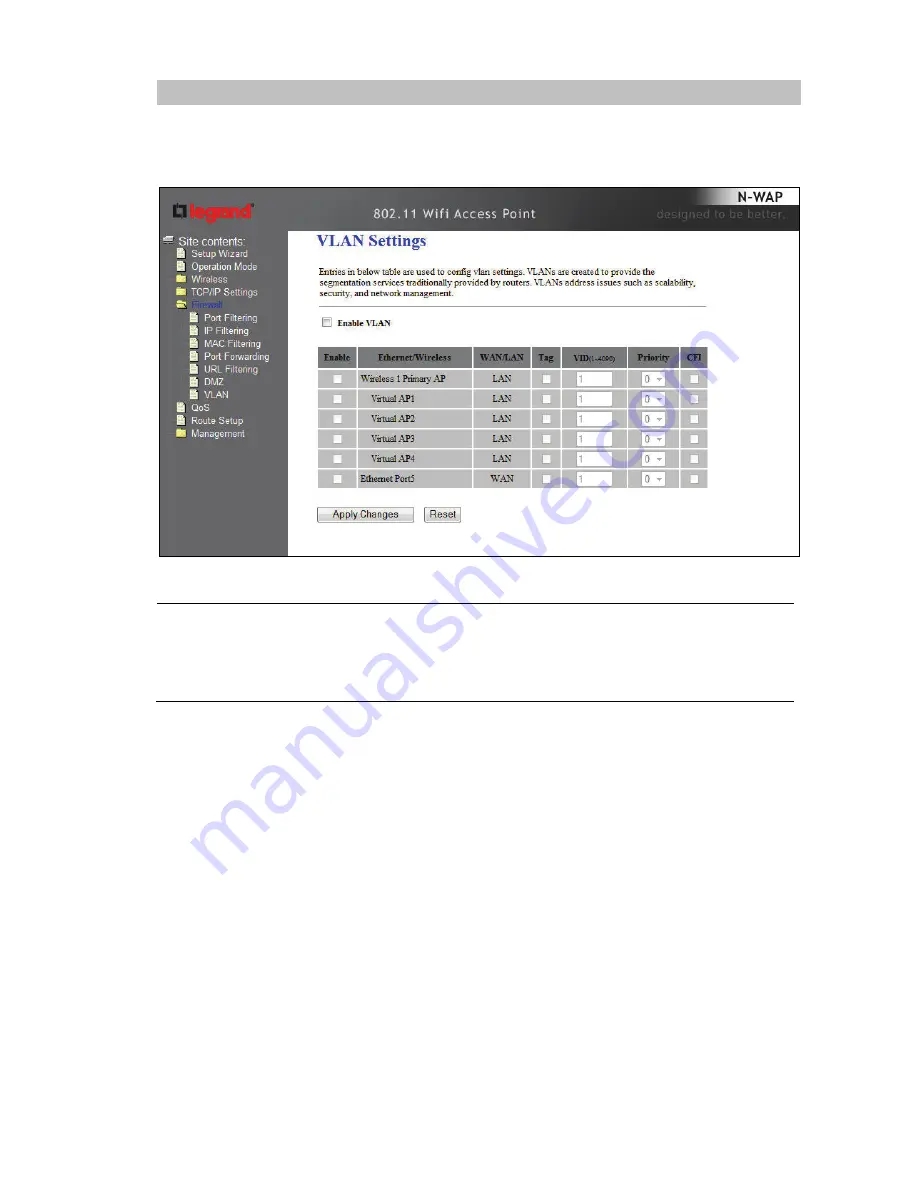
VLAN 

Entries in below table are used to configure VLAN settings. VLANs are created to provide the 

segmentation services traditionally provided by routers. VLANs address issues such as scalability, 

security, and network management. 


Enable VLAN 

VLAN (Virtual Local Area Network) refers to a group of logically 
networked devices on one or more LANs that are configured so that 
they can communicate as if they were attached to the same wire, when 
in fact they are located on different LAN segments. Because VLANs are 
based on logical instead of physical connections, it is very flexible for 
user/host management.  

Summary of Contents for DA1101

Page 1: ... i Wireless Access Point N P N DA1101 Owner s Manual 1308137 Rev B ...

Page 2: ...ircuit different from that to which the receiver is connected Consult the dealer or an experienced radio TV technician for help Reprinted from the Code of Federal Regulations 47 part 15 193 1993 Washington DC Office of the Federal Register National Archives and Records Administration U S Government Printing Office Canadian Department of Communications This digital apparatus does not exceed the Cla...

Page 3: ...0 Protection requirements for electromagnetic compatibility in Article 3 1b Testing for electromagnetic compatibility in EN 301 489 1 EN 301 Testing according to 489 17 Effective use of the radio spectrum as in Article 3 2 Testing for radio test suites according to EN 300 328 2 WARNING TO PREVENT FIRE OR SHOCK HAZARD DO NOT EXPOSE THIS PRODUCT TO RAIN OR MOISTURE THE UNIT MUST NOT BE EXPOSED TO DR...

Page 4: ...01 to help protect the data connection from the POE Injector to the N WAP Operate this product only from the type of power source indicated on the product s marking label If you are not sure of the type of power supplied to your home consult your dealer or local power company Upon completion of any service or repairs to this product ask the service technician to perform safety checks to determine ...

Page 5: ...1 4 Running the Setup Wizard Default AP Mode Overview 6 Operation Mode Selection 8 Client Mode Overview 8 Repeater Mode Overview 11 LAN Interface Setup 12 WAN Interface Setup 13 DHCP Client 14 Static IP 15 PPPoE 16 PPTP 17 L2TP 18 Chapter 4 Firewall 20 Port Filtering 20 IP Filtering 21 MAC Filtering 22 Port Forwarding 23 URL Filtering 24 DMZ 25 VLAN 26 Chapter 5 Wireless Settings 27 Basic Settings...

Page 6: ... 43 Password Setup 44 Chapter 7 QoS 45 Enable QoS 45 QoS Rule Setting 46 Chapter 8 Route Setup 47 Dynamic Route 47 Static Route 48 Appendix A Frequently Asked Questions A Appendix B DA1101 Specifications B Appendix C DA1101 Utility Program C Appendix D Manual logon to DA1101 for configuration D Appendix E DA1101 Mounting Information Best Practices E ...

Page 7: ...he wireless communication the N WAP supports most up to date encryption WEP WPA PSK and WPA2 PSK In addition the N WAP supports WPS configuration with PBC PIN type for users to connect to a secured wireless network easily Product Features IEEE 802 11b g n wireless standard compliant Multi mode AP Client Repeater and Router Mode Supports 64 128 bit WEP WPA WPA PSK WPA2 WPA2 PSK and 802 1x encryptio...

Page 8: ...dress of an installed and working N WAP run the utility program provided on the CD included with the product see Appendix C LED Color State Descriptions Ethernet Green Solid Green Blinking Green Power Present Ethernet Active Power Blue Orange Blue Solid Orange Blinking Orange Power OK Initializing Signal Survey WiFi Green Red Solid Green Blinking Green Red Connected Streaming in Session No WiFi Si...

Page 9: ...e end into the slots on the bracket and tilting it until it is flush with the bracket where it should snap into place 5 If this is a triple gang installation line the feet on the triple gang bracket up with the indentions inside the round cover and snap that cover in place There is a protrusion inside the round cover that allows it only to be installed in the correct orientation If this is a singl...

Page 10: ... No configuration is required for basic operation WARNING By default there is no security configured which means anyone within range even outside your home can access your internet connection To restrict access configure security or operate in a different mode other than AP you must log onto your DA1101 To do this you must know its IP address and we have provided a utility program for you to find ...

Page 11: ...admin for the logon and admin for the password to logon to the DA1101 NOTE If you are not attached to a router which provides you with an IP address you may still manually logon to the DA1101 by performing the steps show in Appendix D and if successful will end up at the same logon screen shown above When you successfully logon you ll be shown a screen where you can run the Setup Wizard or opt to ...

Page 12: ...wirelessly connected devices PCs In this AP Mode the router acts as the DHCP server so if its IP address is say 192 168 40 254 it will give out IP addresses to all DHCP configured wireless devices in that 192 168 40 xxx sub network including the DA1101 and all wirelessly attached PCs Select the Setup Wizard on the left side of the screen and by clicking on Next on the Setup Wizard screen shown bel...

Page 13: ... anyone within range of your N WAP will be able to gain access to your network connection See Chapter 5 Wireless Settings for a detailed overview of setting up security on the N WAP Step 3 Click the Finished button You will then see the Finish page as shown below The DA1101 will reboot automatically to make your configuration take effect and finish the Setup ...

Page 14: ...on Mode screen as it is a functional superset of the Client Mode and is selected from the Wireless Basic Settings screen on an N WAP which is already in Client Mode so first let s go over the use of Client Mode Client Mode Overview Client Mode is used where a second DA1101 N WAP is configured as a wireless remote client of the original N WAP and connects directly to a LAN or PC no wireless devices...

Page 15: ...ss of 192 168 40 252 Its Gateway will still be the router attached to the first N WAP at address 192 168 40 254 NOTE Remember to find the actual IP address given to the N WAP by a router use the utility program provided on the CD that came with the N WAP and which is described in Appendix C NOTE In order to configure the Client second N WAP you ll need to first logon to its default address 192 168...

Page 16: ...nd click Next Then just click on Connect This tells the second N WAP that he is a Client of the original N WAP At this point the PC s attached to the second N WAP should be able to be configured to get IP addresses from the router through the original N WAP Also if you go to Wireless Basic Settings you should notice that the SSID of the second N WAP has changed to that of the original N WAP and if...

Page 17: ...red in Client Mode see previous section then go to Wireless Basic Settings and select Enable Universal Repeater Mode Acting as AP and Client simultaneously as shown on the screen below You ll also need to fill out the SSID of Extended Interface with the SSID that you gave the second N WAP This completes the overview of the Setup Wizard and the various Modes that are used by the DA1101 for typical ...

Page 18: ... or Disable If you select Disable the DHCP service of LAN port is disabled Default Server DHCP Client Range The first and last IP address that DHCP server assigns Default 192 168 40 100 192 168 40 200 Static DHCP It allows you reserve IP addresses and assign the same IP address to the network device with the specified MAC address any time it requests an IP address Default Disable Domain Name Set t...

Page 19: ...cular MAC address in order for you to connect to the Internet This MAC address is the PC s MAC address that your ISP had originally connected your Internet to Type in this section to replace the WAN MAC address with the MAC address of that PC Enable IGMP Proxy Check to enable the IGMP Proxy function Enable Ping Access on WAN Check to enable the Ping Access on WAN function Enable Web Server Access ...

Page 20: ...arameters from your ISP You can see the page as follows The page includes the following fields Object Description Host Name This option specifies the Host Name of the Router MTU Size The default MTU Maximum Transmission Unit value is 1492 Bytes It is not recommended that you change the default MTU Size unless required by your ISP ...

Page 21: ...ded by your ISP usually is 255 255 255 0 Default Gateway Optional Enter the gateway IP address in dotted decimal notation provided by your ISP MTU Size The normal MTU Maximum Transmission Unit value for most Ethernet networks is 1500 Bytes It is not recommended that you change the default MTU Size unless required by your ISP DNS 1 Enter the DNS server IP address provided by your ISP or you can spe...

Page 22: ...nter the Internet service provider name in this field Connection Type Select the connection type Continuous Connect on Demand or Manual from the drop down menu If selected Manual user can click Connect button to make a connection Idle Time It represents that the device will idle after the minutes you set The time must be set between 1 1000 minutes Default value of idle time is 5 minutes This funct...

Page 23: ...P Server IP address in dotted decimal notation provided by your ISP User Name Enter the User Name provided by your ISP The Maximum input is 20 alphanumeric characters case sensitive Password Enter the Password provided by your ISP The Maximum input is 32 alphanumeric characters case sensitive Connection Type Select the connection type Continuous Connect on Demand or Manual from the drop down menu ...

Page 24: ...tion And enter the following parameters You can see the page as follows The page includes the following fields Object Description IP Address Enter the IP address in dotted decimal notation provided by your ISP Subnet Mask Enter the subnet Mask in dotted decimal notation provided by your ISP usually is 255 255 255 0 Server IP Address Enter the L2TP Server IP address in dotted decimal notation provi...

Page 25: ... click Connect button to make a connection Idle Time It represents that the device will idle after the minutes you set The time must be set between 1 1000 minutes Default value of idle time is 5 minutes This function will be available when the Connection Type is selected to Connect on Demand MTU Size The default MTU Maximum Transmission Unit value is 1460 Bytes It is not recommended that you chang...

Page 26: ...ce uses a single port number enter it in both the start and finish fields Protocol Select the protocol TCP UDP or Both used to the remote system or service Comment You may key in a description MAC address Apply Changes After completing the settings on this page click Apply Changes button to save the settings Reset Click Reset button to restore to default values Current Filter Table Shows the curre...

Page 27: ...ddress Protocol Select the protocol TCP UDP or Both used to the remote system or service Comment You may key in a description for the port range Apply Changes After completing the settings on this page click Apply Changes button to save the settings Reset Click Reset button to restore to default values Current Filter Table Shows the current IP filter information Delete Selected Click Delete Select...

Page 28: ...Address Enter the client MAC address in the field Comment You may key in a description MAC address Apply Changes After completing the settings on this page click Apply Changes button to save the settings Reset Click Reset button to restore to default values Current Filter Table Shows the current MAC filter information Deleted Selected Click Delete Selected button to delete items which are selected...

Page 29: ...to the remote system or service Port Range For TCP and UDP Services enter the beginning of the range of port numbers used by the service If the service uses a single port number enter it in both the start and finish fields Comment You may key in a description MAC address Apply Changes After completing the settings on this page click Apply Changes button to save the settings Reset Click Reset butto...

Page 30: ...ing function URL Address Enter the URL address in the field Apply Changes After completing the settings on this page click Apply Changes button to save the settings Reset Click Reset button to restore to default values Current Filter Table Shows the current URL address filter information Delete Selected Click Delete All button to delete all the items Reset Click Reset button to rest ...

Page 31: ...MZ Host Function is enabled it means that you set up DMZ host at a particular computer to be exposed to the Internet so that some applications software especially Internet online game can have two way connections DMZ Host IP Address Enter the IP address of a particular host in your LAN which will receive all the packets originally going to the WAN port Public IP address above Apply Changes After c...

Page 32: ...curity and network management Enable VLAN VLAN Virtual Local Area Network refers to a group of logically networked devices on one or more LANs that are configured so that they can communicate as if they were attached to the same wire when in fact they are located on different LAN segments Because VLANs are based on logical instead of physical connections it is very flexible for user host managemen...

Page 33: ...N clients who may connect to your DA1101 Here you may change wireless encryption settings as well as wireless network parameters Disable Wireless LAN Interface Enable or disable the wireless LAN Band There are 6 modes 2 4GHz B 2 4GHz G 2 4GHz N 2 4GHz B G 2 4GHz G N and 2 4GHz B G N mode Default 2 4GHz B G N ...

Page 34: ... 40MHz bandwidths for cohesion Default 20MHz Control Sideband Specify if the extension channel should be in the Upper or Lower sideband Default Upper Unavailable Channel Number Select the appropriate channel from the list provided to correspond with your network settings Channels differ from country to country Default 6 Broadcast SSID If you enable Broadcast ESSID every wireless station located wi...

Page 35: ...rage If this is enabled a second DA1101 can be used for directly connected LAN devices and wireless devices Default Disable SSID of Extended Interface Click on Enable Universal Repeater Mode In the SSID of Extended Interface enter the SSID of the wireless router that you want to extend Default Null ...

Page 36: ...ue too low it will result in bad performance Default 2346 RTS Threshold When the packet size is smaller the RTS threshold the DA1101 will not use the RTS CTS mechanism to send this packet Default 2347 Beacon Interval The interval of time that this DA1101 broadcast a beacon Beacon is used to synchronize the wireless network Default 100 Preamble Type Preamble type defines the length of CRC block in ...

Page 37: ...fault Enable Aggregation It is a function where the values of multiple rows are grouped together Default Enable Short GI It is used to set the time that the receiver waits for RF reflections to settle out before sampling data Default Enable WLAN Partition This feature also called WLAN isolation or Block Relay If this feature is disabled then there is no barrier between communications among wireles...

Page 38: ...oose the SSID that want to setup encryption function Encryption Select the data privacy algorithm you want Enabling the security can protect your data while it is transferred from one station to another Default Disable 802 1x Authentication Check Box was used to switch the function of the 802 1X When the 802 1X function is enabled the Wireless user must authenticate to this router first to use the...

Page 39: ...ireless user must authenticate to this router first to use the Network service RADIUS Server IP address or the 802 1X server s domain name If you select HEX you have to fill in 64 hexadecimal 0 1 2 8 9 A B F digits If ASCII the length of pre share key is from 8 to 63 Key value shared by the RADIUS server and this router This key value is consistent with the key value in the RADIUS server ...

Page 40: ...ent with the key value in the RADIUS server WPA Mixed When select the WPA Mixed function the Wireless user must authenticate to this router first to use the Network service RADIUS Server The router will detect automatically which Security type WPA PSK version 1 or 2 the client uses to encrypt IP address or the 802 1X server s domain name If you select HEX you have to fill in 64 hexadecimal 0 1 2 8...

Page 41: ...Allowed Listed only those clients whose wireless MAC addresses are in the access control list will be able to connect to your DA1101 When Deny Listed is selected these wireless clients on the list will not be able to connect the DA1101 ...

Page 42: ... do this you must set these APs in the same channel and set MAC address of other APs which you want to communicate with in the table and then enable the WDS Site Survey This page provides a tool to scan the wireless network If any DA1101 or IBSS is found you could choose to connect it manually when client mode is enabled ...

Page 43: ... 37 Wireless Schedule This page allows you setup the wireless schedule rule Please do not forget to configure system time before enable this feature ...

Page 44: ... 38 Chapter 6 Management Status In this page can show the current status and some basic settings of the DA1101 ...

Page 45: ...e System feature which allows the hosting of a website FTP server or e mail server with a fixed domain name named by yourself and a dynamic IP address and then your friends can connect to your server by entering your domain name no matter what your IP address is Before using this feature you need to sign up for DDNS service providers such as www comexe cn www dyndns org or www no ip com The Dynami...

Page 46: ...ount Step 6 Click the Apply Change button to apply the settings Time Zone Setting You can maintain the system time by synchronizing with a public time server over the Internet Current Time Input current time manually Time Zone Select Select local time zone according to location Enable NTP client update Check to enable NTP update Once this function is enabled the DA1101 will automatically update cu...

Page 47: ... Internet connection with invalid packets and connection requests using so much bandwidth and so many resources that Internet access becomes unavailable The Wireless Router incorporates protection against DoS attacks This screen allows you to configure DoS protection ...

Page 48: ...ion System all Activates all logging functions Wireless Only logs related to the wireless LAN will be recorded DoS Only logs related to the DoS protection will be recorded Enable Remote Log Only logs related to the Remote control will be recorded Log Server IP Address Only logs related to the server will be recorded ...

Page 49: ...after upgrade finished Upload Click the Upload button to perform the upgrade process Reset Click Reset will clean all current configurations and return to default values Save Reload Settings This page allows you save current settings to a file or reload the settings from the file which was saved previously Besides you could reset the current configuration to factory default Save Settings to File S...

Page 50: ... is used to set the account to access the web server of DA1101 Empty user name and password will disable the protection User Name Enter user name New Password Input password for this user Confirmed Password Confirm password again ...

Page 51: ...hat your game traffic is prioritized over other network traffic such as FTP or Web Enable QoS Check the box to enable the QoS function Automatic Uplink Download Speed Check the box to enable the automatic uplink download speed function Manual Uplink Download Speed User can manually enter the uplink download speed in the blank field ...

Page 52: ...type that selected user can enter the IP address or MAC address of client to set up the bandwidth of the transmission MAC Address Mode Select Guaranteed minimum bandwidth or Restricted maximum bandwidth modes Uplink Bandwidth Kbps Enter the Uplink Bandwidth Kbps in the column Downlink Bandwidth Kbps Enter the Downlink Bandwidth Kbps in the column Comment Enter the note for the setting ...

Page 53: ... the possible routes change There are several protocols used to support dynamic routing including RIP and OSPF Enable Dynamic Route Check the box to enable the Dynamic Route function NAT Network Address Translation NAT selects to enable or disable this function Transmit Select to enable or disable RIP protocol for transmit Receive Select to enable or disable RIP protocol for receive ...

Page 54: ...way Set up the gateway that would like to send the packets pass through Metric It is used by a router to make routing decisions The metrics used by a router to make routing decisions It is typically one of many fields in a routing table Router metrics can contain any number of values that help the router determine the best route among multiple routes to a destination A router metric typically base...

Page 55: ...re contacting your dealer This can save your time and effort but if the symptoms persist please consult your dealer Q1 I forget my DA1101 login username and or password A1 1 Restore DA1101 to its factory default settings by pressing the Reset button of the device for 10 seconds or more Its factory settings are admin for both the user name and password ...

Page 56: ...8Mbps 12Mbps 9Mbps 6Mbps IEEE 802 11n 14 29 43 58 87 116 130 144Mps in 20MHz 30 60 90 120 180 240 270 300Mbps in 40MHz Transmit Power 802 11b 17dBm 802 11g 15dBm 802 11n 13dBm Receiver Sensitivity 802 11b 86dBm 11M 802 11g 72dBm 54M 802 11n 20MHz 68dBm 802 11n 40MHz 66dBm Antenna 2 x Antenna WDS WDS repeater support LAN 1 x 10 100 Base TX RJ 45 port Protocols and Standard Protocols TCP IP UDP RTP ...

Page 57: ...AP simply run double click the utility program The screen shown below will appear Click on the Refresh button and the screen will be updated to show the IP addresses of all devices attached to the router including the DA1101 To configure the N WAP simply copy its shown IP address and put it into the browser window of your internet search program ie Windows Explorer etc and press Enter You should t...

Page 58: ...manually configure the DA1101 first change your PC s IP address from DHCP provided to one in the 192 168 40 xxx subnet like 192 168 40 10 Then connect the PC directly to the Data In jack on the POE Use your web browser to connect to the DA1101 by putting its default IP address in your browser window as shown below You should see the DA1101 logon screen pop up as shown below Simply type in admin fo...

Page 59: ...R PREWIRE WITH A THREE GANG PLASTIC BOX The Pass and Seymour Slater S354RACS is recommended For the Single Gang Wall Cover the Pass and Seymour Slater S122RS is recommended In all cases the back box should be of a RF friendly construction IE Not Metal THE FOLLOWING WILL NOT WORK TOGETHER ...

Reviews: