PAC735
Installation Instructions
6
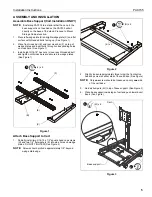
5.
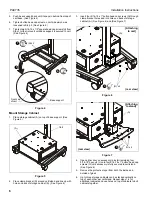
Push base support back until it snaps in behind front cap of
cart base. (See Figure 4)
6.
Tighten button head cap screw on cart side which was
loosened in Step 2. (See Figure 4)
7.
Tighten two 5/16-18 x 1/2" square head cap screws (H) from
Step 1 further into cart until base support is secured to cart.
(See Figure 4)
Figure 4
Mount Storage Cabinet
1.
Place storage cabinet (A) on top of base support. (See
Figure 5)
Figure 5
2.
Place clamp bracket (D) around cart/stand and line up with
holes on back of storage cabinet (A). (See Figure 6)
3.
Insert four 5/16-18 x 1" button head cap screws (G) through
clamp bracket holes and into holes on back of storage
cabinet (A). (See Figure 6) and (See Figure 7)
Figure 6
Figure 7
4.
Open either door on accessory to install remaining four
5/16-18" hex nuts (J) onto four 5/16-18 x 1" button head cap
screws (G) until accessory is fully secured to cart/stand.
(See Figure 6)
5.
Remove the protective layer from both the inside and
outside of glass.
6.
Up to three storage cabinets can be stacked vertically on
top of each other per cart/stand. Repeat steps 1-4 for
additional cabinets and use holes on top of cabinets to bolt
cabinets together.
5
(H) x 2
6
Base support
Front cap
of cart
7
(A)
Cart
(A)
(rear view)
(D)
(G) x 4
3
2
[Attaching
to cart]
(rear view)
(A)
(D)
2
(G) x 4
3
[Attaching
to stand]


