USER MANUAL
1,3 Megapixel IP dome camera4 306 32
LE
0
5
6
3
9
A
Page 1: ...USER MANUAL 1 3 Megapixel IP dome camera 4 306 32 LE05639AA ...
Page 2: ...config tool and and IE 12 4 1 1 Connection with the Search Tool 13 4 1 2 Connection with Internet Explorer 13 4 2 Connection with Mozilla Firefox or Google Chrome 13 5 Quick Configuration Tool 14 5 1 Introduction 14 5 2 Searching Connecting 14 5 2 1 Connecting to the device s web interface 14 5 3 Connecting with the configuration tool to change the IP address or upgrade the device software 16 5 4 ...
Page 3: ...reen and audio prompt Real time video detect motion detect camera masking shows message in screen and audio prompt Generates an alarm when finds an abnormality in the system Network Monitor One channel video data transmit to network terminal Delay is 270ms network bandwidth support needed Max 20 connections Audio and video transmission protocol HTTP TCP UDP RTP RTCP RTSP and etc Web access Network...
Page 4: ...me Rate Main stream 1280 960 15fps extra stream 704 576 15fps or Main stream 1280 720 25fps extra stream 704 576 25fps Video Bitrate H 264 64 6144Kbps MJPEG 64 10240Kbps The bitrate is adjustable Video Flip Mirror function Flip function Snapshot Max 1f s snapshot JPEG Privacy Mask Max 4 privacy mask zones Video Setup Brightness contrast colors etc Video Information Channel title time title motion ...
Page 5: ...maintenance upgrade etc AUX Reset Built in RESET button General Parameter Power Support DC12V and PoE 802 5af Power Consumption 1 5W MAX Working Temperature 10 50 Working Humidify 10 90 Dimensions mm 110 54 Weight 0 25Kg Installation Wall or ceiling mount 1 3 2 Factory Default Settings Function Setup Type Item Default Settings Camera Setup Properties Brightness 50 Contrast 50 Hue 50 Saturation 50 ...
Page 6: ...gs Enable Watermark character DigitalCCTV Extra stream Enable Enable Code Stream Type General Encode Mode H 264B Resolution CIF 352 288 352 240 Frame Rate FPS PAL 25 NTSC 30 Bit Rate Type CBR Reference Bit Rate 192 1024Kb S Bit Rate 1024 I frame Interval 50 Snapshot Snapshot Type General Snap Image Size 720P 1280 720 Quality 5 Interval 1picture s Overlay Privacy Mask Disable Channel Title Enable T...
Page 7: ... address service Enable Connection Max connection 10 TCP port 37777 UDP port 37778 HTTP port 80 RTSP port 554 PPPoE Enable Disable User Name N A Password N A DDNS Server Type Disable CN99 DDNS Server IP none Port 80 Domain Name none User Name none Password N A Update Period 5m IP filter Trusted Sites Disable SMTP email SMTP Server none Port 25 Anonymity Disable User name anonymity Password N A Sen...
Page 8: ...st address 239 255 42 42 Port 36666 QoS Real time monitor 0 Command 0 Event management Video detect Motion Detect Enable Disable Anti dither 5 seconds Sensitivity 3 Record Channel Enable Record Delay 10 seconds Send Email Disable Snapshot Disable Video Masking Enable Disable Record Channel Enable Record Delay 10 seconds Send Email Disable Snapshot Disable Abnormity Disconnec tion Enable Disable Re...
Page 9: ...record 5s Disk Full Overwrite Record Mode Auto Main Stream Main Stream System management General setup Local setup Device Name Device factory SN Language English Date and time Date Format Y M D Time Format 24H Time Zone GMT 08 00 Current Time Sync PC DST Disable DTS type Week Start time 00 00 00 of the first Sunday of the month End time 00 00 00 of the second Monday of the month Synchronize with N...
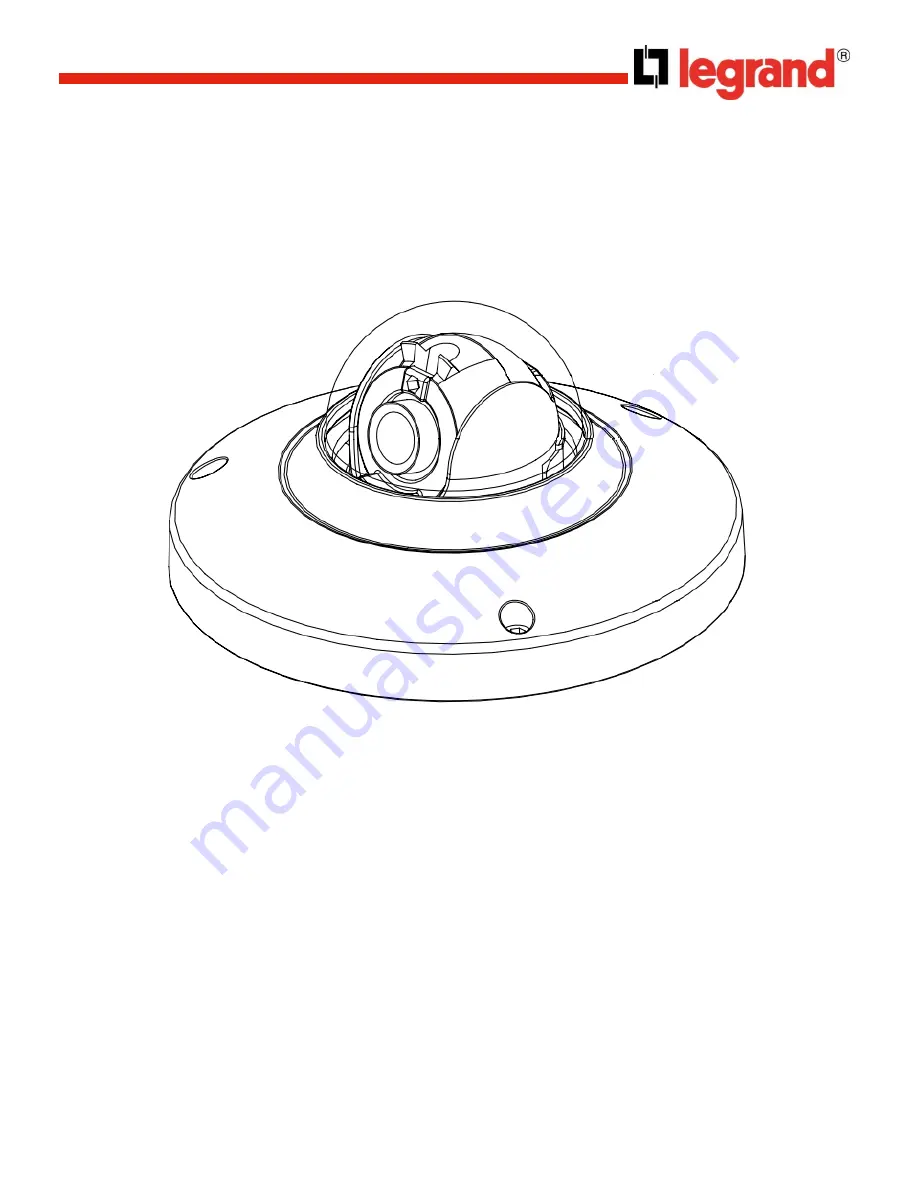
Page 10: ...work 2 1 Dimensions 2 2 Structure X Y Z rotation module Device lens Dome camera enclosure Power input port Connect to the DC 12 power to input Network port Network data input output and PoE Inner hexagonal wrench ...
Page 11: ...e three screw holes in the device pedestal to the three plastic expansion bolt holes in the installation position Put the three self tapping screws in the three plastic expansion bolts firmly Step 4 Loosen the two M3 secure screws of the lens rotation structure do not remove loosen a little bit will be OK Use the inner hexagonal wrench to insert them to the inner hexagonal holes and use the wrench...
Page 12: ...and management via PC System pops up warning information to ask you whether install control webrec cab or not Click OK button system can automatically install the control If you can t download the ActiveX file you can lower the IE security level or disable anti phishing filter Be sure you are logged with administrator rights in your Windows session ...
Page 13: ...IP camera address in the address bar For example if your camera IP is 192 168 1 108 input http 192 168 1 108 in IE address bar 4 2 Connection with Mozilla Firefox or Google Chrome Go to Apple web site download and install QuickTIme www apple com quicktime download Then open Firefox or Chrome and input the IP DVR address in the browser URL Nota These browsers can modify the display interface and so...
Page 14: ... Connecting Select and double click the ConfigTool exe in the application directory The version of Config tool should be at least 1 0 5 5 2 1 Connecting to the device s web interface To find connected devices in the same segment network click the refresh button The tool will search for the connected devices and display the device IPv4 and IPv6 in the form list In the device list interface you can ...
Page 15: ...15 2 Select Open Device Web item to go to the web interface If you can t connect ckeck you internet explorer security settings as described in chapter 4 2 ...
Page 16: ... them in the form of the list N Description 1 Number 2 Device IP address 3 Device TCP port 4 Device subnet mask 5 Device default gateway 6 Device MAC address 7 Select IPv4 or IPv6 or All 8 Upgrade button opens the interface to upgrade the device firmware See below 8 9 Refresh the list 10 Login button opens the login interface to confirm login password and port and configure the device See below 10...
Page 17: ...onnection 4 Click Cancel button to stop the upgrade 5 Add button configures manually s a new device IP and port 6 Return button comes back to the previous interface 10 Login button opens the login interface Highlight the network information device single click in the list Click the Login button or double click the highlighted line The following page opens Note Here any information cannot be modifi...
Page 18: ... back to the previous interface 5 4 2 System Information Before using the camera please check that its software is in updated version Functions Description SN Serial number of the device Software Version Software version of the device Device Name User name Synchronization with PC Synchronisation of the device s date and time the PC Click on Sync to synchronise then on save PC Date Date on the PC P...
Page 19: ...rch interface Steps to upgrade the intertnal software Click the Open button Select and add the bin internal software file firmware Click the the Upgrade button Then the file is transmitted to the device and the device automatically upgrades itself Then click the OK button to end the procedure 6 Resetting the camera Click on the Reset button located inside the camera during 10 seconds Wait for the ...