background image

1

English

5

EDITCHANNEL

EditChannel

Menu

4

1

2

3

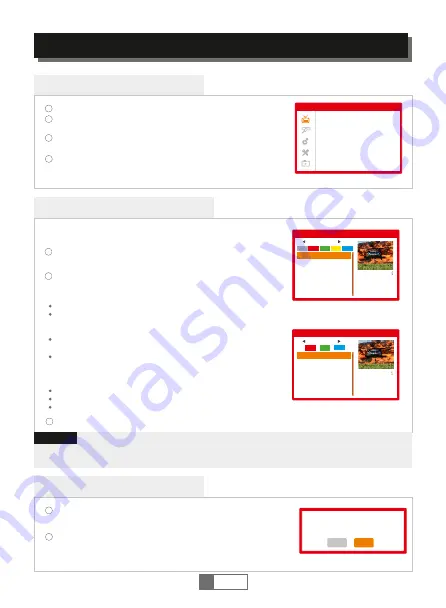
Press the "MENU" button to enter 

to the M

ain 

M

enu.

Press "UP" or "DOWN " button to highlight "Edit Channel"

 and

 press 

"

OK

" button to enter 

to 

the Edit Channel menu.

Press "UP" or "DOWN" button to highlight the desired item 
and press "OK" button to enter 

to 

the sub-menu .

Press "EXIT" button to exit.

DeleteAll

1

2

A warning window appears.
Select "Yes" to delete all channels.
Select "No" to cancel deleting.

In the Edit Channel menu, select "Delete All"

and p

ress "OK" button.


You will be asked to input the password(the default password is
"0000").

TV

ChannelList

/RadioChannel

L

ist

In the Edit Channel menu, select "TV Channel List" or "Radio 
channel List"

.


P

ress "OK" button to enter 

to the 

TV 

C

hannel 

L

ist/

Radio Channel 

L

ist menu.

Press "UP" or "DOWN"  button to highlight the desired channel


and

 press the "OK" button

.


A

 preview of the channel will be 

displayed in the top right corner of the screen.

1

2

Use this menu to set up Favourite, 

L

ock, 

S

kip, 

M

ove, 

S

ort, 

D

elete

and 

R

ename for the selected TV/Radio channels.

Press "FAV" button

 and

 then press "OK" button to set the FAV channels.

Press "Red" button to activate "Lock" function

 and

 then press "OK" 

button

.


Y

ou will be asked to input the password(The default 

password is "0000" )

.


T

hen the selected Channel will be locked.


Press "Green" button to activate "Skip" function

. P

ress "OK" 

button to skip the desired channel.


Press "Yellow" button to activate "Move" function

. H

ighlight the

desired channel and press "OK" button to confirm. Press "UP" or 
"DOWN" button to select the new position and press "OK" 
button

. T

he channel will be moved to the new position.


Press "Blue"button to enter 

to the 

Edit 

C

hannel sub menu.

Press "OK" button again to cancel the corresponding function.
Press colour buttons again to exit the corresponding function.

Press "Exit" button to save and 

to go 

back to "Edit Channel" menu

.

3

Basically, the operation of "Radio Channel List" is the same as "TV Channel List", 
but there is one point different: In "Radio Channel List" mode, there is no video 
information, so it will always display a logo in the right side preview window.

NOTE:

Edit Channel

TV Channel List
Radio Channel List
Delete All

TV Channel List

All TV

FAV Lock Skip

Move

Edit

DVBT
YooPlay Ga
498167KHZ/8K/64QAM
PID:203/303/203
GI:1/32 FEC:3/4

0001 No Name
0002 YooPlay Ga
0003 E4+1
0004 UKTV Histor
0005 SKY THREE
0006 Sky Spts Ne
0007 Sky News

All TV

DVBT
YooPlay Ga
498167KHZ/8K/64QAM
PID:203/303/203
GI:1/32 FEC:3/4

0001 No Name
0002 YooPlay Ga
0003 E4+1
0004 UKTV Histor
0005 SKY THREE
0006 Sky Spts Ne
0007 Sky News

Edit Channel

Sort Rename Delete

Yes

No

Warning! Do you really want to delete 
all channels?

Summary of Contents for HEV1

Page 1: ...Ελληνικά Διαβάστε αυτό το εγχειρίδιο πριν τη χρήση του δέκτη USB DIGITAL RECEIVER DVB T2 H2 65 HEVC ΕΠΙΓΕΙΟΣ ΨΗΦΙΑΚΟΣ ΔΕΚΤΗΣ DVB T2 H 265 HEVC ...

Page 2: ......

Page 3: ...ΡΥΘΜΙΣΕΙΣ ΣΥΣΤΗΜΑΤΟΣ Γλώσσα 7 Σύστημα TV 7 Ρύθμιση Ώρας 7 Ρυθμίσεις Χρονοδιακόπτη 8 Γονικό Κλείδωμα 8 Ρυθμίσεις OSD 8 Αγαπημένα 9 Ρύθμιση Περιγραφής Ήχου 9 Άλλο 9 ΕΡΓΑΛΕΙΑ Πληροφορίες Συστήματος 10 Εργοστασιακές Ρυθμίσεις 10 Αναβάθμιση λογισμικού μέσω OTA 10 Αναβάθμιση μέσω USB 10 Σώσιμο Φόρτωση Καναλιών σε από USB 11 Backup Λογισμικού 11 Ασφαλής αφαίρεση της συσκευής USB 11 MEDIA PLAYER Media Pla...

Page 4: ...Πάνω Κάτω Δέκτης Υπερύθρων Ενδεικτική λυχνία Θύρα USB 1 2 3 4 5 Πίσω Όψη ANT IN ANT OUT Έξοδος HDMI Έξοδος Scart 2 1 3 4 Πλάγια Όψη Είσοδος τροφοδοσίας DC 1 HDMI SCART ANT OUT ANT IN 5V 2A 1 2 3 4 1 USB DIGITAL RECEIVER DVB T2 H2 65 HEVC 1 2 3 4 5 ΕΙΣΑΓΩΓΗ ...

Page 5: ...γή TV και Radio Πράσινο πλήκτρο Υπότιτλοι ON OFF Κίτρινο πλήκτρο TELETEXT Μπλε πλήκτρο Λειτουργία Ήχου 7 EPG 8 Πλήκτρο OK Επιβεβαίωση επιλογής Πλήκτρα Λειτουργίας Εκμάθησης Το τηλεχειριστήριο του δέκτη έχει 4 προγραμματιζόμενα πλήκτρα Σε κάθε πλήκτρο μπορούν να αντιγραφούν κάποιες από τις λειτουργίες του τηλεχειριστηρίου της τηλεόρασης 1 Τοποθετείστε το τηλεχειριστήριο της τηλεόρασης αντικριστά με...

Page 6: ...εικόνες NOTE 1 Μην συνδέετε αποσυνδέετε το καλώδιο HDMI όταν ο δέκτης είναι ενεργοποιημένος 2 Όταν ο δέκτης είναι ενεργοποιημένος η ενδεικτική λυχνία είναι πράσινη Όταν η ενδεικτική λυχνία είναι κόκκινη ο δέκτης είναι σε κατάσταση αναμονής Καλώδιο HDMI Καλώδιο RF Τροφοδοτικό Κεραία TV Καλώδιο Scart HDMI SCART ANT OUT ANT IN 5V 2A ΣΗΜΕΙΩΣΗ ...

Page 7: ...ν οθόνη Πιέστε το πλήκτρο Πάνω ή Κάτω για να επιλέξετε το κανάλι που επιθυμείτε Πιέστε το πλήκτρο Αριστερά ή Δεξιά για να επιλέξετε το συμβάν που επιθυμείτε Πιεστε το Πράσινο πλήκτρο για να ορίσετε το χρονοδιακόπτη στο συμβάν Πιέστε το Κόκκινο πλήκτρο για εμφάνιση του μενού Time bar Μπορείτε να επιλέξετε τον τρόπο εμφάνισης και μετακίνησης του χρόνου πιέζοντας το πλήκτρο ΟΚ Πιέστε το πλήκτρο OK γι...

Page 8: ...ΛΙΟΥ Λίστα Καναλιων TV TV Όλα Αγαπη Κλείδω Παράλ Μετακί Επεξε DVBT YooPlay Ga 498167KHZ 8K 64QAM PID 203 303 203 GI 1 32 FEC 3 4 0001 No Name 0002 YooPlay Ga 0003 E4 1 0004 UKTV Histor 0005 SKY THREE 0006 Sky Spts Ne 0007 Sky News ...

Page 9: ...ριθμός μένει ο ίδιος Η προεπιλεγμένη τιμή είναι Ανενεργό ΕΠΕΞΕΡΓΑΣΙΑ ΚΑΝΑΛΙΟΥ ΕΓΚΑΤΑΣΤΑΣΗ Αυτόματη Ανίχνευση Χειροκίνητη Ανίχνευση LCN Μετονομασία ΕΓΚΑΤΑΣΤΑΣΗ Μπορείτε να ανιχνεύσετε τα καναλια Βάσει Καναλιού ή Βάσει Συχνότητας Αφου επιλέξτε τις επιθυμητές τιμές πιέστε Ανίχνευση Αυτόματη ανίχνευση και αποθήκευση όλων των διαθέσιμων καναλιών ...

Page 10: ...Διαστάσεις Εικόνας Ψηφιακή Έξοδος Ήχο 1080i 50HZ Αυτόματο LPCM Out Σύστημα TV Ρύθμιση Ώρας Περιοχή Επιλέξτε τη χώρα σας Χρήση GMT Στην επιλογή Βάσει Περιοχής γίνεται χρήση του GMT και η ώρα ρυθμίζεται αυτόματα σύμφωνα με τη χώρα που έχετε επιλέξει Στην επιλογή Καθορισμός Χρήστη η ρύθμιση της Ζώνης Ώρας γίνεται απο το χρήστη χειροκίνητα Στην επιλογή Ανενεργό ο χρήστης ρυθμίζει χειροκίνητα την ώρα κ...

Page 11: ...δέκτης μεταβαίνει στο κανάλι που έχετε ορίσει στις παρακάτω παραμέτρους Στην επιλογή Εγγραφή ο δέκτης μεταβαίνει στο κανάλι που έχετε ορίσει και κάνει εγγραφή του προγράμματος στην επιλεγμένη ώρα και διάρκεια Προΰπόθεση της λειτουργίας εγγραφής είναι να έχει εισαχθεί στο δέκτη κάποιος εξωτερικός δίσκος αποθήκευσης USB Κανάλι Αφύπνισης Ορίστε το κανάλι που επιθυμείτε για εγγραφή ή για θέαση Ημερομη...

Page 12: ...κάνει ο δέκτης σε περίπτωση διακοπής ρεύματος Η προεπιλεγμένη τιμή είναι Restart to Last Channel 1 2 3 4 5 6 7 8 Αυτό το μενού σας επιτρέπει να μετονομάσετε τις ομάδες Αγαπημένων Πιέζοντας το πλήκτρο ΟΚ σε μια ομάδα Αγαπημένων μπορείτε να μετονομάσετε τη συγκεκριμένη Λίστα Αγαπημένων Αγαπημένα ΡΥΘΜΙΣΕΙΣ ΣΥΣΤΗΜΑΤΟΣ Αγαπημένα Αγαπημένο 1 Αγαπημένο 2 Αγαπημένο 3 Αγαπημένο 4 Αγαπημένο 5 Αγαπημένο 6 Αγ...

Page 13: ... αλλά κλειστός από το stand by Αντιγράφουμε το λογισμικό σε ένα USB STICK δεν του αλλάζουμε το όνομα και δεν το βάζουμε μέσα σε κάποιο φάκελο εισάγουμε το USB stick στον αποκωδικοποιητή στη θύρα USB και τον ανοίγουμε από το stand by Αφού έχει ανοίξει ο δέκτης τότε σε λίγα δευτερόλεπτα εμφανίζεται μήνυμα στην οθόνη της τηλεόρασης Συνδέθηκε συσκευή USB Πατάμε με το τηλεχειριστήριο Menu Εργαλεία Αναβ...

Page 14: ...Disk Remove USB Disk A 3 GB Remove Ακύρωση Backup Λογισμικού Εάν θέλουμε να κάνουμε ένα Γενικό Backup στο δέκτη σε μορφή λογισμικού Backup abs το οποίο θα περιλαμβάνει το τρέχων λογισμικό τα κανάλια που έχουμε κατεβάσει και τακτοποιήσει σε επιθυμητή σειρά και ρυθμίσεις που έχουμε επιλέξει τότε ακολουθούμε την εξής διαδικασία Πατάμε Menu Εργαλεία Αναβάθμιση μέσω USB Στο παράθυρο που εμφανίζεται επι...

Page 15: ...έστε για εμφάνιση και επεξεργασία της Λίστας Αναπαραγωγής Πιέστε για προσθήκη του επιλεγμένου αρχείου στη Λίστα Αγαπημένων Πιέστε ξανά για ακύρωση και διαγραφή από τη Λίστα Αγαπημένων και τη Λίστα Αναπαραγωγής Πιέστε για προσθήκη όλων των αρχείων του τρέχοντος φακέλου στη Λίστα Αγαπημένων Πιέστε ξανά για ακύρωση της προσθήκης και διαγραφή όλων των αρχείων του τρέχοντος φακέλου από τη Λίστα Αγαπημέ...

Page 16: ...ναι OFF Μετά την εγγραφή Επιλέξτε την ενέργεια του δέκτη μετά την εγγραφή Η προεπιλεγμένη τιμή είναι Πήγαινε στην Αυτόματη Αναμονή Πληροφορίες Αποθήκευσης PVR USB Disk A xxxG bytes Ένταση Συνολικό Μέγεθος Ελεύθερο Μέγεθος Μέγεθος Εγγραφής Μέγεθος TMS Σύστημα Αρχείων xxxx xxxx xxxx xxxx xxxx xxx Μορφή Ρύθμιση DVR OK Ακύρωση Format FAT Disk Mode DVR Type DVR Set REC TMS Timeshift Υπερπήδηση Timeshif...

Page 17: ... Διακοπή του Time Shift Πιέστε το πλήκτρο STOP για διακοπή του TimeShift 03 19 01 36 step 00 02 37 00 07 12 BBC FOUR 179 150 94 TS 100 Κάποιες εκδόσεις λογισμικού πιθανόν να μην υποστηρίζουν αυτήν τη λειτουργία Σιγουρευτείτε ότι έχετε συνδέσει μία συσκευή USB στο δέκτη Καθώς παρακολουθείτε ένα πρόγραμμα πιέστε το πλήκτρο REC για να αρχίσει η εγγραφή Πιέστε 2 φορές το πλήκτρο REC για να αλλάξετε το...

Page 18: ...αι ενεργοποιημένη η σίγαση Mute Απενεργοποιήστε τη σίγαση Mute Υπάρχει ήχος αλλά όχι εικόνα Δεν έχει συνδεθεί σωστά το καλώδιo HDMI ή SCART Ελέγξτε τη σύνδεση του καλωδίου HDMI ή SCART Έχει χαθεί ο 4ψήφιος κωδικός Χρησιμοποιήστε τον κωδικό Power PIN 1006 Ο δέκτης δεν ανταποκρίνεται στις εντολές του τηλεχειριστηρίου Οι μπαταρίες έχουν εξαντληθεί Αντικαταστήστε τις μπαταρίες Η απόσταση του δέκτη με ...

Page 19: ...ΔΙΑΜΟΡΦΩΣΗ ΕΞΟΔΟΣ ΒΙΝΤΕΟ INPUT RATE MAX 48Mbit s ΔΥΝΑΤΟΤΗΤΑ ΕΝΑΛΛΑΓΗΣ 4 3 16 9 AUTO HDMI CVBS QPSK 16QAM 64QAM 256QAM MPEG 2 MP HL H 265 HEVC AVC H 264 HP L4 1 MPEG 4 ASP SUPPORTED MPEG 1 Layer 1 2 PCM HE AAC V1 0 ICE958 SPDIF ΧΑΡΑΚΤΗΡΙΣΤΙΚΑ Ο Σχεδιασμός και τα Χαρακτηριστικά μπορούν να αλλάξουν χωρίς προειδοποίηση ΣΥΝΔΕΣΕΙΣ TUNER ΕΙΣΟΔΟΣ ΚΕΡΑΙΑΣ x1 ΕΞΟΔΟΣ LOOP x1 ΤΡΟΦΟΔΟΣΙΑ ΣΗΜΕΙΩΣΗ HDMI ΕΞΟΔΟΣ H...

Page 20: ...1 Ελληνικά 17 directives 2014 53 EU 107 2009 EC 2014 35 EU ...

Page 21: ...English Read this manual before installation and use USER MANUAL Digital Receiver DVB T2 H 265 HEVC USB DIGITAL RECEIVER DVB T2 H2 65 HEVC ...

Page 22: ...let before cleaning Do not use liquid cleaners or aerosol cleaners Use a damp cloth for cleaning Objects that may touch dangerous voltage points or short out parts could result in a fire or electric shock Never spill liquid of any kind on the product Lightning For added protection for this product during a lightning storm or when it is left unattended and unused for long periods of time unplug it ...

Page 23: ...Auto Scan 6 Channel Scan 6 LCN 6 SYSTEM SETUP Language 7 TV System 7 Local Time Setting 8 Timer Setting 8 Parental Lock 8 OSD Setting 9 Favorite 9 Audio Description Setting 9 Other 9 TOOLS Information 10 Factory Setting 10 S W Upgrade by OTA 11 Upgrade by USB 11 Save Load Channels to from USB 11 Backup Firmware 12 Remove USB device safely 12 MEDIA PLAYER Media Player 13 PVR storage Information 14 ...

Page 24: ...dby Channel Up Down Remote sensor Indicator USB port 1 2 3 4 5 Rear panel ANT IN ANT OUT HDMI Output TV Scart 2 1 3 4 Side panel DC Input 1 HDMI SCART ANT OUT ANT IN 5V 2A 1 2 3 4 1 USB DIGITAL RECEIVER DVB T2 H2 65 HEVC 1 2 3 4 5 INTRODUCTION ...

Page 25: ...ns ON OFF the sound 20 INFO Current channel information 24 RECALL Switches to previous channel 6 Red button Switch between TV and Radio Green button Subtitle ON OFF Yellow button TELETEXT Blue button AUDIO mode 7 EPG 8 OK button Confirms a selection Learning Function buttons The remote control of the receiver has 4 learning function buttons In every button can be copied the function of some button...

Page 26: ... will see some of the most common ways to connect your equipment NOTE 1 Do not plug unplug HDMI connector while the receiver is powered on 2 Power indicator will turn green when the receiver is powered on and turn red when the receiver is in Standby mode HDMI cable RF cable DC power Antenna TV Scart cable HDMI SCART ANT OUT ANT IN 5V 2A NOTE ...

Page 27: ...preview of your current channel will be displayed in the top right corner of the screen Press UP or DOWN button to select the desired channel Press LEFT or RIGHT button to select the desired programme Press GREEN button to set the timer to the programme Press RED button to show the Time bar menu You can select the way showing time and move time by pressing OK button Press the OK button to display ...

Page 28: ...fault password is 0000 Then the selected Channel will be locked Press Green button to activate Skip function Press OK button to skip the desired channel Press Yellow button to activate Move function Highlight the desired channel and press OK button to confirm Press UP or DOWN button to select the new position and press OK button The channel will be moved to the new position Press Blue button to en...

Page 29: ... number of TV channels by scanning This menu allows you to activate disactivate the LCN function The defaul value is Off Channel Scan menu allows you to set up manual channel scan Select Channel Scan and press the OK button to enter to the Channel Scan menu Press cursor button to set Scan mode Scan Band Channel No Frequency Bandwidth and Network search Highlight Search and press OK button to scan ...

Page 30: ...V System Video Resolution Aspect Mode Digital Audio Out Set up Various video resolutions If you are using HDMI output connection the default value is 1080i 50HZ If you are using SCART output connection the default value is 576i Auto 4 3PS 4 3LB 16 9 The default value is Auto BS Out LPCM Out The default value is LPCM Out System Setup Language TV System Local Time Setting Timer Setting Parental Lock...

Page 31: ... 30 12 00 increasing every half hour progressively Summer Time On Off the Summer Time The default value is On Date Time Date and Time menus are valid only when selected Off in GMT Usage menu Press numeric buttons to set the Date Time SYSTEM SETUP Local Time Setting Region GMT Usage GMT Offset Summer Time Date Time Johannesburg Harare Sofia Athens Tallinn Helsinki Bucharest Minsk Istanbul Kyiv Odes...

Page 32: ... power stop The default value is Restart to Last Channel 1 2 3 4 5 6 7 8 This menu allows you to rename the favorite group Favorite In System Setup menu select Favorite and press OK button to enter to the Favorite menu Select the favourite group you want to change and press OK button to open the keypad Input letter and numeric one by one by pressing the cursor buttons and press OK button to select...

Page 33: ...existed channels In the Tools menu select Factory Setting and press OK button You will be asked to input the password the default password is 0000 1 2 A confirmation window is displayed Select Yes to reset back to factory settings and clear all channels Select No to cancel factory settings Press EXIT button to exit Factory Setting menu 3 Displays Information about the Model Name Video Decoder Firm...

Page 34: ... the upgrade confirm the date of the new firmware by pressing Menu Tools Information This option allows you to save load your Channel List to from USB Scan the channels and sort them with the remote control on your desired position Insert a USB stick in the USB port of the receiver Then press Menu Tools Upgrade By USB and press OK In this window select Upgrade Mode Save Channels to USB Below you c...

Page 35: ...want to Backup the current firmware the channels in the desired position and the settings that you have chosen then follow the below process Press Menu Tools Upgrade By USB and press OK In this window select Upgrade Mode Backup Software to USB Below is created automatically a file BackupDateTime abs At the below option Start press OK The process will finish in a few seconds so now we have created a B...

Page 36: ... to switch TAB between Music Image Video PVR Press to sort the files of the current directory by Name Time Size Favorite Press to set repeat mode Repeat Folder Random Folder Repeat One Return to the upper directory RED button GREEN button YELLOW button BLUE button 1 button 2 button INFO button EXIT button Image Press to show and edit the Play List Press to set the selected file to Favourite list P...

Page 37: ... This menu can display some parameters of the external USB device 1 2 Press to set format option FAT NTFS The default value is FAT Press to set DVR Type REC TMS Record Timeshift The default value is REC TMS YELLOW button BLUE button This menu allows you to set the PVR Settings PVR Setting In Media Player menu select PVR Setting and press OK button to enter PVR Setting menu Press UP or DOWN button ...

Page 38: ...ording Trickmodes During the playback it is possible to perform the following actions Press PAUSE button to pause the playback Press FORWARD button to fast forward the playback Press BACKWARD button to rewind the playback Stop the Time Shift Press STOP button to stop TimeShift Plugging an external Mass Storage Device on the USB port gives you access to Time Shift Record a programme Pause a program...

Page 39: ...enna is disconnected Antenna is damaged misaligned Out of digital signal area Scart or HDMI cable is not connected on your TV Remote control batteries exhausted Remote control is not aim correctly Check the power cord Ask the dealer for service Connect the antenna Check the antenna Check with channel provider Connect the Scart or HDMI cable Replace remote control batteries Aim the remote control a...

Page 40: ...LATION VIDEO OUTPUT INPUT RATE MAX 48Mbit s 4 3 16 9 SWITCHABLE HDMI CVBS QPSK 16QAM 64QAM 256QAM MPEG 2 MP HL H 265 HEVC AVC H 264 HP L4 1 MPEG 4 ASP SUPPORTED MPEG 1 Layer 1 2 PCM HE AAC V1 0 ICE958 SPDIF SPECIFICATIONS 1 English 17 Design and Specifications are subject to change without notice CONNECTION TUNER ANTENNA INPUTx1 LOOP OUTPUT x1 POWER SUPPLY NOTE HDMI HDMI OUTPUT x1 DC INPUT 5V 2A D...

Page 41: ...SPECIFICATIONS 1 English 18 directives 2014 53 EU 107 2009 EC 2014 35 EU ...

Page 42: ......

Reviews: