background image

Menu Operations

Lock Menu Options Continued 

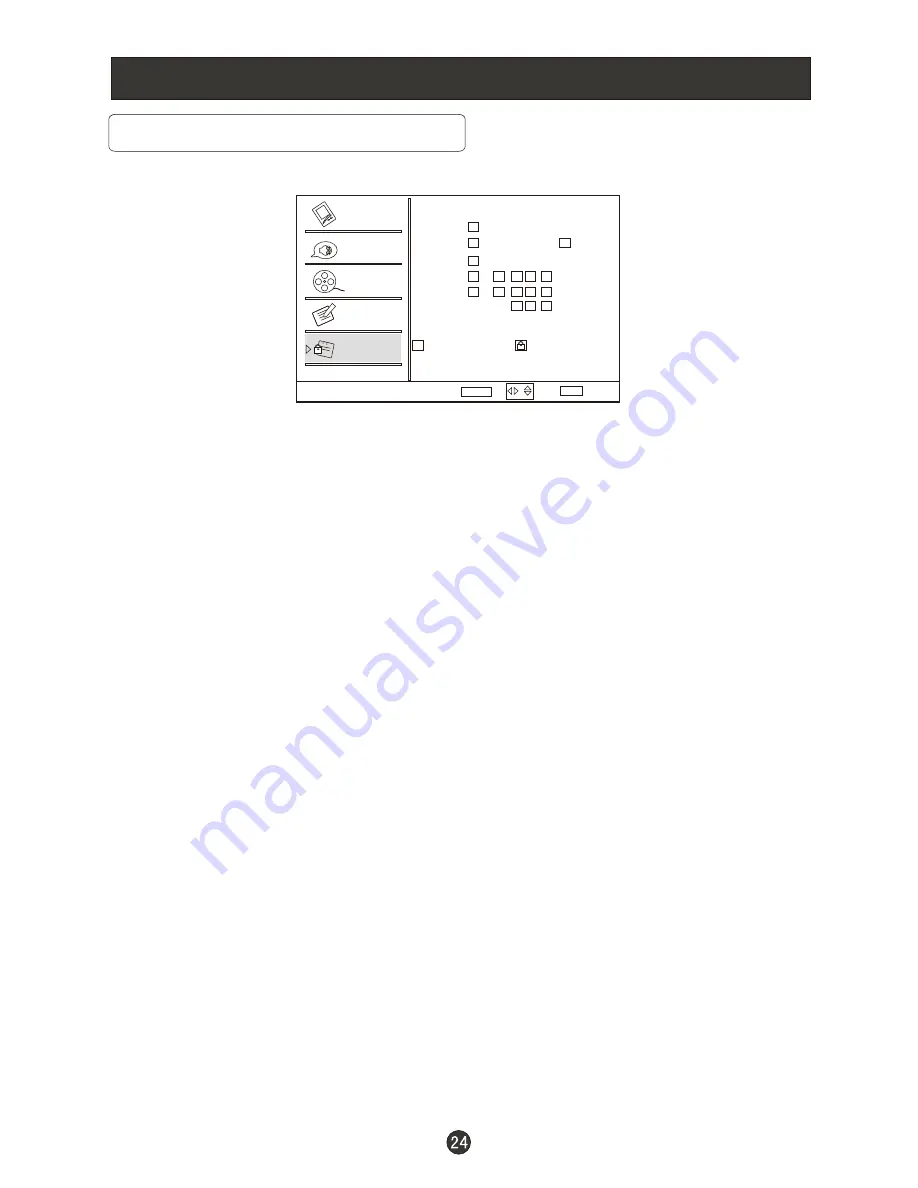
U.S. TV  Program Ratings

TV-Y

:   For all children - these types of rated programs are designed for a very young

             audience, including children from ages 2-6.

TV-Y7

: Directed towards older children - this type of rated programs may include 

            comedic violence of mild physical, or may frighten children under the age of 7.

TV-G

:   General audience - these types of rated programs contains little or no

             violence, no strong language, and little or no sexual dialogue and situations.

TV-PG

:Parental Guidance Suggested-this type of rated programs may contain

             limited violence, some suggestive sexual dialogue and situations, and rare
             language.

TV-14

: Parents strongly cautioned-these types of rated programs may contain sexual

             content, strong language and more intense violence.

TV-MA

:Mature audience only these types of rated programs may contain sexual

             violence, explicit sexual content and profane language.

(A)

All: Blocks all available sub_ratings.

(

D

)Dialogue:   This type of rated programs contain dialogue with sexual content.

(

L

)Languag:  This type of rated programs contain offensive language.

(

S

)Sex: This type of rated programs contain sex.

(

V

)Violence: This type of rated programs contain violence.

(

FV

)Fantasy Violence :  This type of rated programs contain Fantasy and cartoon 

violence.

   
TV-Y
TV-Y7
TV-G
TV-PG
TV-14
TV-MA

A      D   L  S  V  FV

Allowed Rating

Blocked Rating

Parental Guide

Select

Back

EXIT

Video

Audio

Channel

Lock

Function

Set

ENTER

/

Summary of Contents for L1949

Page 1: ...Please read this manual carefully before using this TV set and keep it for future reference L1949 Thank you for choosing Legend Need help fast Legend LEGEND 24 Hours a Day 7 Day a Week ...

Page 2: ...within an equilateral triangle is intended to alert the user to the presence of important operating and maintenance servicing instructions in the literature accompanying the appliance WARNING TO PREVENT FIRE OR SHOCK HAZARD DO NOT EXPOSE THIS APPLIANCE TO RAIN OR MOISTURE CAUTION TO PREVENT ELECTRIC SHOCK DO NOT USE THIS POLARIZED PLUG WITH AN EXTENSION CORD RECEPTACLE OR OTHER OUTLET UNLESS THE B...

Page 3: ...he cart stand tripod bracket or table specified by the manufacturer or sold with the apparatus When a cart is used use caution when moving the cart apparatus combination to avoid injury from tip over 12 Unplug this apparatus during lightning storms or when unused for long periods of time 13 Refer all servicing to qualified service personnel Servicing is required when the apparatus has been damaged...

Page 4: ... Channel You Want Picture Mode Audio Mode Sleep GUIDE ARC button Button CH LIST button FAVORITE button Menu Operations Video Menu Options Video Menu Options Continued Audio Menu Options Audio Menu Options Continued Channel Menu Options Channel Menu Options Continued Function Menu Options Function Menu Options Continued Lock Menu Options Lock Menu Options Continued PC Menu Options PC Menu Options C...

Page 5: ...ning this machine To your safety and extend the life span of LCD TV please read the following items carefully before using l Please read and understand all the instructions before operation l l l Please comply with the instructions provided l Please do not use additional devices that are not recommended by manufacturer l l Do not place the unit on unstable dusty and humid places l Never put the un...

Page 6: ...Left button to adjust the item in the OSD VOL Volume up Right button to adjust the item in the OSD Press to enter 5 CH TV channel down to select the item in the menu CH TV channel up to select the item in the menu 6 Power indicator 7 Remote Sensor Receivers IR signals from the remote control Do not put anything near the sensor which may block the remote control signal INPUT MENU VOL VOL CH CH POWE...

Page 7: ... Video device to the jacks 5 Audio in Connect audio output from an external device to these jacks 6 Video in Connect video output from an external device to this jack 7 USB input Connect a USB flash drive to view JPEG images or listen to MP3 songs 8 VGA Connect to the VGA 15PIN analog output connector of a PC graphics card to use set as a PC display 9 PC audio in Connect the audio output from the ...

Page 8: ...television set As strong light may interfere with the signals change your position to operate the remote control if the television cannot be turned on or off as expected Keep the remote control away from heat sources or humid areas to ensure effective performance of the remote Make sure that two AA1 5V or AAA depending up the model alkaline batteries are loaded The batteries must be of the same ty...

Page 9: ...SB PLAY PAUSE 10 USB fast reverse 11 USB fast forward 12 Press to display the TV status information on the top of the TV screen 13 Shows program schedule in TV 14 Press to turn on and off the TV 15 Press to cycle through different sound settings 16 Press to display the sleep timer option 17 Select MONO STEREO SAP in NTSC system 18 Press to change a channel 19 Press to select digital channels For e...

Page 10: ...e bronze wire when connecting the antenna Bronze Wire Turn clockwise to tighten RF coaxial wire 75 ohm To improve picture quality in a poor signal area purchase and install a signal amplifier If the antenna needs to be split for two Tvs install a 2 Way Signal Splitter in the connections If the antenna is not installed properly contact your dealer for assistance NOTE Cables shown are not included w...

Page 11: ... be noise associated with the resolution vertical pattern contrast or brightness in PC mode If noise is present change the PC mode to another resolution change the refresh rate to another rate or adjust the brightness and contrast on the menu until the picture is clear If the refresh rate of the PC graphic card can not be changed change the PC graphic card or consult the manufacturer of the PC gra...

Page 12: ...g the TV to VCR match the jack colors Video yellow Audio Left white and Audio Right red If you connect an S VIDEO output from VCR to the S VIDEO input the picture quality is improved compared to conne cting a regular VCR to the Video input 2 Insert a video tape into the VCR and press PLAY on the VCR Refer to the VCR owner s manual 3 INPUT To avoid picture noise interference leave an adequate dista...

Page 13: ...to the TV input jacks as shown in the figure When connecting the TV to a Cable Box match the jack colors Video yellow Audio Left white and Audio Right red 2 Select the input source by using the INPUT button on the remote control 3 Select your desired channel with the remote control for cable box External Component Source Setup How to connect Connect the audio and video cables from the external equ...

Page 14: ... number will appear On screen indicating the volume level Mute 1 Press MUTE button to mute the sound temporarily A mute icon Appears on the screen 2 Press MUTE button or VOL again to restore the sound The mute icon disappears Change the picture source so you can watch your TV VCR DVD Cable or any other devices that are connected to your TV 1 Press INPUT button to enter the Select Source menu and t...

Page 15: ... time Off This function allows you to turn off the television after a pre selected minutes 5 Min 10 Min 15 Min 30 Min 45 Min 60 Min 90 Min 120 Min 180 Min 240Min number of GUIDE only available in digital signal Press GUIDE button in digital channels to display Guide menu This menu is just for you to see the information and can not be changed Press CH CH to select information for you to look over O...

Page 16: ...ton to select the channel you desired FAVORITE button Adding favorite channels Press FAVORITE under one channel The favorite channel list opens Press CH or CH to select a blank box then press Enter to confirm The channel will be added to the favorites channel list Press Enter again the channel will be removed from the favorites channel list Tuning to a favorite channel Press FAVORITE The favorite ...

Page 17: ...tely The picture quality on the screen can be adjusted as follows 1 Press MENU button and until the following menu appears on the screen 2 Press ENTER button to enter the menu function and to scroll up and down to select the desired function 3 Press ENTER button to confirm and increase and decrease the level to adjust the selected option to your preference 4 Repeat step 2 and step 3 until desired ...

Page 18: ...crease or decrease Warm red and Cool blue colors to suit personal preferences Select Cool to give the white colors a blue tint Standard to give the white colors a neutral tint Warm to give the white colors a red tint Custom to allow you change the color manually Contrast Brightness Sharpness Color Temperature and Tint can only be adjusted when Mode in Custom mode Advanced Video To adjust the pictu...

Page 19: ...se or decrease the level of the lower pitched sounds Treble Press button and ENTER to confirm then press to increase or decrease the level of the higher pitched sounds Sound surround To turn the simulated surround sound on and off Mode Press ENTER to select the type of sound which best corresponds to your lightning requirements by selecting Mode in Audio menu Equalizer To adjust the equalizer Off ...

Page 20: ...nal sound signal as well as the original one When having selected SAP button on the remote control this TV can only receive the signal when the TV station transmits the proper signals Mono sound is automatically received if the broadcast is only in Mono even though Stereo or SAP has been selected Select Mono if you want to listen to mono sound during stereo SAP broadcasting Stereo or SAP can be re...

Page 21: ... to start to scan press EXIT to cancel All channels now available will be automatically preset in order After the search has finished the first program number will display on the screen This search automatically adds only the active channels in your area to the TV s memory It deletes any channels on which there is no broadcast or a poor signal The channels found are automatically saved Channel Cha...

Page 22: ...that you want to change afterward press INPUT to input the numbers and symbols and button to confirm Channel Skip Press button to enter the submenu then press to select the channel number eg 2 and press to confirm a mark will be display in the pane as follows and this channel will be skipped next time you press but you can press digits button to select the channel If you want to resume the channel...

Page 23: ...ong Low High and Middle to change the transparency of the OSD To select Low the OSD is opacity Screen Mode Press to select among Normal Wide Zoom and Cinema to change the display mode display mode may differ from different inputs Blue Screen Press to select On the screen will be in blue after 3 seconds if there is no signal DPMS PC Power Management To set On the set will be in standby mode automat...

Page 24: ...o mode on the time can not be adjusted Select Off you can operate to set the time manually Date Press to select the position and digits button to set the date Time Press to select the position and digits button to set the time Timer Press to select On or Off To select Off the time can not be adjusted On Time Off Time Press to select the position and digits button to set the time Closed Caption Pre...

Page 25: ...or full translation of the primary language such as English in your area Select CC2 for secondary language translation such as French or any other language that may be broadcast in your area DTV Caption Press to select Service1 Service2 Service3 Service4 Service5 Service6 Off DTV Caption Style Press ENTER to enter the submenu DTV Caption Style Style Size Text Color Text Opacity BG Color BG Opacity...

Page 26: ... the parameter will return to the factory set Are you sure OK Cancel Lock Menu Options Lock Enter Password Back EXIT Video Audio Channel Lock Function 1 Press MENU button and until the following menu appears on the screen 2 Press ENTER to enter and then press digits button to input the digits The initial password is 0000 If you forget your password you can always input 9443 to regain control The m...

Page 27: ...Program Block Press ENTER to enter the submenu as follows Program Block Parental Lock Parental Guide MPAA Rating CA Eng Rating CA Fren Rating Block Unrated Select Back EXIT Video Audio Channel Lock Function On On Parental Lock Press to select On or Off Used to lock all the system following To set Off the system following can not be available Parental Guide Press ENTER to enter the submenu as follo...

Page 28: ...gue and situations and rare language TV 14 Parents strongly cautioned these types of rated programs may contain sexual content strong language and more intense violence TV MA Mature audience only these types of rated programs may contain sexual violence explicit sexual content and profane language A All Blocks all available sub_ratings D Dialogue This type of rated programs contain dialogue with s...

Page 29: ...of movie rating means all ages admitted to see the movie PG Parental guidance suggested Some material may not be suitable for children PG 13 Parents Strongly Cautioned this type of movie rating means some material may not be appropriate for children under13 R Restricted This type of movie rating means children under 17 of age require to be with parent or guardian NC 17 This type of movie rating me...

Page 30: ...some material may not be suitable for children 14 In these types of rated programs some content may not be suitable for viewers under the age of 14 Parents are strongly cautioned not to have their children view 14 rated programs by pre teens and early teens 18 Adults Only these types of rated programs are only for adult viewers only CA Fren Rating Press ENTERto enter the submenu as follows Press t...

Page 31: ...rograms are only for adult viewers only Blocked Unrated Press to select On or Off Used to lock all the channel not rated Password Press ENTER to enter the submenu press digits button to input the number of 0 9 twice in the New Password and Confirm Password Then you can change the password when you input the same number twice Clean All Press ENTER to enter the submenu Are you sure OK Cancel Press t...

Page 32: ...ble options for the best viewing configuration H Position Press button and then press to adjust the horizontal position of the picture V Postion Press button and then press to adjust the vertical position of the picture Phase Press and then press to adjust the phase of the picture Clock Press button and then press to adjust the clock of the picture Video Audio Lock Function Video Mode Custom Brigh...

Page 33: ...he market If a nonstandard device is used then an identification problem may occur USB Input To play pictures 1 Press USB button on the remote to enter stream media system The system start up takes about 3 seconds Then insert the USB drive in the USB input 2 Press button to select Picture folder Press ENTER to enter 3 Press button to select desired picture and then press ENTER button to enter the ...

Page 34: ...c together Insert USB drive with music and picture files in to the USB input select the Music folder and choose the MP3 files to be played Then select the pictures to be played Please note as some files must be read while music is being played the speed of picture operation response might be affected 1 Press button to select Music folder Press ENTER to enter 2 Press button to select desired music ...

Page 35: ...ply is interrupted No sound Press MUTE button and verify if Mute mode is on Switch to another channel and verify if the same problem happens Press VOL button to see if the problem can be solved Poor sound Verify if sound system is functional Refer to chapter on adjusting No picture in some channel Verify if correct channel is selected Adjust the antenna No color for some channel program black and ...

Page 36: ... PC audio input YPbPr input Antenna input HDMI input USB input 120V 60Hz NTSC ATSC Clear QAM Working 5 35 Storage 15 45 Power consumption Model Remote control Batteries User manual Warranty card NOTE Design and specifications are subject to change without notice Dimensions quoted in this manual are approximate Humidity Working 20 80 Storage 5 90 50W 19 ...

Page 37: ...V0 1 0090509107 ...

Reviews: