background image

15

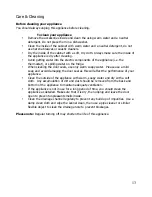
9. 

Interchange positions of plugs and bushings on both

doors. (ie.door plug right side, door bushing left side.)

8. 

Remove the door plugs and door bushings located on

the top and bottom of each door assembly.

7. 

Re-install the top hinge pin on the opposite side of

the cabinet. (Fig.C)

CAUTION: To avoid personal injury to yourself and/or
property, we recommend someone assist you during the

door reversal process.

10. 

Re-install freezer door assembly on cabinet.

5. 

Remove the screws from the middle hinge assembly.

Then remove the hinge and freezer door.

4. 

Remove the main door assembly from the refrigerator

cabinet (open door and pull down).

3. 

Remove the screws holding the lower hinge assembly to

the cabinet. (Fig.A)

2. 

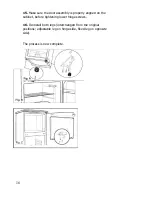
Remove both legs located at the front of the cabinet;

adjustable leg on hinge side, fixed leg on opposite side (Fig.A)

1. 

To access the lower hinge assembly, tilt back the

refrigerator cabinet or lay the refrigerator on its back.

6.

 Remove the top hinge pin. (Fig.C)

12. 

Make sure the door assembly is properly aligned on the

cabinet, before tightening hinge screws.

13. 

Re-install the main door assembly on cabinet.

11. 

Re-install the middle hinge assembly on the

opposite side. (Fig.B)

14. 

Re-install the lower hinge assembly on the opposite side.

Making sure to change bushing and screw on opposite sides
on bottom of unit.

Reversing the doors

Warning: The appliance must always be disconnected
from the power supply when changing the direction the
doors open.

Summary of Contents for T50082W

Page 1: ...CO BY PART NO 50200101B622 STANDARD PART NAME LEC T50082W CE BCD88 S seller REL REV NO g WEIGHT scale MATERIAL 80g AUTHORIZE 0 1 1 TOTAL SHEETS NO OF SHEETS MIDEA REFRIGERATION DIVISION 1 32K 2 3 MARK...

Page 2: ...USER GUIDE T50082W...

Page 3: ...ve endeavoured to answer as many questions as possible and provide you with as much support as we can If however you should find something missing or not covered please contact the Lec Customer Care t...

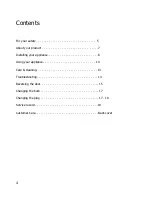
Page 4: ...ty 5 About your product 7 Installing your appliance 8 Using your appliance 10 Care cleaning 13 Troubleshooting 14 Reversing the door 15 Changing the bulb 17 Changing the plug 17 18 Service record 19 C...

Page 5: ...Packaging All of the packaging supplied with your appliance can be recycled or disposed of without any harm to the environment Cardboard may be crushed or cut into smaller pieces if required for recy...

Page 6: ...he refrigerator Never store alcohol in a freezer When cleaning the appliance never use sharp or pointed metal implements Always use a plastic scraper Always keep any ventilation openings clear of obst...

Page 7: ......

Page 8: ...in any unheated rooms garages outhouses etc as the ambient temperature affects the performance of the appliance Do not expose the appliance to damp conditions open air or rain Do not lift the applianc...

Page 9: ...oth Leave the appliance to stand for 2 3 hours to allow the refrigerant to settle following installation and cleaning If the appliance has been transported horizontally it must be left to stand vertic...

Page 10: ......

Page 11: ...wed to drip onto other foods Food which is to be frozen should not be in direct contact with already frozen food You may hear gurgling noises or a humming sound while the appliance is in use and this...

Page 12: ...position and disconnect the power supply Remove the frozen food from the appliance and place it in a cooler to protect the food Leave the door open for a while so that you can easy scrape off the fros...

Page 13: ...only warm soapy water Please use a mild soap and avoid damaging the door seal as this will affect the performance of your appliance Clean the outside of the appliance with warm soapy water and dry wi...

Page 14: ...pressor to run for some time Check that the thermostat is set to a suitable temperature Check that the appliance is not in direct sunlight or near a heating source Check that the ventilation space has...

Page 15: ...down 3 Remove the screws holding the lower hinge assembly to the cabinet Fig A 2 Remove both legs located at the front of the cabinet adjustable leg on hinge side fixed leg on opposite side Fig A 1 T...

Page 16: ...interchanged from the original positions adjustable leg on hinge side fixed leg on opposite side The process is now complete 15 Make sure the door assembly is properly aligned on the cabinet before ti...

Page 17: ...ply voltage is the same as that indicated on the appliance rating plate The appliance is supplied with a 13 amp plug fitted In the event of having to change the fuse in the plug supplied a 13 amp ASTA...

Page 18: ...Note Figures in the user manual are only for reference The actual product may differ slightly...

Page 19: ......

Page 20: ...20 Lec Refrigeration Stoney Lane Prescot Merseyside L35 2XW Customer Care Centre 0844 815 3737 www lec co uk Lec Refrigeration a division of Glen Dimplex Home Appliances Model name T50082W...

Reviews: