Lec INT800LA User Manual Download Page 6

EN

5

• 

This appliance is not intended for use 

by persons (including children) with 
reduced physical, sensory or mental 
capabilities, or lack of experience 
and knowledge, unless they have 
been given supervision or instruction 
concerning use of the appliance by a 
person responsible for their safety. 

• 

Children should be supervised to 

ensure that they do not play with the 
appliance.

Electrical Requirements 

• 

Before you insert the plug into the 

wall socket make sure that the 
voltage and the frequency shown on 
the rating plate inside the appliance 
corresponds to yourelectricity supply.

• 

Rating label is on the left hand side of 

fridge inner liner.

• 

We recommend that this appliance 

be connected to the mains supply via 
a suitable switched and fused socket. 
The appliance must be positioned so 
that the plug is accessible.

• 

Should the mains lead of the 

appliance become damaged or 
should it need replacing at any time, 
it must be replaced by a special 
purpose made mains lead which 
can only be obtained from a 

LEC


Authorised Service Agent.

Warning! This Appliance 

Must Be Earthed

• 

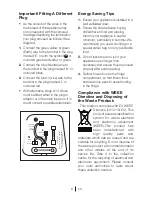
 If the fitted moulded plug is not 

suitable for your socket, then the plug 
should be cut off and an appropriate 
plug fitted. Destroy the old plug 
which is cut off as a plug with bared 
cord could cause a shock hazard if 
inserted into a socket elsewhere in 
the house.

• 

The moulded plug on this appliance 

incorporates a 13 A fuse. Should 
the fuse need to be replaced an 
ASTABEAB approved BS 1362 fuse 
of the same rating must be used. Do 
not forget to refit the fuse cover. In the 
event of losing the fuse cover the plug 
must not be used until a replacement 
fuse cover has been fitted. 

• 

Colour of the replacement fuse cover 

must be the same colour as that 
visible on the pin face of the plug. 
Fuse covers are available from any 
good electrical store.

Summary of Contents for INT800LA

Page 1: ...USER GUIDE INT800LA...

Page 2: ...endeavored to answer as many questions as possible and provide you with as much support as we can If however you should find something missing or not covered please contact the Lec Customer Care team...

Page 3: ...refrigerator 8 Before operating your refrigerator 8 Disposing of the packaging 9 Disposing of your old refrigerator 9 Placing and Installation 9 Placing the refrigerator under the counter and adjustin...

Page 4: ...it vegetables salads 4 Tubes small bottles and cans 5 Egg tray 6 Butter cheese dairy products 7 Beverages large bottles C The figures in this manual are schematic and they may not be in exact accordan...

Page 5: ...ge do not expose the appliance to fire or potential ignition source and immediately ventilate the room where the appliance is situated We suggest you contact your local authority for disposal informat...

Page 6: ...cessible Should the mains lead of the appliance become damaged or should it need replacing at any time it must be replaced by a special purpose made mains lead which can only be obtained from a LEC Au...

Page 7: ...alled in a well ventilated area 2 Ensure the time between buying chilled frozen food and placing them in your appliance is kept at minimum particularly in summer We recommend you use a cool bag or a s...

Page 8: ...als specified in the Directive Package information Packaging materials of the product are manufactured from recyclable materials in accordance with our National Environment Regulations Do not dispose...

Page 9: ...Please install the 2 plastic wedges as illustrated in the figure Plastic wedges will provide the required distance between your refrigerator and the wall in order to allow the air circulation The illu...

Page 10: ...rator cut out the electric plug and if there are any locks on the door make them inoperable in order to protect children against any danger Placing and Installation A If the entrance door of the room...

Page 11: ...ance of your refrigerator does not decrease 140 cm2 If your refrigerator is unstable You may turn the front legs of your refrigerator as seen in the figure and make it stay balanced The corner of the...

Page 12: ...cal electrical store and then fit it as follows 1 Switch off at the socket outlet and pull out the mains plug You may find it useful to remove shelves for easy access 2 Remove the light diffuser cover...

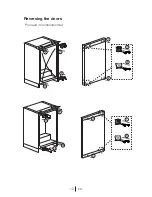
Page 13: ...EN 12 Reversing the doors Proceed in numerical order...

Page 14: ...make sure that the interior of your refrigerator is cleaned thoroughly If two refrigerators are to be installed side by side there should be at least 2 cm distance between them When you operate your r...

Page 15: ...a Some sections of the fridge may be cooler or warmer such as the salad crisper and the top part of the cabinet which is quite normal Over ambient temperatures of 25 C 77 F especially in summer turn t...

Page 16: ...ove the droplets which have refrozen If at any time the defrost water does not drain from the collection channel check to ensure that no food particles have blocked the drain tube The drain tube can b...

Page 17: ...EN 16 Installat on Instruct ons Deta led Step By Step...

Page 18: ...EN 17...

Page 19: ...EN 18 Note For installation Step 1 the screws for the top plastic part should not be tightened fully to allow side to side adjustment...

Page 20: ...EN 19...

Page 21: ...EN 20...

Page 22: ...EN 21...

Page 23: ...ot going to be used for a long period of time unplug the power cable remove all food clean it and leave the door ajar C Check door seals regularly to ensure they are clean and free from food particles...

Page 24: ...ntainers Leaving the door ajar Switching the thermostat to a colder degree Decreasing the time the door left open or using it less frequently Covering the food stored in open containers with a suitabl...

Page 25: ...refrigerator to run for a longer period of time in order to maintain the current temperature Freezer temperature is very low while the fridge temperature is sufficient The freezer temperature is adjus...

Page 26: ...mal and not a fault Doors might have been left ajar make sure that the doors are closed fully Doors might have been opened frequently or left ajar for a long time open them less frequently Humidity oc...

Page 27: ...nd will help more and us to help you quickly efficiently When contacting us please use the Customer Care number on the back cover of this handbook Model Number Serial Number Date of purchase Installer...

Page 28: ...Lec Refrigeration Stoney Lane Prescot Merseyside L35 2XW Customer Care Centre 0844 815 3737 www lec co uk Lec Refrigeration a division of Glen Dimplex Home Appliances 57 3096 0000 AB...

Reviews: