Learn & Climb STAY IN BED User Manual Download Page 8

8

SETTING THE STAY IN BED LIGHT

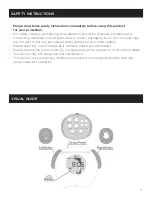
1.  After pressing the “Alarm” button in the previous steps, the alarm time 

will be displayed at the top of the screen, with “OFF” in the center of the 
display.

 (See Image 8.)

2.  Press the “Light Adj.” button to turn on the stay in bed light alarm. The 

Stay in bed alarm time will be shown in the center of the display. Note: 
This is the time in which you would like the clock to light up (Red) to let 
your child know that it is still too early to get out of bed.

3.  Push the “Hour & Min” buttons to set the time for the stay in bed light to turn on.
4.  Push the “Big on the left hand side of the clock to select what color you want the clock 

to light up for the stay in bed light alarm. (There are 3 color options: Orange, Red, and 
Purple; Green was already used by Ok to come out of bed.)

5.  Once the time and color have been set push the “Alarm” button. Now both the “Ok to 

come out of bed”, and the “Stay in bed in light” alarms have been set. The current time 
will be displayed in the center of the display with the “ok to come out of bed alarm time 
shown above the current time. • Note: The stay in bed alarm and light will be saved, you 
will not see it on the screen. If you go back into Alarm setting to check, your stay in bed 
time setting will be erased and you will need to reprogram the timing.

SILENCING THE ALARM AND SNOOZE FUNCTION

When the alarm goes off you have two options
1.  Turn the alarm ???????? “Big Bell button” on the clock’s right side.
2.  To Snooze the alarm, press the “Big Light Bulb Button” on the clocks left side, this 

snooze the alarm for 10 minutes. To Cancel a snooze at any time, press the “Big Bell 
Button” on the clocks right side

TURNING OFF THE ALARM SETTINGS

The "OK to Come out of bed” and the “stay in bed light alarm” can both be turned off 
completely so there is no alarm, or the stay in bed light alarm can be turned off leaving the 
OK to come out bed alarm still active.

TURNING OFF ALL ALARM SETTINGS

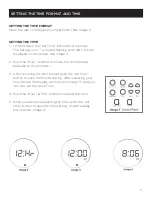
1.  Open the cover to the Control Panel and press the “Alarm” Button. The 

the “ and the alarm time at the top of the display will disappear, and the 
current time will be shown in the middle of the display. 

(See Image 9)

2.  Now all alarms have been turned off, to turn the alarms back on simply 

press the alarm button again. The     the     and the alarm time at the top 
of the display will reappear. The Alarm is turned back on now.

8

NOTE: If Alarm button is held down for more than a brief second, it will lose the saved 

alarm settings.

Summary of Contents for STAY IN BED

Page 1: ...1 USER MANUAL STAY IN BED L I G H T C L O C K ...

Page 2: ...more time to sleep The Stay in Bed clock can also be a Night light when your little one is sleeping You will find the Stay in Bed clock useful for kids to learn time and wake up at the right time SAFETY INSTRUCTIONS pg 3 VISUAL GUIDE pg 3 WHAT S INCLUDED pg 4 SETUP pg 4 SETTING THE TIME FORMAT AND TIME pg 5 NIGHT LIGHT SETTING pg 6 AUTO OFF FUNCTION pg 6 ...

Page 3: ...as tape plastic sheets packaging locks wire ties and tags are not part of this toy and should be discarded for your child s safety Please keep this user s manual as it contains important information Please protect the environment by not disposing of this product with household waste This device may not cause harmful interference This device must accept any interference received including interfere...

Page 4: ...unit and open it with a small Philips screwdriver 2 Insert 3 AA batteries as illustrated 3 Replace the battery cover and tighten the screw USING THE USB POWER CABLE 1 Take the supplied USB Power cord and plug it into the Power port on the back of the clock 2 Insert the other end of the USB Power Cable into a USB Power Supply not included and then insert into a regular 120V Outlet Once the batterie...

Page 5: ...een See Image 2 2 Push the Hour button to choose the clock format between 12 Hr and 24 Hr 3 After choosing the hour format push the set time button to save the format setting After selecting your hour format the display will look like Image 3 and you can now set the clock Time 4 Push the Hour Min buttons to adjust the time 5 Once you are done adjusting the time push the set time button to save the...

Page 6: ...e increments SETTING THE AUTO OFF Hold Down the Auto Off button for 2 seconds The icon will flash and Off will be displayed on the screen By default the Auto Off Function is off and the night light will stay on all night Push the Min buttons to select the length of time in 15 min increments that you want the night light to stay on before turning off Once the amount of time for the auto off functio...

Page 7: ...t you can adjust the brightness of light by pressing the Light Adj button there are 3 brightness levels 7 Once the light color is selected press the Alarm button to save the alarm settings 8 Your Ok to come out of bed alarm light is now set If you do not want to set a stay in bed light press the alarm button one more time and the clock will display the current time with the ok to come out of bed a...

Page 8: ... will be saved you will not see it on the screen If you go back into Alarm setting to check your stay in bed time setting will be erased and you will need to reprogram the timing SILENCING THE ALARM AND SNOOZE FUNCTION When the alarm goes off you have two options 1 Turn the alarm Big Bell button on the clock s right side 2 To Snooze the alarm press the Big Light Bulb Button on the clocks left side...

Page 9: ...h the Big Bell Button on the clocks right side to select the ring type for when the nap timer counts down to zero There are 2 ring options Slow Ring Quick Ring Note At this time you can adjust the volume of the ring by pressing the Light adj button There are 3 volume options Once you have selected the volume press the Alarm button again to move to the light selection 4 Press the Nap Button to Save...

Page 10: ...ience use the QR code below and you will be taken to the instructional video ADVICE 9 9 MAINTAIN THE CLOCK The clock is not waterproof Do not use the clock near the water 9 9 POWER SOURCE This product should be connect to a power supply only of the type marked on the outside off your USB wall power adapter 9 9 USB SAFETY This producut has the USB port and 1USB cable included Please plug the USB ca...

Page 11: ... rechargeable batteries DO NOT short circuit the supply terminals Rechargeable batteries are to be removed from the toy before being charged Rechargeable batteries are only to be charged under adult sup ervision 8 8 Clock does not turn ON or does not respond 8 8 Clock makes strange sounds behaves erratically or makes improper responses 8 8 Sound becomes weak or the Clock suddenly stops working 9 9...

Page 12: ...12 E support learnandclimb com P 888 888 8888 W learnandclimb com ...

Reviews: