


21
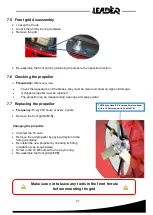
7.5 Front grid disassembly
•
Loosen the 9 nuts.
•
Unlock the grid by turning clockwise.
•
Remove the grid.
•
Re-assemble the front grid by performing the steps in the opposite direction.
7.6 Checking the propeller
➢
Frequency:
After every use.
•
Check the appearance of the blades, they must be clean and show no signs of damage.
•
A chipped propeller must be replaced.
•
The propeller can be cleaned using a sponge and soapy water.
7.7 Replacing the propeller
➢
Frequency:
Every 200 hours or every 2 years.
•
Remove the front grid
(cf.7.5)
.
Changing the propeller:
•
Unscrew the 10 nuts.
•
Remove the old propeller by paying attention to the
fitting orientation.
•
Re-install the new propeller by checking its fitting
orientation (see image below).
•
Screw in the 10 M6 nuts with a new nylon ring.
•
Re-assemble the front grid
(cf.7.5)
.
10 M6 nuts class 8.8 for propeller mountings
with a 10 Nm torque with Loctite 2701
Make sure not to leave any tools in the front ferrule
before mounting the grid
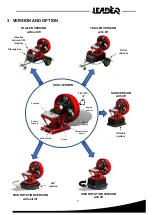
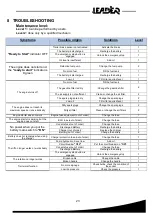
Summary of Contents for EASY 2000
Page 1: ...EASY 2000...
Page 2: ......
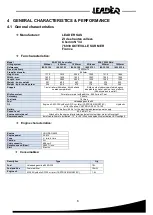
Page 6: ...6 ATTENTION ATTENTION ATTENTION Area of occasional presence R 15m m Wear protective equipment...
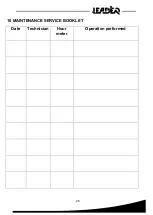
Page 25: ...25 10 MAINTENANCE SERVICE BOOKLET Date Technician Hour meter Operation performed...
Page 26: ...26 Date Technician Hour meter Operation performed...
Page 27: ...27 Date Technician Hour meter Operation performed...
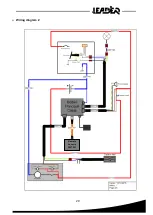
Page 28: ...28 11 ANNEX Wiring diagram 1...
Page 29: ...29 Wiring diagram 2 Remote console 2007267...
Page 31: ...31...
Page 32: ...32 Package leaflet Code EASY2000 0 ZN3 67 EN 0...