background image


VMS 1C and 5C Operation Manual - Version 2.0 

Page 25 of 42


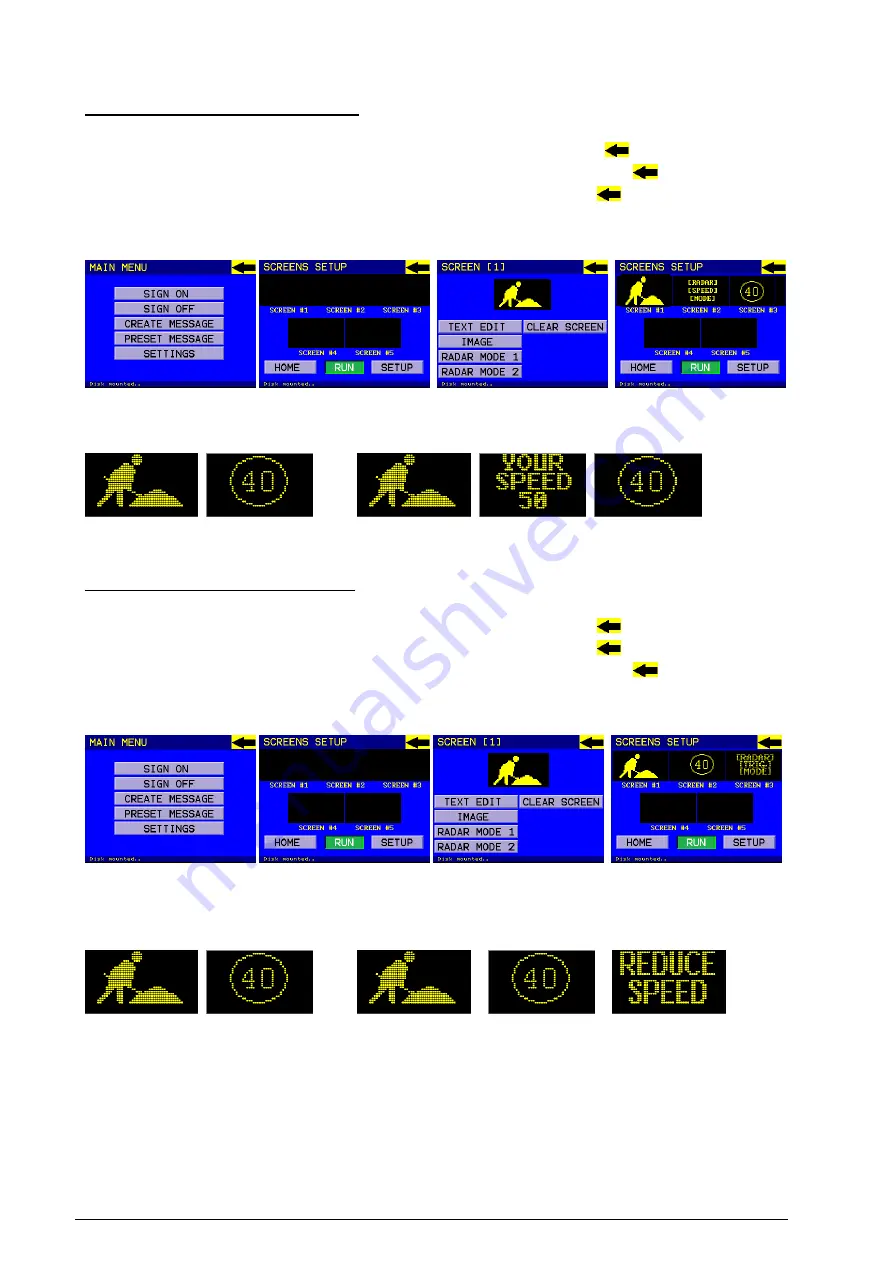
RADAR MODE 1 MESSAGE EXAMPLE:  

1.


Select CREATE MESSAGE,  

2.


Press SCREEN 1, Select the IMAGE, press the backwards arrow   


3.


Press SCREEN 2, Select RADAR MODE 1, press the backwards arrow 


4.


Press SCREEN 3, Select the IMAGE, press the backwards arrow 


5.


Press RUN when completed message  


HAND CONTROLLER 


VMS will display Screen 1 and Screen 3 until a vehicle speed is detected. 


Screen 1 

      Screen 3 


    Screen 1              Screen 2 

      Screen 3 

      Vehicle speed detected at 50km/h 


RADAR MODE 2 MESSAGE EXAMPLE: 

1.


Select CREATE MESSAGE,  

2.


Press SCREEN 1, Select the IMAGE, press the backwards arrow 


3.


Press SCREEN 2, Select the IMAGE, press the backwards arrow 


4.


Press SCREEN 3, Select RADAR MODE 2, press the backwards arrow 


5.


Press RUN when completed message 


HAND CONTROLLER 


VMS will display Screen 1 and Screen 2 until a vehicle speed is detected.  
If the vehicle speed is higher than MX Speed in Radar settings then Screen 3 will be displayed 


Screen 1 

      Screen 3 


    Screen 1              Screen2 

              Screen 3       


Vehicle speed detected at 50km/h 


          Mx Speed SET AT 45


Summary of Contents for VMS 1C

Page 1: ...anual Version 2 0 Page 1 of 42 VMS 1C AND VMS 5C OPERATION AND PROGRAMMING VMS TOUCH SCREEN HAND CONTROLLER N21990 Manufactured by Global Traffic Equipment A Quality Management System Approved to AS NZS ISO 9001 2008 Reg C31071 ...

Page 2: ...number 12 5 2 Inserting the SIM Card 13 5 3 Introduction 16 5 4 Local Hand Controller Operation 16 5 4 1 Message Creation 17 5 4 2 Run Pre set or Saved Messages 21 5 4 3 Time Date Setup 22 5 4 4 General Settings 23 5 4 5 RADAR Setup Applicable if Radar fitted to sign 24 5 4 6 SMS Passwords Setup 26 5 4 7 Sensors Setup 27 5 4 8 Brightness 28 5 4 9 Network Telecommunications Mobile Data 28 5 4 10 So...

Page 3: ... energized as a single component FTP File Transfer Protocol FTP is a standard network protocol used to transfer files from one host or to another host over a TCP based network such as the Internet LOG Computer data logging is the process of recording events with a computer program usually application software in a certain scope in order to provide an audit trail that can be used to understand the ...

Page 4: ... time while the vehicle is in motion Sign must not be raised unless stabilizer legs have been deployed All electrical work should be carried out by a qualified auto electrician Failure to do so may void the warranty The VMS must be turned off lowered and stowed correctly whenever the trailer is to be moved Damage caused to the sign or vehicle will not be covered under the warranty for failure to d...

Page 5: ...ED FOR READ ALL Instructions before using this equipment Note Once raised and rotated into position and BEFORE leaving the sign unattended the mast locking pin and brake locking device MUST be securely key locked pad locked in position and the winch handle removed to prevent potential unauthorised tampering with the sign ...

Page 6: ...e solar panels to direct sunlight or connecting a suitable battery charger The touchscreen hand controller where supplied is not weatherproof and must not be allowed to get wet Store the controller in the weather resistant container supplied at all times when not in use Clean the polycarbonate screen with a damp soft non abrasive cloth and water to remove any dust or dirt that may impair light cla...

Page 7: ...ng order Ensure the drawbar pins are inserted and locked into the removable drawbar Fit the trailer tow hitch securely to the vehicles tow ball and ensure the locking tongue retainer is closed on the ball The ball should be lightly greased so the hitch rotates smoothly on it Fit the R Clip to ensure the coupling cannot become detached whilst towing Fit the supplied safety chains to the tow vehicle...

Page 8: ...ising legs from their travelling position horizontal to their set up position vertical by pulling out the spring loaded leg locking pin and pivoting the leg 90 degrees until the locking pin re locks the leg in position Wind the leg down until a firm footing is made with the ground Fill water ballast tanks forward and rear option with water to aid stability and comply with AS 4852 2 Note All 4 legs...

Page 9: ...mpartment located next to the batteries is an UP DOWN button for the electric mast Electric Winch To erect the mast press the up button until it reaches its desired height To lower the mast press the down button until the mast is fully lowered UP DOWN Button for the electric winch Press the UP button on the winch for erection and DOWN button to lower the electric mast ...

Page 10: ...ly the brake lever must be pulled away from the mast while rotating the sign When the lever is released the brake is re applied as a fail safe To rotate the sign first release the brake locking device Position the sign to the desired viewing angle while pulling the brake lever and then release Use the Sighting Devise per AS 4852 2 to align the sign to approaching traffic Apply the brake locking de...

Page 11: ... the winch handle removed to prevent potential unauthorised tampering with the sign As a further failsafe measure the tow hitch drawbar maybe removed to prevent possible theft and to reduce the trailer footprint in the workspace To remove the drawbar remove the two drawbar locking pins and slide the drawbar out of the tailer To remove relocate the trailer complete the above steps in the reverse or...

Page 12: ...OMPUTER WITH HILO 850 USE ONLY TELSTRA SIM CARD or 850MHz Band supported SIM CARD THE NEW VMSCOMPUTER WITH AIRPRIME WILL SUPPORT OTHER TELECOMMUNICATION NETWORK PROVIDERS The SIM card by default will be issued with a PIN number by the telecommunications provider When inserted into the sign without disabling the PIN number first the sign will not work as the pin security interferes with the sign co...

Page 13: ... mounted on gas struts to assist 4 Remove the LED tile in front of the VMS computer so as to access it This is the 3rd LED Tile board down in the second row as shown below To remove the tile board gently squeeze the tops of the 6 retainers stand offs Do NOT remove any wiring 5 Ensure the sign power is OFF before inserting the SIM card This can be done by disconnecting the Orange connector from the...

Page 14: ... power is OFF at the fuse BEFORE inserting SIM card NB Ensure the SIM card PIN number has been DISABLED BEFORE inserting SIM card Hardware DIP Switch Configuration Settings The hardware DIP switches are used to configure the sign for a particular board type and Telecommunication Provider Care must be taken when changing the DIP switch configuration as an incorrect setting can affect the operation ...

Page 15: ...on 2 0 Page 15 of 42 ON ON ON ON White position indicates top of switch ON ON White position indicates top of switch 7 7 7 7 6 6 6 6 5 5 5 5 4 4 4 4 3 3 3 3 2 2 2 2 1 1 1 1 8 8 7 7 6 6 5 5 4 4 3 3 2 2 1 1 VMS1C CUSTOM APN VMS5C CUSTOM APN ...

Page 16: ...cal Hand controller as outlined below Remote access to sign via PC based program VMS Director Remote access using SMS 5 4 Local Hand Controller Operation When the hand controller plugs into the sign the below representation screen appears on the controller Touch screen to switch to the main menu Press this button to move back to the start up screen To turn the sign ON To turn the sign OFF ...

Page 17: ...e press this button Note A message can comprise between 1 to 5 screens To run the message To modify any screen press to select it Note No blank screens in between set messages To set the screen as a part of RADAR speed Note To set the relevant message refer to RADAR setup section in manual To set the screen as a part of RADAR speed triggered text Note To set the relevant message refer to RADAR set...

Page 18: ...e 1 Fields here are Line 1 Line 2 and Line 3 Note 2 The sign supports 4 different fonts and it automatically chooses one that fits the best To clear the line press this button CLR twice To edit the screen as a text screen press this button To edit the line press this button To switch between upper and lower case characters To switch between alphabet and numeric ...

Page 19: ...and 5C Operation Manual Version 2 0 Page 19 of 42 To move to the previous image page To move to the next image page To edit the screen as an image screen press this button twice To select an image press on it ...

Page 20: ...ssage ID To save and move to the next field To justify the text to the centre right or left To set the ON Time The display time of screens Note 1 For an infinite display set the On Time to zero Note 2 The time unit is 1 10th of a second To set the OFF Time The blank time between screens Note 1 The time unit is 1 10th of a second To setup message parameters press this button ...

Page 21: ...ssages To run a pre set message as found in the appendix at the end of this manual or custom saved message press this button To run the message as its name displayed press this button To move to the next pre set message To move to the previous pre set message Shows the message file name ...

Page 22: ...ry To set the date time of the start finish of daylight saving DST Note 1 Must put an in year minute and second place e g To add the DST to start at 2 am of 8th March 13 enter 3 8 2 Note 2 To disable the feature simply choose the same Date Time for both DLS Start Finish like above picture To save and move to the next field To clear the entire field on this line press CLR button twice Press this bu...

Page 23: ...ent the sign works out its remote destination address by this parameter which is a unique ID and issued by the manufacturer Any change must be authorized by the manufacturer or selling agent To set the default ON time display time OFF time blank time Note Wherever the ON OFF time is missed then the sign picks up these default values To set general parameters press this button To save and move to t...

Page 24: ...to display a set message when the vehicle speed detected is above the MX speed set by the hand controller RADAR SETUP OPTIONS Sets the message as a part of RADAR speed Note Addressed as RADAR Mode 1 in CREATE MESSAGE MENU Sets the message as a part of RADAR speed Note Addressed as RADAR Mode 2 in CREATE MESSAGE MENU Sets the maximum speed before RADAR Mode 2 is triggered Any Radar values higher th...

Page 25: ...n 1 Screen 3 Screen 1 Screen 2 Screen 3 Vehicle speed detected at 50km h RADAR MODE 2 MESSAGE EXAMPLE 1 Select CREATE MESSAGE 2 Press SCREEN 1 Select the IMAGE press the backwards arrow 3 Press SCREEN 2 Select the IMAGE press the backwards arrow 4 Press SCREEN 3 Select RADAR MODE 2 press the backwards arrow 5 Press RUN when completed message HAND CONTROLLER VMS will display Screen 1 and Screen 2 u...

Page 26: ...etup To set the SMS passwords Note The sign answers to either passwords Any change to the first password must be authorized by the manufacturer or selling agent To save and move to the next field To set the SMS Passwords press this button Requires the first password to be entered ...

Page 27: ...f the page will appear the sensor levels that need to be adjusted to suit the sign The 3 levels are Min Level Mid Level and Max Level These levels refer to the Dimming Level Min Level is the Daytime Setting Mid Level is the Sunrise Sunset Settings Max Level is the Night Time Setting The values that are suggested are as follows Min level 3 Mid Level 200 Max Level 252 1st Factor 400 2nd Factor 900 H...

Page 28: ... life of the sign To force the dimming Min brightness 3 Max brightness 255 press this button Note To switch dimming to auto mode the value must be set to 0 1 or 2 5 4 9 Network Telecommunications Mobile Data This section allows the user to place in the custom Network configuration for mobile data applications into the sign This configuration will only need to be set once not unless the Service Pro...

Page 29: ...to the relevant provider DIP Switch 6 configuration Set for ON will read the APN and configuration from the Network Setup file To check if number setup was successful enter SETTINGS then REVIEW APN and SMS CENTER values should be the same as what was entered in the network setup page PROVIDER APN SMS CENTER Optus internet 61411990001 Telstra telstra internet 61418706700 Spark NZ internet 642774390...

Page 30: ...ncludes the current Input voltage battery temperature reading Battery Voltage Current from Solar Panel 1 and 2 and Voltage from Solar Panel 1 and 2 5 4 11 Other Features To calibrate the display of hand controller Note Calibrate the hand controller when it is unresponsive To review all settings Help Press this button to move to the SETTINGS menu ...

Page 31: ...show the communication with the server as well as sign information and constantly scroll through the status and debug log NB The touchscreen hand controller where supplied is not weatherproof and must not be permitted to get wet Store the controller in the supplied weather resistant container at all times when not in use ...

Page 32: ... 1C and 5C Operation Manual Version 2 0 Page 32 of 42 5 5 PC Based Program VMS Director For a detailed description of Cloud based programming please refer to the separate Cloud Director programming manual ...

Page 33: ... connection to external 240 V AC supply The solar power system provides uninterrupted continuous operation with a minimum of seven day battery backup Optional Auxiliary 3 stage 240 V AC battery charger Should battery charging via 240V AC be needed plug a 10 Amp power lead into the water resistant socket on the rear side of the control storage box and the battery charger will charge the batteries P...

Page 34: ...ximum travel In order to raise or lower the mast the buttons on the switch located inside the control box will need to be held down until the limits are met or the desired position is achieved 7 1 2 Safety Watch out for overhead hazards when operating winch Keep hands clear of winch cable at all times 7 1 3 Maintenance The following maintenance should be checked and carried out a regular basis The...

Page 35: ...death to the public We have designed our product to be more efficient in power use as well as have added additional solar capacity with the choice of the solar panels installed in a flat arrangement We have kept it simple so users cannot get it wrong AS 4852 2 states that a VMS board s sign face shall be capable of rotation through 360 on the vertical axis with reference to the trailer orientation...

Page 36: ...re Small Stainless Steel BS1126 Mast Locking Pin Silver GM5032 Removable Drawbar Complete Yellow silver BS1027 19mm Drawbar Pin Silver BW3066 Jacking leg Red Handle BS3005 Jockey Wheel Red Handle BS1030 Brake winch Silver BS1031 Brake winch handle Yellow Orange BW3015 Brake winch cable Stainless Steel BS1001 Spare wheel and tyre BLACK BW3004 Radar BLACK BS1048 Tail Light Multi Voltage Yellow Red G...

Page 37: ...2V Optional Auxiliary Battery Charger 240VAC 230W 3 Stage Power Consumption 3 Lines Text with 8 Characters o Output 100 Brightness Full Sunlight 66 5W o Output 3 Brightness Night 3 8W 11 Disclaimer This document provides information on our products and all efforts are made to ensure the accuracy of the information contained within The specifications of the products are subject to change and contin...

Page 38: ...VMS 1C and 5C Operation Manual Version 2 0 Page 38 of 42 12 Appendix A SMS Graphics G00 G13 G01 G14 G02 G15 G03 G16 G04 G17 G05 G18 G06 G19 G07 G20 G08 G21 G09 G22 G10 G23 G11 G24 G12 G25 ...

Page 39: ...VMS 1C and 5C Operation Manual Version 2 0 Page 39 of 42 Appendix A SMS Graphics CONTINUED G26 G39 G27 G40 G28 G41 G29 G42 G30 G43 G31 G44 G32 G45 G33 G46 G34 G47 G35 G48 G36 G49 G37 G50 G38 G51 ...

Page 40: ... Appendix A SMS Hand Controller Graphics CONTINUED G52 G55 G53 G56 G54 G57 13 Appendix B Pre set Messages P01 WRK T P02 WRK T P03 WRK TT P04 WRK TT P05 WRK T P06 WRK T P07 WRK TTT P08 WRK TTT P09 WRK TT P10 WRK TT P11 WRK T P12 WRK T P13 FLAGMAN P14 LEFT ARR ...

Page 41: ... 2 0 Page 41 of 42 Appendix B Pre set Messages CONTINUED P15 RGHT ARR P16 CTN RDWK P17 PREPSTOP P18 EXPDELAY P19 PTSEXDEL P20 CHNGTRAH P21 DTRAH RS P22 TRAF HZD P23 EXITCLSD P24 ROADCLSD P25 WRK T P26 WRK TT P27 WRK T P28 WRK T P29 RDWKRAMP ...

Page 42: ...cifing that the modem we are using only supports 850MHz band NextG J S 28 04 2015 V1 5 RMS Version Updated SIM card section specifing that the modem we are using only supports 850MHz band NextG J S 6 05 2015 V1 6 Safe Work instructions added Safety Amended D E 20 11 2015 V1 7 Ballast tank details added D E 26 10 2016 V1 8 ISO Cerification updated B B 16 05 2017 V1 9 Electric Winch added Ammended S...

Reviews: