background image

LBA


H

ome

 A

ppliAnce

SEVILLA

5

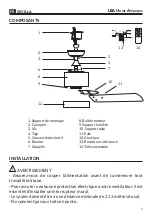
COMPOSANTS

FR


AVERTISSEMENT

· Assurez-vous de couper l’alimentation avant de commencer tout 
travail électrique.

· Pour assurer une bonne protection électrique à votre ventilateur, il est 

essentiel d’installer un interrupteur mural.
· Les pales doivent être à une distance minimale de 2,13 mètres du sol.
· Ne convient pas aux toits en pente.

INSTALLATION

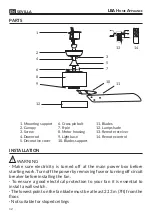
1. Support de montage
2. Canopée
3. Vis
4. Tige
5. Couvercle decóratif
6. Boulon
7. Goupille

1

2

13

14

6

3

7

8

4

5

9

10

12

8. Boîtier moteur 
9. Support lumière
10.  Support pale

11. Pale

12. Abat-jour
13. Récepteur à distance
14. Télécommande

11

Summary of Contents for 127892401

Page 1: ... 127892414 LBA Home Appliance VENTILATEUR DE PLAFOND CEILING FAN VENTILADOR DE TECHO VENTILATORE DA SOFFITTO DECKENVENTILATOR MANUEL D UTILISATION FR USER MANUAL EN MANUAL DE INSTRUCCIONES ES MANUALE D ISTRUZIONI IT ANLEITUNG DE ...

Page 2: ......

Page 3: ...s mismas que las del producto mostrado en la tienda online IT NB Dietro il marchio generico di Lba Home ci sono marchi rinomati a livello nazionale ed internazionale che molto spesso non offrono un servizio assistenza post vendita o semplicemente non vogliono competere con le reti di distribuzione locali Una volta ordinato riceverete il ventilatore da soffitto del marchio originale I dati relativi...

Page 4: ...LBA Home Appliance SEVILLA 2 FR EN ES IT DE 3 10 17 24 31 ...

Page 5: ...on du ventilateur coupez l alimentation électrique en enlevant les fusibles ou en coupant les disjoncteurs Usage domestique et intérieur uniquement Nepasinstallerdansleszonesprèsdeproduitschimiquesetinflammable telle que cuisinière à gaz lieux humides ou mouillés les hautes vibrations ou impact et exposition continue direct au vent Ce manuel n est pas destiné à instruire les personnes non qualifié...

Page 6: ...xionssontcorrectesetsécuriséespourempêcherleventilateur de tomber ou de causer des dommages matériels ou des blessures Assurez vous que le câble de sécurité est connecté fermement à la platine Veillez à ne pas plier ou endommager l arbre d entraînement du moteur ou les pales du ventilateur lors de la manipulation ou de l installation Si le produit est défectueux veuillez contacter le service clien...

Page 7: ...ur il est essentiel d installer un interrupteur mural Les pales doivent être à une distance minimale de 2 13 mètres du sol Ne convient pas aux toits en pente INSTALLATION 1 Support de montage 2 Canopée 3 Vis 4 Tige 5 Couvercle decóratif 6 Boulon 7 Goupille 1 2 13 14 6 3 7 8 4 5 9 10 12 8 Boîtier moteur 9 Support lumière 10 Support pale 11 Pale 12 Abat jour 13 Récepteur à distance 14 Télécommande 1...

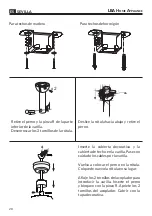
Page 8: ...eplacez le boulon dans la rotule Mettez en place la rotule Desserrez les 2 vis du coupleur pour insérer la tige Insérez le boulon et verrouillez avec la goupille Resserrez les 2 vis dans le coupleur Couvrir avec le couvercle décoratif x2 Retirez le boulon et la goupille de la partie inférieure de la tige Dévissez les 2 vis de la rotule Faites glisser la rotule vers le bas et retirez le boulon ...

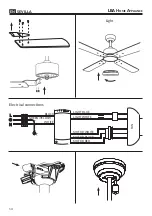
Page 9: ...LBA Home Appliance SEVILLA 7 L L N N Lumière Connexions électriques NOIR JAUNE VERT BLANC FR LUMIÈRE BLEU LUMIÈRE BLANC MOTEUR BLANC MOTEUR NOIR MOTEUR ROUGE VENTILATEUR ...

Page 10: ...rrêt Ventilateur 6 Minuterie 7 Marche Arrêt Lumière 8 Fonction été hiver 1 6 N utilisez pas la fonction réversible Été Hiver lorsque le ventilateur est en marche Le ventilateur doit être éteint et les pales doivent être arrêtées Eté l air circule vers le bas en produisant une brise fraîche Hiver Le flux d air ascendant pousse l air chaud du plafond qui va circuler vers le bas 7 2 4 ALL OFF 8 3 5 I...

Page 11: ...oids sur la surface de la pale à la hauteur de le clip Retirez le clip et mettez le ventilateur en marche Si la vibration persiste fixez un autre contrepoids ou essayez une autre position pour fixer un contrepoids FR RECYCLAGE DES APPAREILS DOMESTIQUES USÉS La directive Européenne 2012 19 EU WEEE sur les Résidus des Equipements Électriques et Électroniques RAEE précise que les appareils domestique...

Page 12: ... turning off the circuit breakers to the outlet box and associated wall switch location For household and indoor use only Do not install in areas places near chemicals and flammable products such as gas stoves wet and humid places such as bathroom or high vibration or impact and continuous direct exposure to the wind Thismanualisnotintendedtoinstructorassistuntrainedorunqualified persons to instal...

Page 13: ...nfirm after the fan is completely installed that all connections are proper and secure to prevent the fan from falling or causing property damages or personal injury Take care not to bend or damage the motor drive shaft or fan blades whenhandlingorinstallingthem Ifsuchdefectisnoticed pleasecontact the customer service before installation of the ceiling fan Use of unapproved remote control voids th...

Page 14: ...ntrol WARNING Make sure electricity is turned off at the main power box before starting work Turn off the power by removing fuse or turning off circuit breaker before installing the fan To ensure a good electrical protection to your fan it is essential to install a wall switch The lowest point on the fan blade must be at least 2 13 m 7ft from the floor Not suitable for sloped ceilings INSTALLATION...

Page 15: ...the bolt in the hanger ball Put the hanger ball in place Loosen the 2 coupler screws to insert the downrod Insert the bolt and lock it with the R pin Tighten the 2 screws in the coupler and place the canopy cover x2 Remove the cross pin bolt and R pin from the lower part of the downrod Unscrew the 2 svrews from the hanger ball Slide the hanger ball down and remove the bolt ...

Page 16: ...LBA Home Appliance SEVILLA 14 Electrical connections EN L L N N BLACK GREEN YELLOW WHITE LIGHT BLUE LIGHT WHITE MOTOR WHITE MOTOR BLACK MOTOR RED FAN Light ...

Page 17: ...Speeds 5 Fan OFF 6 Timer 7 Light On Off 8 Summer Winter function 1 6 Do not use the Summer Winter reversible function when the fan is on The fan must be switched off and the blades must be stopped Summer The air flows downwards producing a cool breeze Winter The ascending air flow pushes the warm air from the ceiling downwards 7 2 4 ALL OFF 8 3 5 Install battery Open the battery cover by pressing ...

Page 18: ...ppears Glue the counterweight to the surface of the blade at the height of the clip Remove the clip and turn on the fan If the vibration persists attach another counterweight or try another position to attach a counterweight EN DISCARDING WORN HOUSEHOLD DEVICES The European directive 2012 19 EU pertaining to electrical and electronic waste prohibits such household goods from being discarded with l...

Page 19: ... o disyuntores que alimentan la caja eléctrica donde se va a instalar al ventilador y el interruptor de pared asociado Únicamente para uso doméstico y en interiores No instale en áreas lugares cerca de productos químicos e inflamables como estufas a gas lugares húmedos o mojados altas vibraciones o impactos y exposición continua y directa al viento Este manual no está destinado para instruir o ayu...

Page 20: ...e todos los tornillos y las conexiones sean correctas y seguras para evitarcaídasdelventiladorodañosalapropiedadolesionespersonales Asegúrese de que el cable de seguridad esté firmemente conectado a la placa de montaje Tenga cuidado de no doblar o dañar el eje de transmisión del motor o las palas del ventilador al manipularlos o instalarlos Si se encuentra este defecto póngase en contacto con el s...

Page 21: ...LACIÓN ADVERTENCIA Antes de la instalación asegúrese de que el suministro eléctrico ha sido previamente desconectado Paraasegurarunabuenaproteccióneléctricaasuventiladoresesencial instalar un interruptor de pared La distancia mínima entre el suelo y las palas debe ser de 2 13m No apto para techos inclinados 11 Pala 12 Difusor lámpara 13 Receptor remoto 14 Mando a distancia 1 2 13 14 6 3 7 8 4 5 9 ...

Page 22: ...a colocar el perno en la rótula Colque de nuevo la rótula en su lugar Afloje los 2 tornillos del acoplador para introducir la varilla Inserte el perno y bloquee con la pinza R Apriete los 2 tornillos del acoplador Cubrir con la tapa decorativa x2 Retire el perno y la pinza R de la parte inferior de la varilla Desenroscar los 2 tornillos de la rótula Deslice la rótula hacia abajo y retire el perno ...

Page 23: ...LBA Home Appliance SEVILLA 21 Conexiones eléctricas ES Luz L L N N NEGRO ALLO VERDE BLANCO LUZ AZUL LUZ BLANCO MOTOR BLANCO MOTOR NEGRO MOOR ROJO VENTILADOR ...

Page 24: ...atural 4 Velocidades 5 Apagado ventilador 6 Temporizador 7 Encendido Apagado Luz 8 Función Verano Invierno 1 6 No utilice la función reversible Verano Invierno cuando el ventilador esté encendido El ventilador debe estar apagado y las aspas deben estar detenidas Verano El aire fluye hacia abajo produciendo una brisa fresca Invierno El flujo de aire ascendente empuja el aire caliente del techo haci...

Page 25: ... superficie de la palaa la altura del clip Retire el clip y encienda el ventilador Si la vibración persiste coloque otro contrapeso o pruebe otra posición para colocar un contrapeso ES RETIRADA DE LOS APARATOS DOMÉSTICOS USADOS La directiva Europea 2012 19 EU RAEE sobre los Residuos de Aparatos Eléctricos y Electrónicos RAEE exige que los aparatos domésticos usados no se desechen en el flujo norma...

Page 26: ... dell installazione Spegnere gli interruttori che alimentano la scatola elettrica nel luogo in cui si intende installare il ventilatore e il relativo interruttore a parete Solo per uso domestico ed in ambienti interni Non installare in zone in prossimità di prodotti chimici e infiammabili comestufeagas luoghiumidiemoltoumidi comeibagni fortivibrazioni o impatti e l esposizione continua e diretta a...

Page 27: ...l momento della installazione Dopo che il ventilatore è installato assicurarsi che tutti i collegamenti siano corretti e sicuri per evitare cadute o provocare danni materiali o lesioni personali Assicurarsi che il cavo di sicurezza sia saldamente collegato alla piastra di montaggio Fare attenzione a non piegare o danneggiare l albero di trasmissione del motore o le pale del ventilatore durante la ...

Page 28: ...TENZA Prima dell installazione assicurarsi che l alimentazione elettrica sia stata previamente scollegata Per garantire una buona protezione elettrica al vostro ventilatore è necessario installare un interruttore a parete La distanza minima tra il pavimento e le pale deve essere di 2 13 m Non adatto per soffitti inclinati 11 Pala 12 Paralume 13 Ricevitore remoto 14 Controllo remoto 1 2 13 14 6 3 7...

Page 29: ...perno nel giunto sferico Tornare a inserire il giunto sferico Allentare le 2 viti dell accoppiatore per inserire l asta Inserire il perno e bloccare con la R clip Serrare le 2 viti dell accoppiatore Coprire con il coperchio decorativo x2 Rimuovere la r clip e il perno dalla parte inferiore dell asta Svitare le 2 viti del giunto sferico Far scorrere il giunto sferico verso il basso e rimuovere il p...

Page 30: ...LBA Home Appliance SEVILLA 28 Connessioni elettriche Luce L L N N NERO GIALLO VERDE BIANCO LUCE BLU LUCE BIANCO MOTORE BIANCO MOTORE NERO MOTORE ROSSO VENTILATORE ...

Page 31: ...turale 4 Velocità 5 Ventilatore OFF 6 Timer 7 Luce On Off 8 Funzione estate inverno 1 6 Non utilizzare la funzione reversibile Estate Inverno quando il ventilatore è acceso Il ventilatore deve essere spento e le pale devono essere fermate Estate l aria scorre verso il basso producendo una brezza fresca Inverno il flusso d aria verso l alto spinge l aria calda dal soffitto verso il basso 7 2 4 ALL ...

Page 32: ...eso alla superficie della pala all altezza della pinza Rimuovere la pinza e accendere la ventola Se la vibrazione continua attaccare un altro contrappeso o provare un altra posizione per attaccare un contrappeso IT SMALTIMENTO DEGLI ELETTRODOMESTICI USATI La Direttiva Europea 2012 19 UE WEEE sui Rifiuti di Apparecchiature Elettriche ed Elettroniche richiede che le apparecchiature domestiche usate ...

Page 33: ... vermeiden vergewissern Sie sich dass der Strom am Hauptsicherungskasten ausgeschaltet ist bevor Sie mit der Installation beginnen Nur für den Innenbereich geeignet Nur für den Hausgebrauch Installieren Sie das Gerät nicht in der Nähe von Chemikalien und brennbaren Bereichen wie Gasherd Orten nasser und hoher Luftfeuchtigkeit hohenVibrationenoderStößenundständigerdirekter Windbelastung Dieses Anle...

Page 34: ...iden dass der Ventilator von der Decke fällt und oder Schaden anrichtet Achten Sie bei der Montage darauf dass das Sicherheitskabel fest mit der Montageplatte verbunden ist Achten Sie darauf dass die Motorantriebswelle oder die Lüfterflügel nicht gebogen oder beschädigt werden Sollte dieser Defekt festgestellt werden wenden Sie sich bitte an den Kundendienst vor der Installation Die Verwendung nic...

Page 35: ...NUNG Stellen Sie sicher dass das Netzteil von der Stromversorgung abgetrennt ist Um einen guten elektrischen Schutz für Ihren Ventilator zu gewährleisten ist es unerlässlich einen Wandschalter zu installieren Die Lüfterflügel sollten mindestens 2 13m vom Boden entfernt sein Nicht geeignet für schräge Decken 11 Flügel 12 Lampenschirm 13 Fernempfänger 14 Fernbedienung 1 2 13 14 6 3 7 8 4 5 9 10 12 1...

Page 36: ...en Sie das Halbkugel ein Lösen Sie die 2 Kupplungsschrauben um die Stange einzusetzen Setzen Sie den Bolzen ein und verriegeln Sie ihn mit dem Stift Ziehen Sie die 2 Schrauben im Koppler fest Decken Sie mit der Dekorabdeckung ab x2 Entfernen Sie den R Bolzen und den Stift aus dem unteren Teil der Stange Drehen Sie die 2 Schrauben des Halbkugel heraus Schieben Sie das Halbkugel nach unten und entfe...

Page 37: ...LBA Home Appliance SEVILLA 35 Elektrische Anschlüsse DE Lichtsatz L L N N SCHWARZ GELB GRÜN WEISS LICHT BLAU LICHT WEISS MOTOR WEISS MOTOR SCHWARZ MOTOR ROT VENTILATOR ...

Page 38: ...mer Winterfunktion 1 6 Verwenden Sie die umschaltbare Sommer Winterfunktion nicht wenn der Ventilator eingeschaltet ist Der Ventilator muss ausgeschaltet sein und die Flügel müssen stillstehen Sommer Die Luft strömt nach unten und erzeugt eine kühle Brise Winter Die umgekehrte Drehrichtung im Winter leitet die warme Luft über die Decke wieder nach unten 7 2 4 ALL OFF 8 3 5 Batterie einlegen Öffnen...

Page 39: ...eren bis die Vibration verschwindet Kleben Sie das Gegengewicht auf der Flügeloberfläche in Höhe des Clips an Entfernen Sie den Clip und schalten Sie den Ventilator ein Wenn die Vibrationen weiterhin bestehen bringen Sie ein anderes Gegengewicht an oder versuchen Sie eine andere Position um ein Gegengewicht anzubringen DE ENTSORGUNG GEBRAUCHTEN HAUSHALTSGERÄTEN Die EU Richtlinie 2012 19 EU WEEE in...

Page 40: ...s ceiling fan co uk ESPAÑA 34 960 105 375 contact ventilador techo es ITALIA 39 0694 800 814 post vendita ventilatore soffitto it DEUTSCHLAND ÖSTERREICH 49 681 969 89101 43 720 116 587 Auftragsverfolgung decken ventilator kaufen V 1_03 2021 Online B Trust Sl Av Peris y Valero N 4 46006 Valencia España ...

Reviews: