background image

9

8

– To reduce the risk of serious injury:

Provide a clear path for operation of the back and legrest. Place tables and area rugs

at a distance to allow the legrest to fully extend without rubbing or interference.

WARNING

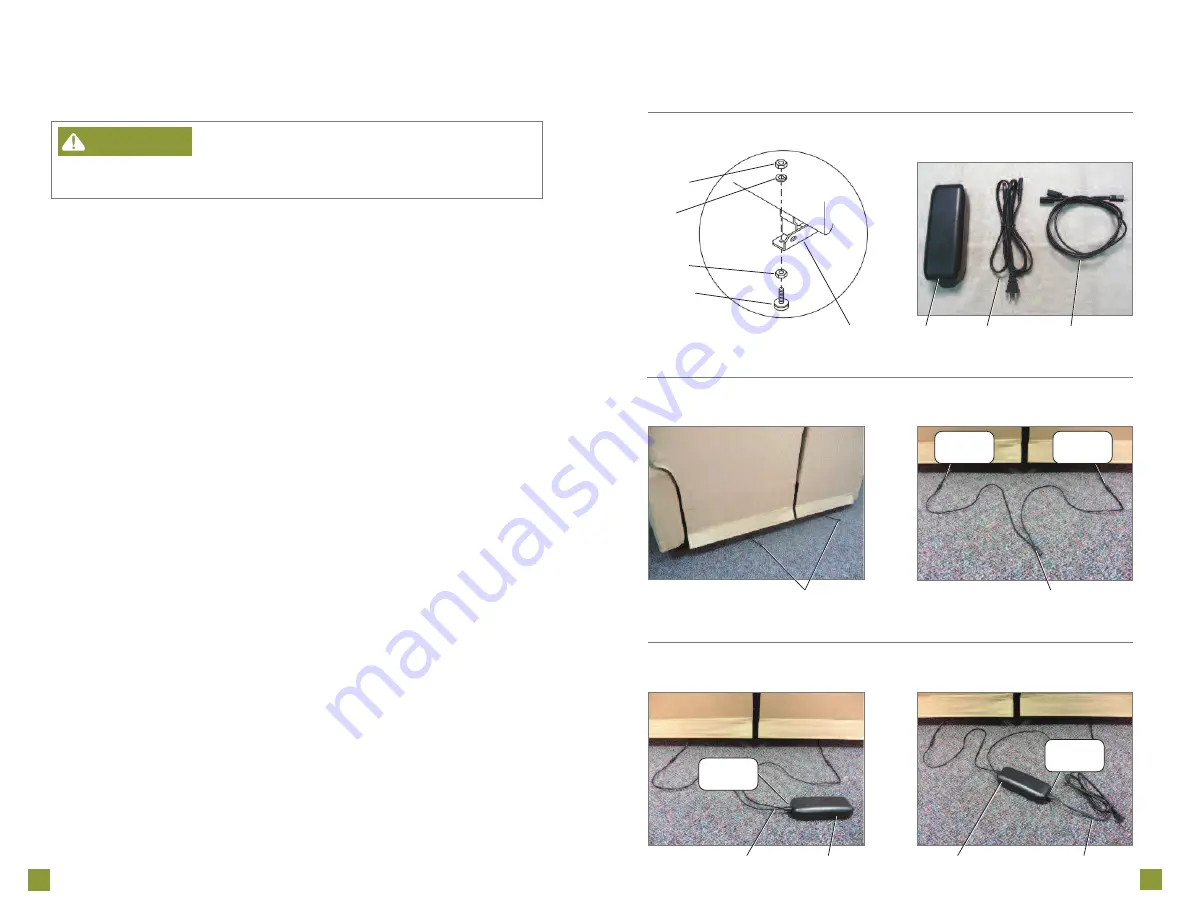
7. Adjustable glides are standard on the front rails of motion sofas with metal base rails. Adjust the front

glides to a height that provides an unobstructed path for operation of the legrest (see Furniture
Placement Guide).

Each adjustable glide is attached to the base rail by one jam nut and one lock washer on top of
the base rail, and one jam nut on the bottom of the base rail (F

IGURE

7). Loosen the jam nut located

on top of the base rail.

Holding the top jam nut, turn the glide clockwise to lower the unit or counterclockwise
to raise the unit.

Tighten the bottom jam nut to the base rail, and then tighten the top jam nut to the base rail.

Repeat this step for each adjustable glide, as necessary.

8. Identify the electrical components to be used in the following assembly steps (F

IGURE

8).

9. Each end of the power motion sofa has its own motor. Locate the motor connectors

behind the end units (F

IGURE

9).

10. The dual motor junction cable has two long ends to reach both motor connectors. Connect the

long ends of the dual motor junction cable to the motor connectors (F

IGURE

10).

11. Connect the power transformer to the dual motor junction cable (F

IGURE

11).

12. Connect the 120 volt power cord to the power transformer (F

IGURE

12). Do not plug in until

instructed in the operating instructions.

13. Proceed to the

Battery Backup Assembly Instructions

.

14. To remove the backs, unplug the 120 volt power cord from the electrical outlet and disconnect

the dual motor junction cable from the motor connectors behind each end of the power motion
sofa. Reverse the

Assembly Instructions

steps.

La-Z-Time

®

Power Motion Sofa

Assembly Instructions

La-Z-Time

®

Power Motion Sofa

Assembly Instructions

F

IGURE

7

F

IGURE

8

F

IGURE

9

F

IGURE

10

F

IGURE

11

F

IGURE

12

Front Base Rail

Motor
Connectors

Jam Nut

Lock
Washer

Jam Nut

Adjustable
Glide

Power
Transformer

120 Volt
Power Cord

Dual Motor
Junction Cable

Dual Motor
Junction Cable

Make this

connection

Dual Motor
Junction Cable

Power
Transformer

Make this

connection

Power
Transformer

120 Volt
Power Cord

Make this

connection

Make this

connection

Summary of Contents for Power Recline Series

Page 1: ..._________ instructions La Z Boy Incorporated 1284 N Telegraph Road Monroe MI 48162 la z boy com Power Recline 2012 La Z Boy Incorporated 93000536 00 Rev 06 12 Motion Sofas Modulars ________ Sof s recl...

Page 2: ...njoy your new furniture s comfort and style 3 2 Table of Contents Important Safety Instructions 4 5 La Z Time Power Motion Sofa Assembly Instructions 6 9 La Z Time Power Motion Modulars Assembly Instr...

Page 3: ...ildren Plug directly into a wall outlet Do not use an extension cord adapter or surge protector Keep cord out of reach of small children and do not use where it may be a trip hazard To reduce the risk...

Page 4: ...of injury Do not operate the unit until the back is installed and locked WARNING 4 Install the backs Lay the back on the seat and locate the back and body brackets FIGURE 2 Lift the back at a slight a...

Page 5: ...has its own motor Locate the motor connectors behind the end units FIGURE 9 10 The dual motor junction cable has two long ends to reach both motor connectors Connect the long ends of the dual motor j...

Page 6: ...the back and body brackets FIGURE 2 Lift the back at a slight angle and align the brackets on the back with the brackets on the body Lower the back onto the body making sure the back and body bracket...

Page 7: ...this step for each adjustable glide as necessary 8 Identify the electrical components to be used in the following assembly steps FIGURE 8 9 Locate the motor connector behind the power motion modular u...

Page 8: ...ntil the threaded studs are securely engaged in both the front and rear latch brackets The rear bracket is not a locking bracket Note Due to variations in upholstery and style the threaded stud length...

Page 9: ...e desired position To raise the back and lower the legrest press the top of the outside power switch or the back button of the inside power switch and hold Release the power switch when the back and l...

Page 10: ...plugged into an electrical outlet 2 Make sure the electrical outlet is working For example make sure there are no blown fuses or tripped circuit breakers 3 Make sure all the connectors are secure ref...

Page 11: ...Tabla de contenidos Importantes instrucciones de seguridad 22 23 Instrucciones de armado del sof reclinable el ctrico La Z Time 24 27 Reclinado el ctrico La Z Time Modulares Instrucciones de armado 2...

Page 12: ...o de los ni os peque os y no lo use si puede implicar riesgo de tropiezos Para reducir el riesgo de quemaduras incen dio choque el ctrico lesiones serias o muerte Siempre mantenga alejados los cigarri...

Page 13: ...cidad de 120 voltios y un cable dual de uni n del motor FIGURA 3 Para reducir el riesgo de lesiones No utilice la unidad antes de que se instale y se asegure el respaldo ADVERTENCIA 4 Instale los resp...

Page 14: ...es el ctricos que ser n usados en el siguiente procedimiento de armado FIGURA 8 9 Cada extremo del sof reclinable el ctrico cuenta con su propio motor Ubique los conectores del motor detr s de cada ex...

Page 15: ...ortes del respaldo con los soportes en el armaz n Baje el respaldo sobre el asiento asegur ndose que los soportes del respaldo y del armaz n est n seguramente acoplados Levante la funda del tapizado t...

Page 16: ...e seguro Repita este paso como sea necesario para cada deslizador 8 Identifique los componentes el ctricos que ser n usados en el siguiente procedimiento de armado FIGURA 8 9 Encuentre el conector del...

Page 17: ...en el lado derecho 15 Deslice la unidad con los soportes de seguro hacia atr s hasta que los tornillos est n firmemente acoplados en los soportes de seguro delanteros y traseros El soporte trasero no...

Page 18: ...do se reclinen y lleguen a la posici n deseada Para elevar el descansapiernas posterior e inferior presione la parte superior del interruptor de corriente externo o el bot n trasero en la parte interi...

Page 19: ...te est enchufado a un tomacorriente 2 Aseg rese de que el tomacorriente est funcionando Por ejemplo aseg rese de que no hay fusibles quemados o circuitos cortados 3 Aseg rese de que todos los conector...

Page 20: ...t quand vous profiterez du confort et de l allure de votre nouveau mobilier 39 38 Table des mati res R gles de s curit importantes 40 41 Montage du canap inclinable lectroPlus La Z TimeMD 42 45 Montag...

Page 21: ...ler la fiche ou la t l commande avec les mains mouill es Pour pr venir la suffocation garder les sacs de plastique loin des enfants Brancher directement dans une prise de courant au mur Ne pas utilise...

Page 22: ...r duire le risque de blessures Ne pas faire fonctionner le meuble avant que le dossier soit install et bloqu AVERTISSEMENT 4 Installer les dossiers D poser le dossier sur le si ge et rep rer les fixat...

Page 23: ...bout du canap inclinable lectroPlus a son propre moteur Rep rer les connecteurs des moteurs l arri re des modules de bout FIGURE 9 10 Le c ble de jonction du moteur double comporte deux longues extr...

Page 24: ...et rep rer les fixations du dossier et de la charpente FIGURE 2 Soulever l g rement le dossier et aligner les fixations du dossier avec celles de la charpente Faire basculer le dossier sur la charpen...

Page 25: ...quet de s curit R p ter cette tape au besoin pour chaque patin r glable 8 Rep rer les composants lectriques utiliser lors des tapes de montage suivantes FIGURE 8 9 Rep rer le connecteur du moteur l ar...

Page 26: ...ns les loquets de s curit avant et arri re Le loquet de s curit arri re n est pas verrouillable Note cause de variations dans le rembourrage et le mod le il se peut que la longueur du goujon filet soi...

Page 27: ...r relever le dossier et abaisser le repose jambes appuyez sur la partie sup rieure de l interrupteur d alimentation externe ou sur le bouton arri re de l interrupteur d alimentation interne et mainten...

Page 28: ...rer que le cordon d alimentation de 120 volts est bien branch dans une prise de courant 2 Vous assurer que la prise de courant fonctionne Par exemple vous assurer qu aucun fusible n a saut et qu aucun...

Reviews: