background image

22

7. Warming  up

After starting the engine, run the engine at the idling speed (throttle lever position is fully CLOSED) 

for a few minutes. 

Notice: 

Allow sufficient warm-up time to prevent engine damage and run the engine smoothly. The engine 

should be run at idle speed for a few minutes to allow it to warm up before applying a load. This will 

allow oil to reach engine parts, and allow piston clearance to reach design specifications. 

8. Adjusting

Fuel adjustment

The carburetor has been adjusted to the optimum fuel supply at the factory. Don’t reset the 

carburetor setting. 

Note:


If adjustment is needed, if should be performed by your authorized LawnKing dealer. 

9. Attach the equipment to the shoulder strap that has been put on (see chapter on “Putting 

      on the Shoulder Strap”).

10. To mow, hold the throttle lock (41) depressed and operate the throttle (42).

11. STOPPING

 • Move the throttle lever on the equipment to the fully CLOSED(engine idle speed) position, 

   and the engine running at idle speed. 

 • Turn the engine switch to the “O” (stopping) (40) position. 

Notice:

Suddenly stopping engine from high speed operation can cause engine damage. Reduce engine 

speed to idle speed to idle speed for one minute before shutting engine off after high-speed, 

full-load operation. 

Summary of Contents for DBT911254

Page 1: ...operating instructions carefully prior to using the machine Keep the instructions safe and pass them on to any subsequent user so that the information is always available Serial Number Translation of...

Page 2: ...ty information Symbols General description Assembly Operation Maintenance and service Troubleshooting Storage Disposal environmental protection Guarantee Technical specifications CE 2 3 3 8 10 13 18 2...

Page 3: ...by incorrect operation In order to be able to operate the equipment safely all instructions and information in the operating instructions about safety assembly and operation must be followed precisel...

Page 4: ...or which they have been constructed 5 Ensure appropriate clothing Clothing must be appropriate and not impede you when working Wear clothing with cut protection pads 6 Use personal protective equipmen...

Page 5: ...of damage and wear Are individual parts damaged In case of slight damage ask seriously whether the tool will nonetheless work properly and safely Ensure correct alignment and adjustment of moving par...

Page 6: ...nt in the rain or on damp grass 6 Before use or after an impact check the equipment for possible damage repair if necessary 7 Do not use the equipment if the safety devices are damaged or not correctl...

Page 7: ...it unattended Cleaning it Transporting it from one location to another Removing or replacing the cutting device and manually adjusting the length of the cutting thread When the metal cutting blade is...

Page 8: ...ils for the prevention of personal and property damage Command signs with details for the prevention of damage Information signs with information for better handling of the equipment 1 Read the operat...

Page 9: ...ds 13 Mix ratio 40 1 Use ONLY fuel mix STOPPING STARTING 14 Symbol on the choke lever Lever in cold start position START Lever in warm start position RUN 9 000 7 Caution Fuel and fuel fumes are flamma...

Page 10: ...e cable clamps 10 Anti vibration ring 11 Bike Handle 12 Handle Adjustment Knob 13 Shaft tube 14 Line cutter 15 Nylon Head Guard 16 Nylon Head 17 Cutting Line Spool 18 Metal cutting blade 19 Gear Housi...

Page 11: ...ugal clutch at high speed Picture 1 nos 15 20 Protects the operator from accidental contact with the cutting tool and foreign bodies being thrown out pic 2 41 40 42 4 Safety Functions On off switch pi...

Page 12: ...g fixings 24 Allen key 25 Maintenance Locking Pin 26 Maintenance Socket Spanner 27 Fuel mixing can 28 Shoulder Strap Instruction Manual The equipment has an automatic double thread reel as the cutter...

Page 13: ...p 9 on the shaft tube 13 With the small cable clamp 21 on the bike handle 11 Foldable function of bike handle for easy transportation 1 Turn counterclockwise several times to loosen tube fixing knob 1...

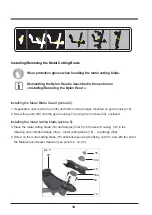
Page 14: ...a flanges mounted on gear housing 19 2 Screw the guard 20 onto the gear housing 19 using the 3 screws 34 enclosed Installing the metal cutting blade picture 5 3 Place the metal cutting blade 18 and fl...

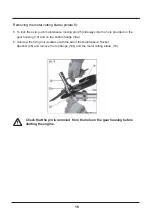
Page 15: ...tal cutting blade picture 6 5 To lock the axle push maintenance locking pin 25 sideways into the hole provided on the gear housing 19 and on the bottom flange 33a 6 Unscrew the fixing nut clockwise wi...

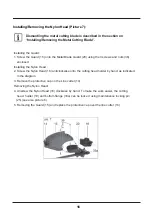
Page 16: ...cated in the diagram 3 Remove the protective cap on the Line cutter 14 Removing the Nylon Head 4 Unscrew the Nylon Head 16 clockwise by hand To make the work easier the cutting head holder 19 and bott...

Page 17: ...ne oil oil up to the 600 mark Close the container and shake carefully 2 Unscrew the tank cap 37 and pour the fuel mix into the fuel tank 2 Wipe away fuel residues around the tank cap and reclose the t...

Page 18: ...ulder strap 28 and close the strap clasp 38 2 Adjust the strap so it fits tightly 3 Adjust the strap so the spring clip 39 is around 10 cm below the hip 4 Fix the spring clip onto the carry ring for s...

Page 19: ...cture 10 Warning Never fill the tank so the fuel level rises into the filler neck If the tank is overfilled heat may cause the fuel to expand and overflow through the vents in the tank cap After refue...

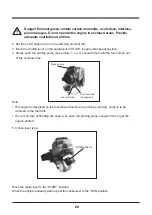
Page 20: ...ver to the RUN position Danger Exhaust gases contain carbon monoxide a colorless odorless poisonous gas Do not operate the engine in enclosed areas Provide adequate ventilation at all time 2 Set the o...

Page 21: ...g Releasing the starting rope suddenly may allow the rope to whip around and cause injury and or damage the recoil starting mechanism When starting the engine firmly grasp the recoil starter grip do n...

Page 22: ...the factory Don t reset the carburetor setting Note If adjustment is needed if should be performed by your authorized LawnKing dealer 9 Attach the equipment to the shoulder strap that has been put on...

Page 23: ...cutting head on the ground during operation Working Notes When cutting observe the countryspecific local regulations Do not cut during commonly applicable quiet periods Solid objects such as stones m...

Page 24: ...e line 2 The line cutter included in the mowing guard cuts the line to the desired length If the line ends no longer extend Switch off the equipment Press the reel insert until it stops and give a str...

Page 25: ...tting line spool 17 from the nylon head 16 5 To install the new spool thread both line ends through the eyes 44 in the nylon head Press the spool into the nylon head Ensure that the springs 45 are sit...

Page 26: ...ive line cutter If the line cutter blade is damaged contact our service centre 1 Switch off the engine 2 Remove the air cleaner cap from the air cleaner by removing the air cleaner cap screw 3 Remove...

Page 27: ...ilter regularly Warning Many solvents are highly flammable and may cause serious burns Improper use of solvents can result in fire or an explosion Do not use gasoline or low flash point solvents to cl...

Page 28: ...eduction of the engine 6 Check the spark plug gap and reset it if necessary The gap must be between 0 6mm and 0 7mm To change the gap bend only side electrode using a spark plug tool 7 Install and tig...

Page 29: ...29 TROUBLESHOOTING Service should be performed by an authorized LawnKing dealer...

Page 30: ...be stored over 30days should be completely drained of fuel to prevent gum deposits forming on essential carburetor parts fuel filter and fuel tank 1 Clean the engine 2 Remove all the fuel from the tan...

Page 31: ...p your receipt as proof of purchase Please always contact the service center to verify all the specific conditions of guarantee of this product DISPOSAL ENVIRONMENTAL PROTECTION Do not allow used oil...

Page 32: ...s 460 mm Thread thickness 2 5 mm Thread length 2 x 2 5 m Sound pressure level LpA 103 dB A Sound power level LwA Measure 112 dB A KpA 1 dB Sound power level Guaranteed 113 dB A Vibration an 9 3 m s2 K...

Page 33: ...ial health and safety requirements of the following directives The Machinery Directive 2006 42 EC The EMC Directive 2004 108 EC The Noise Directive 2000 14 EC 2005 88 EC The Directive Emissions 97 68...

Reviews: