background image

LAUNCH                                                                            CreaderVII English User’’s Manual 

4. Operations 

4.1 Connections 

1

˅

  Find the vehicle’’s DLC; 

2

˅

  Plug the OBD II connector of CreaderVII into DLC; 

3

˅

  Turn the ignition switch on;   

4

˅

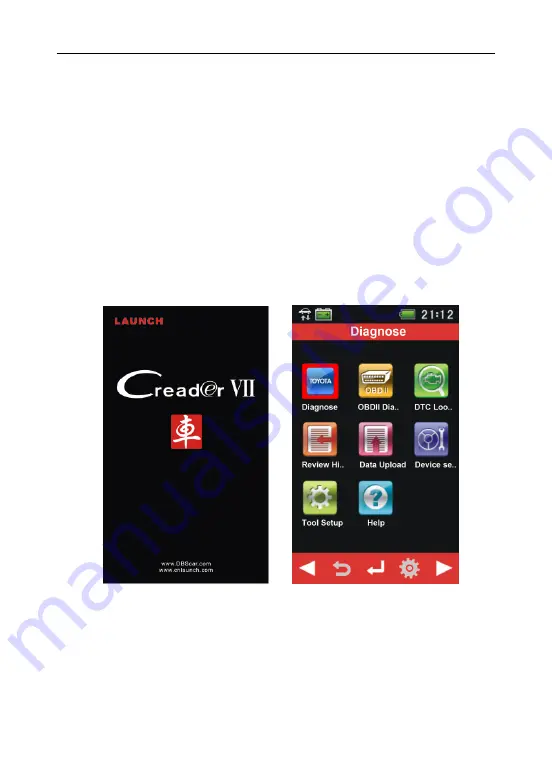
  CreaderVII automatically enter the start-up screen, as shown on Fig. 4-1.   


Notes:   

‹

  The ignition switch should be off when making connections.   

‹

  When turning the ignition on or engine is running, do not disconnect or connect any 

testing devices to avoid damage to vehicle or devices.   

 
5

˅

  Then the system enters the main menu screen, as shown on Fig. 4-2.   


Fig. 4-1                                                    Fig. 4-2 


10


Summary of Contents for CreaderVII

Page 1: ...2012 05 22 V1 00 000 ...

Page 2: ...use any trademark service mark domain name logo or company name of LAUNCH or any third party without permission from the owner of the applicable trademark service mark domain name logo or company name You may contact LAUNCH at www cnlaunch com or write to LAUNCH TECH CO LTD Launch Industrial Park North of Wuhe Avenue Banxuegang Bantian Longgang Shenzhen Guangdong P R China to request written permi...

Page 3: ... pertaining to the equipment and made available by LAUNCH with the equipment in any manner including on CD Rom or on line Unless otherwise expressly provided in the Document Customer shall use the Software solely as embedded in for execution on or where the applicable document permits installation on non LAUNCH equipment for communication with LAUNCH equipment owned or leased by Customer and used ...

Page 4: ...UNCH reseller NOTWITHSTANDING ANY OTHER PROVISION OF THIS AGREEMENT 1 CUSTOMER HAS NO LICENSE OR RIGHT TO USE ANY ADDITIONAL COPIES OR UPGRADES UNLESS CUSTOMER AT THE TIME OF ACQUIRING SUCH COPY OR UPGRADE ALREADY HOLDS A VALID LICENSE TO THE ORIGINAL SOFTWARE AND HAS PAID THE APPLICABLE FEE FOR THE UPGRADE OR ADDITIONAL COPIES 2 USE OF UPGRADES IS LIMITED TO LAUNCH EQUIPMENT FOR WHICH CUSTOMER IS...

Page 5: ...rify compliance with this Agreement In the event such audit discloses non compliance with this Agreement Customer shall promptly pay to LAUNCH the appropriate license fees plus the reasonable cost of conducting the audit Export Software including technical data may be subject to PRC export control laws including the PRC Export Administration Act and its associated regulations and may be subject to...

Page 6: ...sumable products other than those designated as Original LAUNCH Products or LAUNCH Approved Products by LAUNCH Safety Precautions and Warnings To prevent personal injury or damage to vehicles and or the CreaderVI please read this user s manual first carefully and observe the following safety precautions at a minimum whenever working on a vehicle z Always perform automotive testing in a safe enviro...

Page 7: ...A LINK CONNECTOR DLC 2 2 4 OBD II READINESS MONITORS 3 2 5 OBD II MONITOR READINESS STATUS 4 2 6 OBD II DEFINITIONS 4 3 PRODUCT DESCRIPTIONS 6 3 1 OUTLINE OF CREADERVII 6 3 2 MAIN MENU 7 3 3 SPECIFICATIONS 8 3 4 MAIN FEATURES 9 3 5 ACCESSORY INCLUDED 9 4 OPERATIONS 10 4 1 CONNECTIONS 10 4 2 DEVICE SELF TEST 11 4 3 TOOL SETUP 13 4 4 DIAGNOSING 16 4 5 DTC LOOKUP 18 4 6 HELP 18 5 UPDATE 19 6 FAQ 20 v...

Page 8: ...lved and the desire to improve the On Board Diagnostic system increased a new generation of On Board Diagnostic system was developed This second generation of On Board Diagnostic regulations is called OBD II The OBD II system is designed to monitor emission control systems and key engine components by performing either continuous or periodic tests of specific components and vehicle conditions When...

Page 9: ...or Diagnostic Link Connector is the standardized 16 cavity connector where diagnostic code readers interface with the vehicle s on board computer The DLC is usually located 12 inches from the center of the instrument panel dash under or around the driver s side for most vehicles If Data Link Connector is not located under dashboard a label should be there telling location For some Asian and Europe...

Page 10: ...on the motor vehicle manufacturer s emissions control strategy Continuous Monitors Some of the vehicle components or systems are continuously tested by the vehicle s OBD II system while others are tested only under specific vehicle operating conditions The continuously monitored components listed below are always ready 1 Misfire 2 Fuel System 3 Comprehensive Components CCM Once the vehicle is runn...

Page 11: ...a particular supported non continuous monitor has not been completed the monitor status will be reported as Not Complete or Not Ready In order for the OBD monitor system to become ready the vehicle should be driven under a variety of normal operating conditions These operating conditions may include a mix of highway driving and stop and go city type driving and at least one overnight off period Fo...

Page 12: ... been erased from the PCM s memory or after the battery has been disconnected Running through a vehicle s complete drive cycle will set the readiness monitors so that future faults can be detected Drive cycles vary depending on the vehicle and the monitor that needs to be reset For vehicle specific drive cycle consult the service manual Freeze Frame Data When an emissions related fault occurs the ...

Page 13: ...eys and interface No Name Descriptions USB port To connecto to PC for update Cable with OBD II connector To connect the CreaderVII to the vehicle s Data Link Connector DLC Power button To turn Creader VII on off TF card slot To save TF card LCD screen Inductive button Left Right arrow To select menu items or options 6 ...

Page 14: ...nfirm To confirm your selection or proceed to the next step Inductive button Return To return to the previous screen Buzzer Battery 3 2 Main menu Fig 3 2 shows the main menu of CreaderVII Fig 3 2 Table 3 2 formulates the detailed definitions of all indicators and operation buttons on CreaderVII main menu 7 ...

Page 15: ...n be executed it will be highlighted otherwise it will be displayed in gray Indicates that it can be done by pressing Left Arrow button on the main menu See Item No in Table 3 1 Indicates that it can be done by pressing Return button on the main menu See Item No in Table 3 1 Indicates that it can be done by pressing Confirm button on the main menu See Item No in Table 3 1 Indicates that it can be ...

Page 16: ...read DTCs datastream freeze frame vehicle information and clear DTCs etc z Provides data playback and upload z Features trouble code inquiry input the desired trouble code and find out the definitions of the trouble code z Supports DLC location inquiry z Update via USB or TF card User can update online via USB directly or download the update package into TF card then perform update 3 5 Accessory i...

Page 17: ...witch on 4 CreaderVII automatically enter the start up screen as shown on Fig 4 1 Notes The ignition switch should be off when making connections When turning the ignition on or engine is running do not disconnect or connect any testing devices to avoid damage to vehicle or devices 5 Then the system enters the main menu screen as shown on Fig 4 2 Fig 4 1 Fig 4 2 10 ...

Page 18: ...beeper works properly or not In main menu choose Device Self test and then click to enter Fig 4 3 Fig 4 3 1 LCD test This option allows you to test the display effect of the screen Choose LCD test and touch to confirm the screen will be displayed in pure color See Fig 4 4 Touch to switch to different colors Fig 4 4 11 ...

Page 19: ...and touch to confirm the screen will display as Fig 4 5 Fig 4 5 Normally the screen will display the corresponding button if one button is pressed or else the button malfunctions Touch to return to the previous screen 3 Beep test This option is to check if the buzzer sounds or not Choose Beep test and touch to confirm the screen will display as Fig 4 6 Touch to toggle between On and Off In general...

Page 20: ...ual Fig 4 6 4 3 Tool Setup In main menu select Tool Setup and touch to enter Fig 4 7 Fig 4 7 1 Language This option enables you to set the user interface language Choose Language and touch to confirm the screen will enter the language 13 ...

Page 21: ...ate This item is used to set the system date and time Choose Time And Date and touch to enter the setting interface as indicated on Fig 4 8 Follow the on screen instructions to finish your setting Fig 4 8 3 Beeper It is used to set On Off of the buzzer Choose Beeper and touch to confirm the screen enters Fig 4 9 Touch to switch between on and off 14 ...

Page 22: ...ecord mode This item lets you open or close record function Choose Record Mode and touch to confirm the screen enters Fig 4 10 Touch to switch between on and off If it is set to On CreaderVII starts recording DTCs datastream freeze frame etc Fig 4 10 15 ...

Page 23: ...ehicle model has been installed on your CreaderVII For vehicles manufactured by different vendors it is possible that it has different diagnostic menus For details please follow the instructions on the screen to proceed Take TOYOTA for example In main menu select Diagnose and touch to confirm the screen will display as Fig 4 11 Fig 4 11 Choose the desired one and touch the system will enter vehicl...

Page 24: ...and touch the screen will display the communication progress See Fig 4 15 Fig 4 15 After communication is complete the system will start diagnosing the selected item If communication failed a dialog box prompting you communication failure will appear as shown on Fig 4 16 17 ...

Page 25: ...s to input the trouble code After inputting touch to confirm the screen will display the definitions of your inquired trouble code Touch to return to the previous screen 4 6 Help This menu enables you to view device information and OBD introduction In main menu select Help and touch to enter Fig 4 17 Choose the desired itme and touch to view the detailed information 18 ...

Page 26: ...Tool Information displays software version hardware version series number etc About OBD gives a brief introduction of OBD 5 Update Visit www crecorder com and download the update package into your TF card via USB cable or TF card reader for update 19 ...

Page 27: ...it again Question Screen of main unit flashes at engine ignition start Answer Caused by electromagnetic disturbing and this is normal phenomenon Question There is no response when communicating with on board computer Answer Please confirm the proper voltage of power supply and check if the throttle has been closed the transmission is in the neutral position and the water is in proper temperature Q...

Page 28: ...eplacement and LAUNCH shall not be liable for any consequential or incidental damages Final determination of defects shall be made by LAUNCH in accordance with procedures established by LAUNCH No agent employee or representative of LAUNCH has any authority to bind LAUNCH to any affirmation representation or warranty concerning LAUNCH automotive meters except as stated herein Order Information Repl...

Reviews: