


DE/FR/IT/EN/ES/NL
Instructions for use
These instructions for use must be
carefully read before installation.
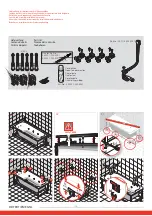
Check on content of delivery and condition of the com-
ponents
Check delivery after receipt for completeness and possi-
bly damage (see parts list on page
10). Inform the dealer
immediately when damage is apparent. We are not liable
for damage arising during or after installation/i tting.
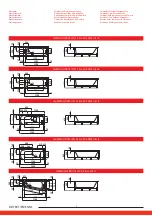
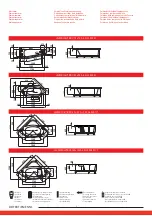
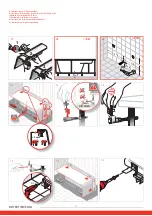
Check door width before starting work
Does the bath pass trough the door of the room in which
the bath will be installed? Required minimum door width:
See dimensions page 8+9.
Lifting/moving
Always hold bath on rim when lifting/moving - never on
hoses or installation parts.
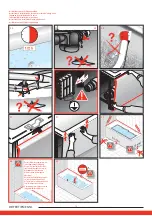
Laying circuits
Do not lay any circuits under the bath.
Protection from damage
Use suitable protective covers to prevent damage to
surfaces and blockages by dirt or dust arising during i t-
ting. Cover sensitive components (drain, nozzles, control
panel) temporarily with a protective cover before starting
the installation/i tting.
Special precautions
When cleaning the tiles, make sure that no ammoniac
or a similar aggressive cleaning agent come into contact
with the installed parts.
Electrical connection (230 V)
Must be performed by a qualii ed electrician. Fusing via a
FI protective switch (30 mA).
System execution
Maximum performance
605
0,77 kW
615
0,01 kW
635
0,84 kW
645
1,62 kW
675
1,63 kW
695
1,63 kW
056
3,00 kW
057
3,01 kW
Safety regulations
While installing the bathtub, a series of simple steps must
be followed in order to prevent possible accidents. The
installation must be carried out by qualii ed technicians.
The bathtub must be connected to a voltage of 230 V
AC at 50 Hz. The appliance must be supplied through a
residual current device (RCD), having a rated residual op-
erating current that does not exceed 30 mA. Additionally,
the electrical installation should be equipped with an
electrical switch to ensure all-pole disconnection from
the power supply. An equipotential connection must
be made between the metallic elements of the bath, in
accordance with the corresponding regulations of each
country.
Parts containing live components, except parts supplied
with safety extra-low voltage not exceeding 12 V, must be
inaccessible to a person in the bath.
Parts incorporating electrical components, except re-
mote control devices, must be located or i xed so that
they cannot fall into the bath.
Water connection through the water massage or over-
l ow.
As soon as the water inlet is below
the rim of the tub, the connection
must be made with a safety device
according to EN 1717 (Fluid category
5). For example, that might be a DC
safety device (e.g. a type A 1 pipe-in-
terrupter with permanent connection
to the atmosphere) depending on the
installation requirements.
This con-
nection must absolutely be ef ected
by a qualii ed specialist. This is to be
observed with:
(a) all tubs i lled through the overl ow.
(b) all tubs connected and i lled through the nozzles of
the water massage of the existing T-i tting. In both ver-
sions, the connection must be made using reinforced
elastic tubing carrying the premixed hot and cold water.
Feed rate:
Maximum 20 litres/min (EN 200)
Overl ow rate:
Minimum 36 litres/min (EN 274)
Drainage rate:
Minimum 48 litres/min (EN 274)
Permanent installation
Maintenance hatches of at least 50 x 50 cm are to be
provided so that technical parts (pump, blower, valves,
connection box, other connections) remain accessible.
Removable side panels are ideal and rigid elements are
always to be preferred.
Recommendation: Also provide 20 x 20 cm maintenance
hatches for drainage/overl ow. Install with sound insula-
tion.
The installation of a ventilation grill (not supplied) is ab-
solutely necessary. It is placed in the wall lining, depend-
ing upon the model of the tub. To be positioned near the
units.
Ventilation grid (min.150 cm
2
) for air supply to the blower
can be i tted inside the hatch. Maintenance hatch/venti-
lation grid can also be put in the adjacent room.
Recommendation: Install the ventilation grid with sound
insulation. The ventilation grid can also be in the adjacent
room.
If space is tight:
If there is not enough space for the
maintenance hatch, we recommend installing the tub by
„applying” it to the surfaces so that, if necessary, the com-
plete tub can be removed. Ensure that the drainage pipe,
electrical connections and if necessary the water supply
lines can be uncoupled through the ventilation opening.
Seal all round the edge of tub with silicone (acetic acid-
free).
Checking that the tub is waterproof
After connecting the water supply and drainage pipes,
the tub must be i lled and examined to ensure that it is
waterproof.
Check the following functions using the controls
1. Air system
2. Water pump
Setting the bath water temperature 40 °C should not be
exceeded.
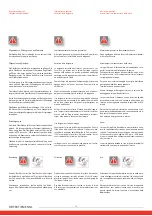
General installation instructions
Check on conte
5
Summary of Contents for SOLUTIONS 2.2250.1
Page 2: ......


