background image

POLSKI

42

A

3

A

2

<

3 mm / 10m = OK

A

3

A

2

A

2

A

1

A

1

A

2

4.

3.

2.

1.

Kontrola Kalibracji - przygotowanie: 

Można w każdej

chwili sprawdzić kalibrację. Stawiamy niwelator w środku
pomiędzy dwiema łatami (ścianami), które są oddalone o
co najmniej 5m. Dla najlepszego skontrolowania
używamy statywu, Kontrolka 11 wyłączona. Włączamy
niwelator.               

1.

Zaznaczamy punkt A1 na ścianie.

2.

Obracamy niwelator o 180° i zaznaczamy punkt A2.

Wskazówka:

Jeżeli punkty A2 i A3 leżą od siebie dalej niż 3 mm / 10
m konieczna jest kalibracja. Skontaktuj się z lokalnym
handlowcem lub serwisem Umarex-Laserliner.

Sprawdzanie linii pionowej:

Instrument ustawić ok. 5m od jednej ze ścian. Na ścianie
zawiesić pion o długości sznurka 2.5m. Pion powinien być
luźno zawieszony. Włączyć instrument i naprowadzić
pionowy laser na sznurek pionu. Instrument spełnia
wymagania tolerancji, jeżeli odchylenie linii lasera od
sznurka jest mniejsze niż ± 1.5 mm.

Sprawdzanie linii poziomej:

Instrument ustawić ok. 5m od jednej ze ścian i
włączyć. Zaznaczyć na ścianie punkt B. Odsunąć
laser o ok. 2.5m w prawo i zaznaczyć punkt
C. Sprawdzić, czy punkty B i C
leżą w poziomie
(tolerancja ± 2mm). Pomiar
powtórzyć przesuwając
laser w lewo.

AutoCross Laser 2

Kontrola Kalibracji:
3.

Ustaw najbliżej jak to możliwe ściany na wysokości 
punktu zaznaczonego A1.

4.

Obróć niwelator o 180° i zaznacz punkt A3. Różnica
pomiędzy A2 i A3 jest tolerancją. 

B

C

2,5 m

<

2 mm = OK

Summary of Contents for AutoCross Laser 2

Page 1: ...ing instructions Gebruiksaanwijzing Betjeningsvejledning Mode d emploi Instrucciones para su uso Istruzioni d uso Instrukcja Obs ugi K ytt ohje Instru es de uso 3 7 8 12 13 17 18 22 23 27 28 32 33 37...

Page 2: ...AutoCross Laser 2 2 Optional max 50 m...

Page 3: ...in einer Fachwerkstatt m glich ist Eine Kalibrierung Ihrerseits ist nur eine Ann herung und die Genauigkeit der Kalibrierung h ngt von Ihrer Sorgfalt ab Hinweis Das Produkt ist ein Pr zisionsinstrume...

Page 4: ...e f r Magnethalterung 6 1 4 Gewinde f r Fotostativ 7 Magnete 8 Schlitz f r einen Befestigungsriemen 9 5 8 Gewinde f r Baustativ 10 Handempf nger Modus 11 Kontrollleuchte AutoCross Laser 2 1 2 11 4 9 5...

Page 5: ...s Ger t zu schr g aufgestellt wurde au erhalb von 3 bzw 6 blinkt der Laser und es ert nt ein Warnsignal Dann das Ger t auf einer ebeneren Fl che aufstellen Hinweis berpr fen Sie regelm ig die Kalibrie...

Page 6: ...sieren die Laserlinien bis max 50 m Entfernung Bewegen Sie nun das Empfangsfeld F des Laserempf ngers durch die Laserlinien auf und abw rts horizontale Laserlinie bzw seitw rts vertikale Laserlinien b...

Page 7: ...Linie Ger t ca 5 m von einer Wand aufstellen An der Wand ein Lot mit einer 2 5 m langen Schnur befestigen das Lot sollte dabei frei pendeln Ger t einschalten und den vertikalen Laser auf die Lotschnu...

Page 8: ...ibration by yourself is only approximate and the accuracy of the calibration will depend on the care with which you proceed Note This product is a precision instrument that must be handled and treated...

Page 9: ...cal mount 6 1 4 nut for con to camera tripod 7 Magnets 8 Slot for fixing strap 9 5 8 nut for connection to constrution tripod 10 Hand receiver mode 11 Indicator lamp AutoCross Laser 2 1 2 11 4 9 5 8 9...

Page 10: ...sitioned too much out of level more than 3 or 6 the laser will blink and an acoustic warning signal will sound Position the device on a more level surface Note Regularly check the calibration before u...

Page 11: ...ating laser lines up to a maximum distance of 50 m Now move the receiver field F of the laser receiver through the laser lines upwards and downwards horizontal laser line and or sideways vertical lase...

Page 12: ...b with a line of 2 5 m length on the wall making sure that the bob can swing freely Switch on the device and align the vertical laser to the plumb line The precision is within the specified tolerance...

Page 13: ...weest Verder wijzen wij u erop dat een absolute kalibratie alleen mogelijk is bij uw vakspecialist Wanneer uzelf kalibreerd hangt het resul taat af van uw eigen nauwkeurigheid en kennis van zaken Opme...

Page 14: ...4 schroefdraad voor de magneethouder 6 1 4 schroefdraad voor fotostatief 7 Magneet 8 Sleuf voor een bevestigingsriem 9 5 8 schroefdraad voor bevestiging op statief 10 Handontvangermodus 11 Kontroleli...

Page 15: ...rbeeld 3 6 knippert de laser en hoort u een waarschuwingssignaal Daarna dient u de laser op een meer rechte ondergrond te plaatsen Belangrijk controleer regelmatig de kalibratie voordat u de laser geb...

Page 16: ...ij het pulseren tot max 50 m registreren Beweeg nu het ontvangstveld F van de laserontvanger door de laserlijnen omhoog en omlaag horizontale laserlijn resp naar opzij verticale laserlijnen totdat de...

Page 17: ...2 meter draad bevestigen de draad moet vrij kunnen pendelen apparaat instellen in de vertikale positie en wanneer u de draad nadert moet mag het verschil niet meer zijn dan 1 5 mm daarbij blijft u bi...

Page 18: ...mulig p autoriseret v rksted Foretages kalibrering af brugeren vil resultatet afh nge af dennes viden og omhu Bem rk En laser er et pr cisionsv rkt j der skal behandles med forsigtighed og omhu Undg...

Page 19: ...onsol 6 1 4 UNC gevind b sning til foto eller video stativ 7 Magneter 8 Revne til fastg relse m rem ej medlev 9 5 8 UNC gevind b sning til nivell r stativ 10 Lasermodtagerfunktion 11 Kontrollampe Auto...

Page 20: ...eren for skr t over 3 hhv 6 blinker laserstr len og en advarselstone lyder Er dette tilf ldet skal laseren rettes op i det ene eller i begge plan Bem rk Kontroll r regelm ssigt og altid ved p begyndel...

Page 21: ...e laserlinierne i en afstand op til ca 50 m Bev g nu lasermodtagerens modtagefelt F gennem laserlinien opad og nedad for at fange den vandrette laserlinie og derefter fra side til side for at fange de...

Page 22: ...rn dne Kontrol af lodret laserlinie Laseren opstilles ca 5m fra en v g P v ggen oph n ges et snorelod med 2 5m snor s ledes at det h nger frit Laseren t ndes og sigtes ind s den lodrette laser str le...

Page 23: ...Produit destin un usage professionnel pr sentant des dangers pour une autre utilisation que la prise de niveau Indication Ce produit est un instrument de pr cision qui doit tre manipul avec pr cautio...

Page 24: ...Filetage 1 4 pour raccord sur support magn tique 6 Filetage 1 4 7 Aimants 8 Fente pour courroie de fixation 9 Filetage 5 8 10 Mode r ception 11 Lampe de contr le AutoCross Laser 2 1 2 11 4 9 5 8 9 6 7...

Page 25: ...s clignotantes et acoustique signale que l appareil a t pos en dehors de la zone de mise niveau auto matique Il faudra dans ce cas chercher une position mieux l horizontale Indication Avant utilisatio...

Page 26: ...ce de 50 m max D placer le champ de r ception F du r cepteur de laser dans les lignes de laser vers le haut et le bas ligne laser horizontale le cas ch ant lat ralement lignes laser verticales jusqu c...

Page 27: ...eil env 5 m d un mur Fixer sur le mur un fil d aplomb avec une corde de 2 5 m de longueur Le fil d aplomb doit alors pendre librement Allumer l appareil et aligner le laser vertical sur le fil d aplom...

Page 28: ...ci n absoluta s lo es posible en un taller especializado La calibraci n realizada por el usuario s lo es una aproximaci n y la precisi n de la misma depender del cuidado con se realice Nota El product...

Page 29: ...n al soporte magn tico 6 Conexi n 1 4 para tr pode de c mara 7 Imanes 8 Ranura para cintur n de sujeci n 9 Conexi n 5 8 para tr pode de obras 10 Modo receptor port til 11 Piloto AutoCross Laser 2 1 2...

Page 30: ...can si el aparato fue instalado fuera de su margen de autonivelaci n En este caso buscar una posici n m s horizontal Nota Compruebe regularmente la calibraci n antes del uso despu s de transportes y d...

Page 31: ...ncia a trav s de la pulsaci n Mueva hacia arriba y abajo l neas l ser horizontal el campo de recepci n F del rayo l ser por las l neas l ser o lateralmente l neas l ser verticales hasta que se enciend...

Page 32: ...epita el proceso pero ahora girando la cruz de l ser hacia la izquierda Preparativos para la comprobaci n de la calibraci n Usted mismo puede comprobar la calibraci n del l ser Coloque el aparato en e...

Page 33: ...calibratura assoluta possibile solo in un officina spe cializzata La calibratura effettuata dall utente pu essere solo approssimativa precisione della calibratura dipende dall accuratezza con cui vie...

Page 34: ...gnetico 6 Filettatura da 1 4 per treppiede fotografico 7 Magneti 8 Fessura per cinghia di trasporto 9 Filettatura da 5 8 per treppiede da geometri 10 Modalit ricezione manuale 11 Lampadina di controll...

Page 35: ...eccessivamente inclinato oltre 3 o 6 il laser lampeggia e viene emesso un segnale acustico di avvertimento In questo caso collocare l apparecchio su una superficie meno inclinata N B Controllare peri...

Page 36: ...a il campo di ricezione F del ricevitore laser verso l alto e verso il basso attraverso le linee laser linea laser orizzontale o verso destra e verso sinistra linee laser verticali fino all accensione...

Page 37: ...a piom bo lungo 2 5 m il piombo deve poter oscillare liberamen te Accendere l apparecchio e puntare il laser verticale sul filo a piombo La precisione rientra nella tolleranza se lo scostamento tra l...

Page 38: ...owo sprawdza przed wa nym pomiarem po transporcie d ugim sk adowaniu dok adno kalibracji Dok adna kalibracja jest mo liwa jedynie w serwisie Kalibracja wykonana samodzielnie zale y od staranno ci jej...

Page 39: ...mocowania magnetycznego 6 Gwint 1 4 do statywu fotograficznego 7 Magnes 8 Wyci cie mocuj ce 9 Gwint 5 8 do statywu budowlanego 10 Tryb z odbiornikiem r cznym 11 Kontrolka AutoCross Laser 2 1 2 11 4 9...

Page 40: ...Je eli laser ustawiony jest zbyt pochy o poza 3 6 laser miga i wydaje ton ostrzegawczy Nale y ustawi laser bardziej poziomo Wskaz wka Prosimy sprawdza regularnie kalibracj zw aszcza po transporcie i...

Page 41: ...ie promieniowanie z odleg o ci do 50m Poruszamy teraz odbiornikiem polem F wzd u linii lasera odpowiednio w pionie dla linii pionowej i poziomo dla linii poziomej a za wieci si rodkowa dioda G Zaznacz...

Page 42: ...i pionowej Instrument ustawi ok 5m od jednej ze cian Na cianie zawiesi pion o d ugo ci sznurka 2 5m Pion powinien by lu no zawieszony W czy instrument i naprowadzi pionowy laser na sznurek pionu Instr...

Page 43: ...rointi on tarkistet tava ennen k ytt Vain alan erikoisliike pystyy suoritta maan absoluuttisen tarkan kalibroinnin K ytt j n suoritta ma kalibrointi antaa likim r isen tuloksen ja absoluutti nen kalib...

Page 44: ...ht 5 1 4 magneettijalustan kierreliitin 6 1 4 kierreliitin kolmijalkaan 7 Magneetit 8 Kiinnityshihnan aukko 9 5 8 kierreliitin kolmijalkaan 10 K sivastaanotto 11 Merkkivalo AutoCross Laser 2 1 2 11 4...

Page 45: ...sti Huomautus Jos laite on liian vinossa asennossa kallistus yli 3 tai 6 laser vilkkuu ja kuulet nimerkin Aseta laite tasaisemmalle pinnalle Huomautus Tarkista laitteen kalibrointi aina kuljetuksen ja...

Page 46: ...taa t ll taajuudella v r htelev t laserviivat max 50 metrin et isyydelt Siirtele laservastaanottimen vastaanottokentt F laserviivojen alueella yl s ja alasp in vaakasuuntainen viiva tai sivuttain pyst...

Page 47: ...stoon Pystyviivan tarkistus Aseta laite n 5 m n et isyydelle sein st Kiinnit mittaluoti sein n 2 5 m n pituisella langalla siten ett luoti p see vapaasti heilumaan K ynnist laite ja suuntaa pystys de...

Page 48: ...uinte comprovar regularmente a calibragem antes do uso depois do transporte e armazenagem prolongados Al m disso informamos que a calibragem absoluta s possivel numa oficina especializada A calibragem...

Page 49: ...suporte magn tico 6 Rosca 1 4 para trip para m quinas fotogr ficas 7 Magnetes 8 Ranhura para uma correia de fixa o 9 Rosca 5 8 para trip de constru es 10 Modo de receptor manual 11 L mpada de control...

Page 50: ...ocado demasiado inclinado fora de 3 ou 6 o laser pisca e soa um sinal de aviso Coloque a seguir o aparelho numa rea plana Nota Verifique regularmente a calibragem antes do uso depois de transporte e a...

Page 51: ...a seguir o campo de recep o F do receptor laser atrav s das linhas de laser para cima e para baixo linha de laser horizontal e ou para os lados linha de laser vertical at o LED central G acender Marqu...

Page 52: ...e Fixar um fio de prumo de 2 5m na parede podendo o fio mover se livremente Ligar o aparelho e orientar o laser vertical no sentido do fio de prumo A precis o est dentro da toler ncia se o desvio entr...

Page 53: ...53 AutoCross Laser 2 635 3 10 3 6 ACL 2 100 2 Umarex Laserliner 2M EN 60825B1 2007B10...

Page 54: ...54 1 2 3 4 5 5 8 6 1 4 7 8 9 5 8 o 10 11 AutoCross Laser 2 1 2 11 4 9 5 8 9 6 7 7 8 3 10 2...

Page 55: ...55 AutoCross Laser 2 1 RX Ready 3 6 3 6 3 10 20 3 x 1 5V AA 48 635 2M 5 0 5 0 C 50 C 10 C 70 C 50 05 2007...

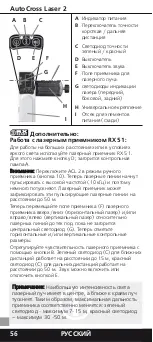
Page 56: ...56 7 15 30 50 RX 51 RX 51 D ACL 2 10 10 50 F G B C 15 C 50 E B A C D E G F I H AutoCross Laser 2 A B C D E F G H I...

Page 57: ...57 A3 A2 3 mm 10 m OK A3 A2 A2 A1 A1 A2 4 3 2 1 2 5 11 1 A1 2 180 A2 A1 A2 A2 A3 3 10 UMAREX LASERLINER 5 2 5 V1 V2 1 5 5 2 5 2 AutoCross Laser 2 3 A1 4 180 A3 A2 A3 B C 2 5 m 2 mm OK...

Page 58: ...AutoCross Laser 2 58...

Page 59: ...styr Accessoires en option Accesorios opcional Accessori optional Akcesoria opcja Lis mahdollisuuksia valinnaisvarusteilla Acess rios opcional GB DE NL DK ES IT PL FI Art Nr 090 120 FR Art Nr 080 29 m...

Page 60: ...KG Donnerfeld 2 59757 Arnsberg Germany Tel 49 2932 638 300 Fax 333 www laserliner com Umarex GmbH Co KG Laserliner M hnestra e 149 59755 Arnsberg Germany laserliner umarex com AutoCross Laser 2 GB DE...

Reviews: