WAL-BP-3XLED-CPR
Larson Electronics, LLC
Phone: (800) 369-6671
Fax: (903) 498-3364
www.larsonelectronics.com
1
of
2
108W Portable Emergency LED Light Tower
10,000 Lumens - USB Port & 12V Socket - 5.25' Tall Tower
Operation Manual
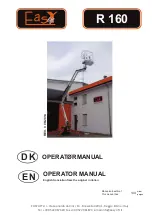
SETUP PROCEDURE
1.
Lay case on ground and open lid.
2.
Deploy legs by releasing latch and rotating leg out. Lift the locking pin for holding leg in place.
Once leg is aligned with locking pin, press pin down to engage.
3.
Repeat for leg on opposite side.
4.
Stand the light tower upright until it locks in place.
5.
Loosen adjustment knob and rotate light head upwards.
6.
Extend the light pole to the desired height by unlatching clips for each pole. Relatch clips to secure
each section.
7.
Unfold the light head and position lens up for spot light and down for flood light in one area. For all
around lighting, fold the light head to its 360° scene light configuration.
8.
Press the power button on the front to illuminate the light. 1
st
Press – Low Output, 2
nd
Press – Medium
Output, 3
rd
Press – High Output, 4
th
Press – Off.
9.
Close the lid.
BREAKDOWN PROCEDURE
1.
Turn light off by cycling through power button. (Additionally, light will automatically disengage once
folded into case.)
2.
Fold and rotate light head downwards. Loosen adjustment screw and tighten.
3.
Open lid.
4.
Lower telescoping pole to its fully collapsed position.
5.
Fold light tower assembly into case by depressing the pin toward the base of the mast to unlock it and
set it inside.
6.
Release locking pin holding each leg and fold toward case.
7.
Latch legs.
8.
Close lid and the light tower is ready for transport.
CHARGING
•
Orange Receptacle marked “Input” on side is used for line voltage charging. This can be via the
cigarette plug adapter or household 100-240V AC power supply. Connect either into Orange plug
connector and supply power to charge the battery.
POWERING
•
A waterproof power button is located on the front to power the light. Next to the power button is a
gauge which displays the current battery levels.
DC POWER RECEPTACLE
•
The light is equipped with 2 USB ports and a locking DC accessory receptacle, located toward the
center top of the case accessed from inside the box under the lid. Simply plug devices into these
ports for powering.
VEHICLE EXTERNAL POWER SOURCE
1.
Attach DC power cord charger into the “Input” side of the light tower.
2.
Plug the DC power cord into the DC accessory receptacle of your vehicle.
3.
It is recommended that the vehicle be running during operation in this mode as it will drain the vehicle
battery. The light DC accessory receptacle is connected directly to the internal battery.
NOTE: