


3
www.larsonelectronics.com
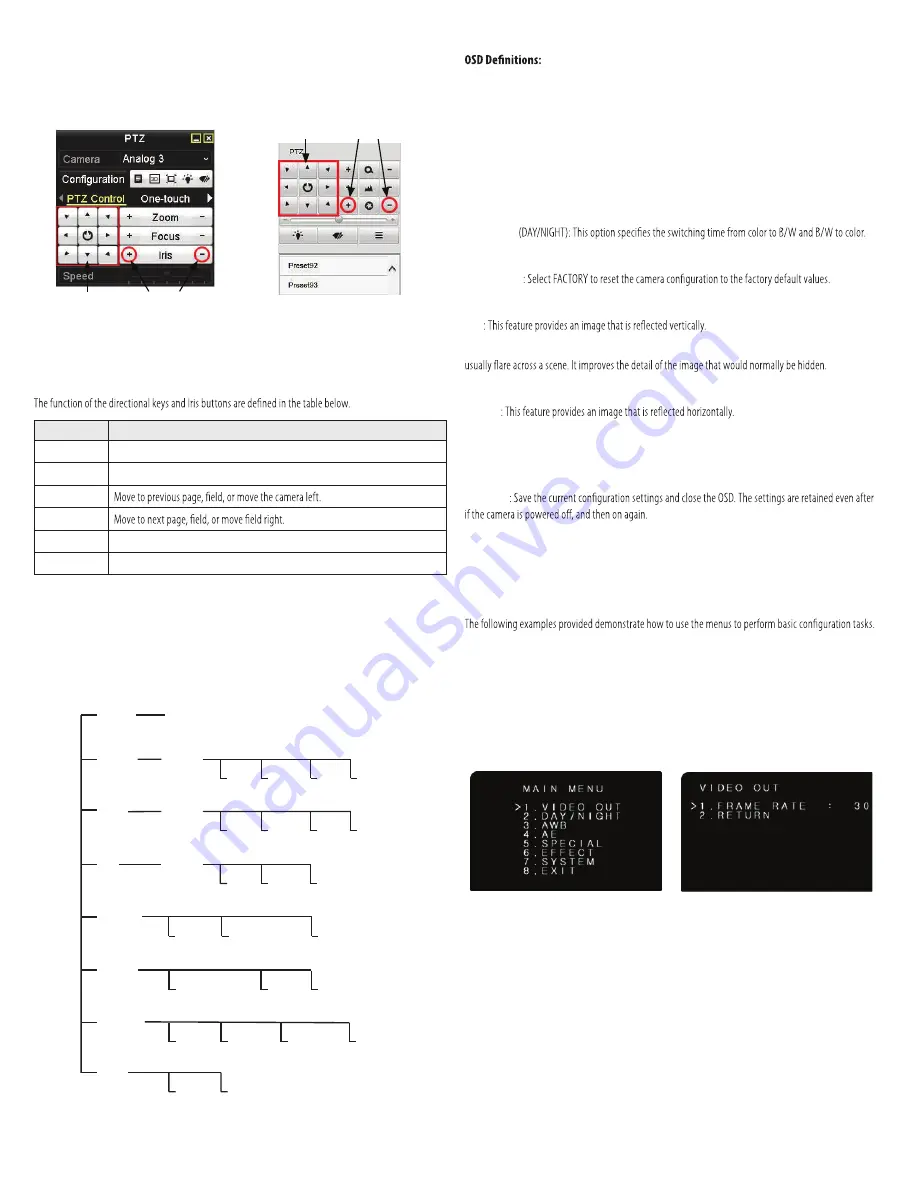
OSD menu navigation
For the HVR
: Navigation and settings in the OSD are made through direction keys and the
Iris +
and
Iris -
buttons in the HVR PTZ Control panel. See below.
Direction keys
Iris+ Iris–
Iris+ Iris–
Direction keys
HVR PTZ Control panel
HVR remote access PTZ control panel
For remote access to the HVR
: Navigation and settings in the OSD are made through direction keys
and the
Iris +
and
Iris -
buttons in the HVR PTZ control panel. See above.
Keys
Function
Move up in the parameter list
Move down in the parameter list.
Iris+
(OPEN)
Set parameter value, or open sub-menu
Iris–
(CLOSE)
Cancel change of parameter.
Step 4. Use the OSD menu to configure the camera
The abbreviated OSD menu tree is shown below.
MAIN MENU
EXT
COLOR
B/W
AUTO
VIDEO
OUT
VIDEO OUT (frame rate)
MODE
DAY/
NIGHT
AUTO
USER
PUSH
Set
Temp (K)
MODE
ESC
HOLD
DC
MODE
HLC
PRIVACY
MOTION
FLIP
MIRROR
Video settings
ID DISPL
NAME DISPL
LANGUAGE
FACTORY
INIT
CAM ID
SAVE/
EXIT
EXIT
AWB
AE
SPECIAL
EFFECT
SYSTEM
EXIT
AE
: Set automatic exposure mode.
AGC
(Automatic Gain Control): Higher gain increases brightness but also increases any noise. When a high
gain level is applied, higher noise levels are seen.
AWB
(Automatic White Balance): The function to search for the color which is matched well with the
ambient environment.
BLC
(Back Light Compensation): This feature enables the camera to compensate for strong back light
conditions in a selected area of the image.
DELAY TIME
D TO N
,
N TO D
: This option sets the AGC brightness when switching from day to night and night to day.
FACTORY INIT
FLICKER
: Feature used to reduce noise in the image produced by AC current at 60 Hz.
FLIP
HLC
(High Light Compensation): HLC feature is used to identify and suppress the strong light sources that
LSC
(Lens Shading compensation): This feature brightens the image in shaded areas.
MIRROR
MOTION
: The MOTION feature allows you to quickly identify areas of the image where motion is detected.
PRIVACY
: The PRIVACY feature allows you to block areas of the image from being seen. Use the SX, EX, SY,
and EY parameters to set the right, left, up and down limits of the privacy area.
SAVE/EXIT
SX
,
EX
,
SY
,
EY
: Sets the start and end X boundaries and the start and end Y boundaries of a PRIVACY or
MOTION area.
Examples
For clarity, the background video image was removed in the screens included here.
Example 1: Change video frame rate
The video frame rate parameter can be set using the Main Menu VIDEO OUT submenu. To change the
setting:
1.
Open the OSD Main Menu (see “Step 3. Open the OSD menu” on page 2).
2.
With the
>
marker at the VIDEO OUT entry, click the
Iris +
button to open the VIDEO OUT submenu
(see the right screen above.
3.
With the
>
marker at the FRAME RATE entry, click the
or
button to decrease or increase the
frame rate.
4.
Click the
button to position the
>
marker at RETURN, and then click the
Iris +
button to return
to the previous menu (MAIN MENU).
5.
Click the
button to position the
>
marker at EXIT, and then click the
Iris +
button to open the
EXIT submenu.
EXPCMR-ALG-1080P-
24
V


