

EPLC2-PT-2X150LED-RT
Larson Electronics, LLC
Phone: (877) 348-9680
Fax: (903) 498-3364
www.larsonelectronics.com
1
of
2
Explosion Proof 300 Watt Pole Top LED Light Fixture
35,000 Lumens - C1D2 / C2D1
Instruction Manual
Thank you for your purchase of the Larson Electronics EPLC2-PT-2X150LED-RT Explosion Proof LED light fixture.
WARNING
TO AVOID THE RISK OF FIRE, EXPLOSION OR ELECTRIC SHOCK, THIS PRODUCT SHOULD BE INSTALLED,
INSPECTED AND MAINTAINED BY A QUALIFIED ELECTRICIAN ONLY, IN ACCORDANCE WITH ALL
APPLICABLE ELECTRICAL CODES.
TO AVOID ELECTRIC SHOCK:
•
BE CERTAIN ELECTRICAL POWER IS OFF BEFORE AND DURING INSTALLATION AND MAINTENANCE.
•
PRODUCT MUST BE CONNECTED TO A WIRING SYSTEM WITH AN EQUIPMENT-GROUNDING
CONDUCTOR.
TO AVOID EXPLOSION:
•
MAKE SURE THE SUPPLY VOLTAGE IS WITHIN THE VOLTAGE RATING.
•
ENSURE THE MARKED T RATING IS LESS THAN THE IGNITION TEMPERATURE OF THE HAZARDOUS
ATMOSPHERE.
•
DO NOT OPERATE IN AMBIENT TEMPERATURES ABOVE THOSE INDICATED ON THE PRODUCT
NAMEPLATE.
•
DO NOT OPERATE IF THE LENS, CORD, SEALS, HOUSING, RECEPTACLES, ETC. IS CRACKED OR
DAMAGED. IF SO, DISCONTINUE USE AND CONTACT MANUFACTURER FOR REPLACEMENT PARTS.
•
ALL FASTENERS SHOULD BE PROPERLY SEATED.
The Larson Electronics EPLC2-PT-2X150LED-RT Explosion Proof pole top slip fitter light fixture provides operators with a
powerful and energy efficient alternative to traditional hazardous location luminaries. Cree LED technology and compact
design makes this lamp an excellent replacement upgrade option for bulky and high maintenance cost older fixtures.
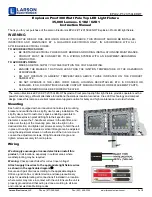
Mounting
Each unit is equipped with an innovative trunnion style mounting
bracket and is attached to a slip fit yoke for easy installation. The
slip fit yoke is built to customer`s specs, enabling operators to
mount this explosion proof LED light to their specific pole
diameter. Loosen the T-handle set screws in the slip fitter, and
slide over the top of the mounting pole. Face the light in the
desired direction, and tighten set screws securely to hold the unit
in place. Once light is mounted, vertical tilt angle can be adjusted
using the adjustment screws on either side of the trunnion mount.
Loosen the adjustment screws, tilt light to desired angle, and
tighten screws securely to hold in place.
Wiring
We strongly encourage a licensed electrician install this
product,
in all locations, especially in outdoor areas where
weatherproofing may be required.
Warning:
Check product label for correct input voltage!
Attach supply line wires to the appropriate light fixture wires
as shown in the applicable diagram
Secure each pair of wires according to the applicable diagram.
Utilize a junction box or similar device and take precautionary
steps for weatherproofing all connections if installed in a location
where water may come in contact with the unit. Ensure the unit is
properly grounded and that wiring is done according to all local
and national electrical/building codes.


