background image

3 Target Setup 

Linux Software Developers Kit (SDK) Quick Start Guide 

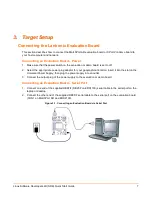
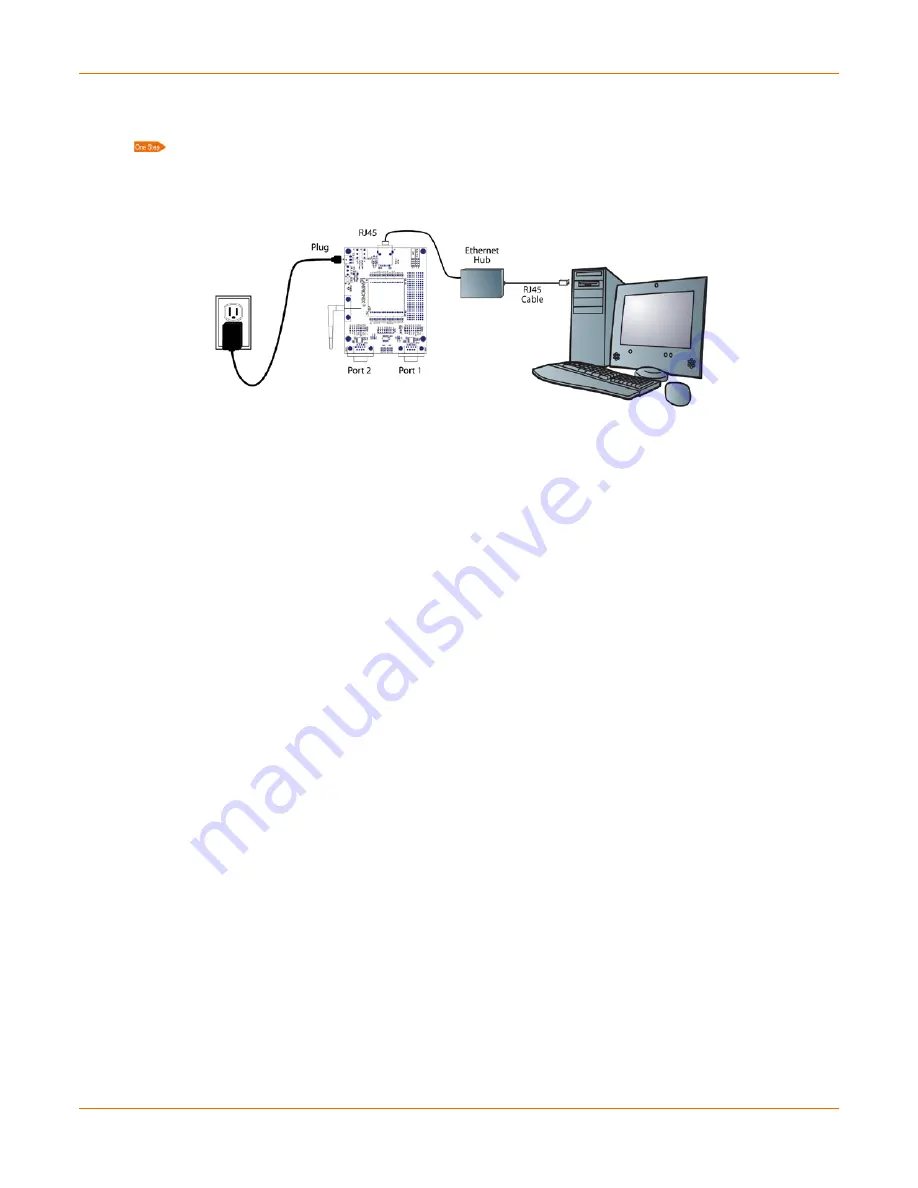
Connecting an Evaluation Board – Ethernet 


Connect the PC to the evaluation or demo board with a cross-over cable, or a hub/switch and two 

regular RJ45 cables. 

Figure 3-2. Connecting an Evaluation Board via Ethernet 


Connecting the EDS1100/2100 

1.  Select the appropriate power plug adaptor for your geographical location. Insert it into the slot on 

the Universal Power Supply; then plug the power supply into an outlet. 

2.  Connect the output plug of the power supply to the EDS1100/EDS2100. 

3.  Connect one end of the supplied DB9F/F (DB25F on EDS1100) serial cable to the serial port on 

the laptop or desktop. 

4.  Connect the other end of the supplied serial cable to the serial port on the EDS1100 (CON1 on 

EDS2100). 

5.  Connect the PC to the evaluation or demo board with a cross-over cable, or a hub/switch and two 

regular RJ45 cables. 

Booting the Target Device 

To boot your target device (MatchPort AR, XPort Pro, or EDS1100 / 2100): 

1.  From the host computer, open a terminal emulation program for the serial port. 

2.  Configure the following serial port settings: 

‹

‹


baud rate: 115200 

‹

‹


data length: 8 

‹

‹


parity: None 

‹

‹


stop bit: 1 

‹

‹


flow control: None 

3.  Turn the power on. 

A series of boot messages displays before the Linux shell prompt of ‘#’ appears. 

Summary of Contents for EDS1100

Page 1: ...Linux Software Developers Kit SDK Quick Start Guide Part Number 900 549 Revision C June 2010 EDS1100 2100...

Page 2: ...acts Lantronix Corporate Headquarters 167 Technology Irvine CA 92618 USA Phone 949 453 3995 Fax 949 450 7249 Technical Support Online www lantronix com support Sales Offices For a current list of our...

Page 3: ...ard 7 Connecting an Evaluation Board Power____________________________________________7 Connecting an Evaluation Board Serial Port ________________________________________7 Connecting an Evaluation Bo...

Page 4: ...of Figures Figure 3 1 Connecting an Evaluation Board via Serial Port 7 Figure 3 2 Connecting an Evaluation Board via Ethernet 8 Figure 4 1 Message Prompts 12 Figure 5 1 Configuration Profile Menu 13...

Page 5: ...etworking capabilities to your device The development board includes two RS 232 serial ports and a 10 100Base TX network connection RJ45 The XPort Pro module can be used to add networking capabilities...

Page 6: ...to UFL adapter cable XPort Pro The box contains the following items Cat5e UTP RJ45M M Ethernet cable XPort Universal Demo Board XPort Pro Development Board with BDM Connector 3 3V wall mount power sup...

Page 7: ...the appropriate power plug adaptor for your geographical location Insert it into the slot on the Universal Power Supply then plug the power supply into an outlet 3 Connect the output plug of the power...

Page 8: ...1100 EDS2100 3 Connect one end of the supplied DB9F F DB25F on EDS1100 serial cable to the serial port on the laptop or desktop 4 Connect the other end of the supplied serial cable to the serial port...

Page 9: ...rary static address issue the following command replace angle bracketed items with actual values ifconfig eth0 target_ip_address target_subnet_mask To set a static address that persists across reboots...

Page 10: ...distributions Fedora 9 10 11 12 Fedora Core 5 6 CentOS 5 2 5 3 5 4 groupinstall Development Tools installs additional development tools not necessary for the SDK or gcc make glibc devel python sudo l...

Page 11: ...hical configuration utility Other Distributions OpenSUSE 11 2 pattern install devel_C_C pattern install devel_kernel python sudo libacl devel tftp or tftpd hpa libtasn1 devel zlib devel rsync Optional...

Page 12: ...Run the installation script Use the full path to cdrom directory cdrom directory install sh 5 When prompted type Y to accept the installation directory 6 Install the directory install directory Y n Y...

Page 13: ...file when prompted NOTE If you are unsure of which configuration profile to use begin with the DEFAULT profile Figure 5 1 Configuration Profile Menu 5 Press Enter to accept the default options for the...

Page 14: ...linux images Figure 5 3 Installed Images 7 Build the root file system for NFS from the installation directory mkdir linux nfs make image bin imageu bin imagez bin linux bin linuxz bin image without_he...

Page 15: ...ownloads Please visit the Lantronix Web site or the Forums page to determine if a more current version of the SDK is available Individual forum topics are monitored by Lantronix engineers and technica...

Reviews: