background image

34

1.

Click setting application in main interface.

2.

Click Security.

3.

Click screen lock.

4.

Choose pattern in text setting area.

5.

Click next following the remind message.

6.

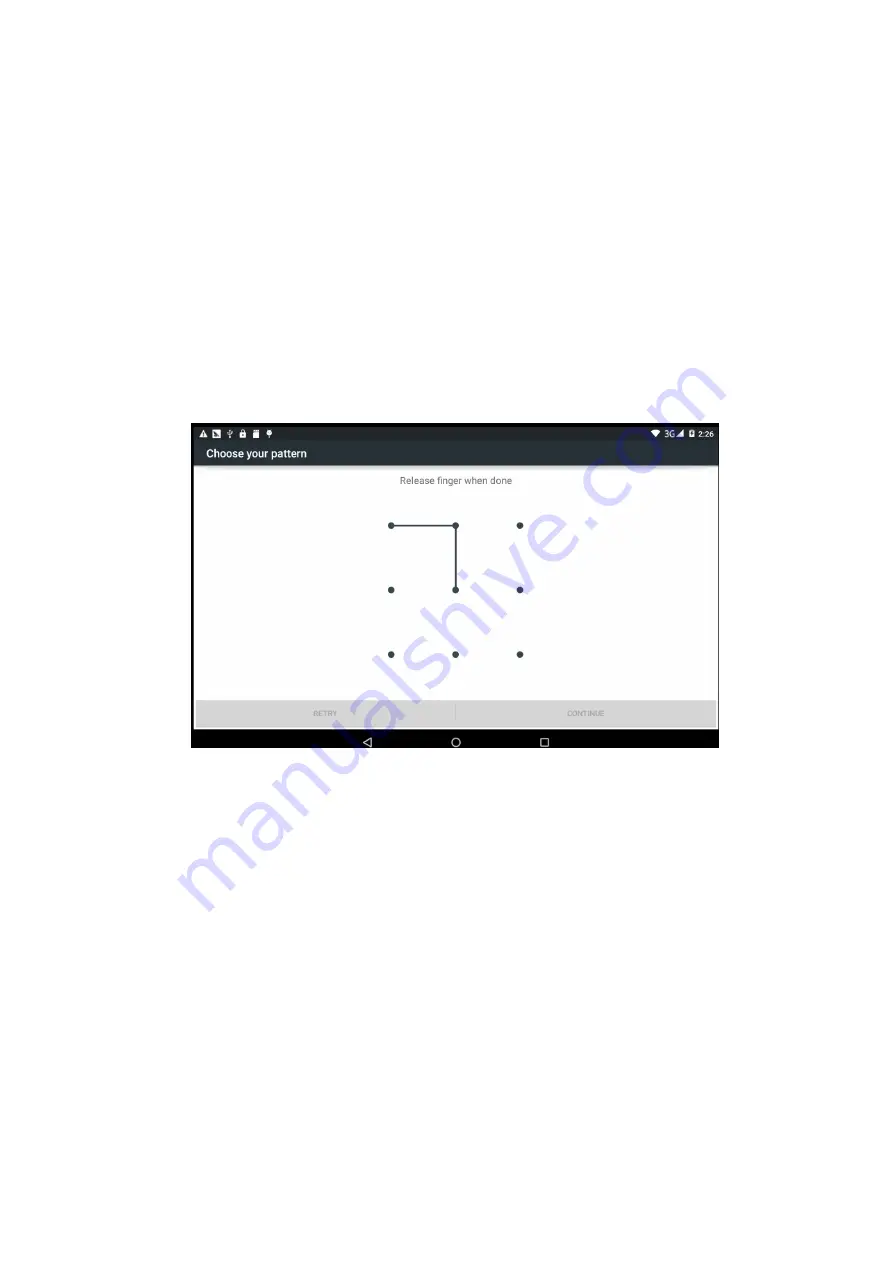
The unlocked pattern board pop up, there are nine touch spots, connect 4
points from vertical, horizontal or diagonal direction. As Picture 4.10, move
your finger from the screen when finish. The system will record your new
unlock pattern.

7.

Click continue.

8.

When you see the reminder, enter the unlock pattern, then click confirm.

Picture 4.34

Set unlock PIN code

1.

Click setting application in main interface.

2.

Click Security.

3.

Click screen lock.

4.

Choose PIN in text setting area.

5.

Enter new PIN code (numbers) and click continue.

6.

Enter new PIN code again and click confirm.

Set unlock password

1.

Click setting application in main interface.

2.

Click Security.

3.

Click screen lock.

4.

Set password in text setting area.

Summary of Contents for Ilium pad L8X

Page 1: ...f Touch Screen 8 3 5 Home Page 9 3 6 Visit Application Procedures 12 3 7 USB Connection 12 3 8 Typing words 13 3 9 Operation Technique 15 4 Basic Setting 15 4 1 Wireless and Internet 15 4 3Bluetooth 1...

Page 2: ...2 8 2 Calculator 51 8 3 File Manager 52 9 4 Recorder 54 9 Installation of Procedures 56 9 1 Installation 56 9 2 Uninstall 56 10 Troubles Shooting 57...

Page 3: ...onsumption to enter into a fresh palm internet entertainment time The manual systemically introduces the functions use techniques and announcements please read this manual carefully before your operat...

Page 4: ...vicinage of high accuracy electronic equipments Please don t disassemble the MID and accessories Only authorized agent has access to service the MID Please keep the MID far away from magnetic equipmen...

Page 5: ...reviation Terminology Full Name Description MID Mobile Internet Device Mobile Internet Terminal WIFI Wireless Fidelity Base on IEEE 802 11b g n standard wireless LAN T F TransFlash Alternative name Mi...

Page 6: ...Then you can close the reminder window through clicking the column to slide up Please refer to below status icons New email Airplane Mode on USB connected USB debugging connected Return button Downloa...

Page 7: ...y in menu interface Setting button display recently browsed history 3 2 Startup and Shutdown Startup Long press POWER key for three seconds you can enter into startup picture The system enters into sc...

Page 8: ...Picture 3 1 3 4 Usage of Touch Screen MID operating methods There are below methods to view the main screen menu and application procedure in your MID Click When you want to use the screen keyboard ty...

Page 9: ...picture 3 2 long press the blank and it will popup windows to set wallpaper folder widgets and shortcut Picture 3 2 The extended home page The home page can be extended beyond the wideness of screen...

Page 10: ...ne icon can also overlay several icons as Picture 3 4 2 Then click the overplayed icons the applications can be folded as Picture 3 5 Click the unnamed folder in the black box it will popup the hidden...

Page 11: ...l appear icons 2 Drag the icon to the above of the remove icon till the icon become red then move your finger to delete the icon Change the wallpaper of desktop 1 In home page long press any blank spa...

Page 12: ...mitting documents you have to conduct storage configuration for your MID 1 Connect the MID and computer by USB cable the reminder column will show the remind information 2 Open the reminder board plea...

Page 13: ...evices 5 After copying finishes Unplug the USB can 3 8 Typing words Use the screen keyboard When you start the procedure or choose the words or numbers edition it will show the screen keyboard The key...

Page 14: ...3 8 1 switch the capital and small letter 2 switch the mode of words input 3 click to insert the space 4 click input to execute 5 delete the character in the left of cursor click and hold to delete al...

Page 15: ...y icon to switch into desktop automatically drag and hold the icon you can move to any position in the desktop Remind If the target position has no space the widget won t be add in the main screen 4 B...

Page 16: ...re 4 1 2 Add Network 1 Click icon in right top as Picture 4 2 Picture 4 2 2 Input network SSID the wireless network name click save 3 Click user name already saved click connect to use network as Pict...

Page 17: ...Notice when WIFI signal appears the right bottom will remind you available WLAN network as Picture 4 1 4 Keep WI FI on during sleep 1 Click icon in right top of Picture 4 3 select advanced 2 Click Ke...

Page 18: ...ur surroundings click search device in right above then MID will automatically search the Bluetooth device nearby As picture 4 5 Picture 4 5 4 Click the available Bluetooth device it will popup reques...

Page 19: ...of Picture 4 3 as Picture 4 7 select rename tablet you can rename it as you want Picture 4 7 2 Display the file you received Choose display the file you received in Picture 4 7 you can view download...

Page 20: ...k Data Usage as Picture 4 9 Picture 4 9 4 5 More 4 5 1 Airplane Mode Airplane Mode can turn off WIFI and GSM card function quickly when airplane mode is turned on WIFI and GSM can t get any signal the...

Page 21: ...save Picture 4 10 Click VPN as Picture 4 11 input VPN user name and password click connect Picture 4 11 4 5 3 Network sharing and portable hotspots Portable WI FI hotspots 1 Click setting application...

Page 22: ...22 Picture 4 12 Picture 4 13 3 Click keep WI FI hotspots on choose open time 4 Return to previous menu open portable WLAN hotspots and click set up WI FI hotspots...

Page 23: ...connect Choose connect type Remark CMWAP transmitters data through GPRS the webpage it visit belongs to wap webpage and CMNET support www browse mobile phone network it can also log in webpage in com...

Page 24: ...data prior mode After Open GPRS data prior mode systems will priority chooses your network 4 6 Sound notification 1 Open settings click contextual model as Picture 4 16 Picture 4 16 2 Click standard...

Page 25: ...MID will vibrate when someone calls you 2 Volume In picture 4 17 click volume you can set ringtone notice and alarm volume as Picture 4 18 Picture 4 18 3 Voice call Ringtone In picture 4 17 click phon...

Page 26: ...election they can t be set 4 7 Display 4 7 1 Adjust the screen brightness 1 Click setting application procedure 2 Click display choose brightness 3 Drag the portion to adjust the brightness volume As...

Page 27: ...lpapers gallery user defined wallpapers system defect photos as Picture 4 21 Picture 4 21 4 7 3 Sleep 1 Click setting application 2 Click display 3 Click sleep 4 Set the sleep time as you want as Pict...

Page 28: ...lick preferred install location you can choose install new application to choose preferred install location Check SD card and MID storage space 1 Enter into setting application 2 Click storage check s...

Page 29: ...torage is MID local NAND storage as Picture 4 25 if you need to check the storage content you can check it in main menu Picture 4 25 2 SD card You can check storage space SD card available space unmou...

Page 30: ...cation 2 Click memory 3 Click uninstall SD card 4 Now you can remove SD card safely Note Removing SD card safely can protect SD card and increase its lifetime 4 9 Battery Click setting function select...

Page 31: ...cation in Apps 2 Select application after enter you can manage and delete installed application and check system used storage space and left space As Picture 4 28 Picture 4 28 3 View the working devic...

Page 32: ...and Sync 1 Select setting application 2 Open account and sync as Picture 4 30 Picture 4 30 3 Click add an account as Picture 4 31 Picture 4 31 4 After successfully load it will open the sync function...

Page 33: ...s Picture 4 33 Picture 4 33 4 13 Safety setting Set locked screen Lock the touch screen by unlock icon or password to protect your MID Note After setting screen locked you should enter the passcode ea...

Page 34: ...creen when finish The system will record your new unlock pattern 7 Click continue 8 When you see the reminder enter the unlock pattern then click confirm Picture 4 34 Set unlock PIN code 1 Click setti...

Page 35: ...wn source 1 In main interface click setting 2 Click Security 3 Click unknown source as Picture 4 35 Picture 4 35 Note Manual installing APK files needs to turn on unknown source 4 14 Language and Inpu...

Page 36: ...oogle keyboard setting and click input language as Picture 4 38 Picture 4 38 4 15 Backup and Reset Connect WIFI and login your google account choose backup my data system will backup your data into go...

Page 37: ...ne 5 Click Zone Selecting then choose the zone lists Slide down the list to view more zones 6 Click Date setting then click upper or down button to adjust date month and year click setting when you fi...

Page 38: ...me zone 4 17 Fixed time Startup and Shutdown 1 Click Setting application procedure 2 Click Schedule power on off 3 Operate as below Picture 4 41 Picture 4 41 Click it into fixed time startup setting C...

Page 39: ...Touch and hold delay Click touch and hold delay to increase time as Picture 4 42 Picture 4 42 4 19 Developer options 4 19 1 USB adjustment After opening USB adjustment you can use some software to rea...

Page 40: ...sh it will display related area when the area is refreshing 4 19 6 Show CPU usage After open CUP usage in the right top of MID will show CPU usage situation as Picture 4 43 Picture 4 43 4 20 About Tab...

Page 41: ...r into music player in menu or desktop click music icon to enter into music player click the music you want to play as Picture 5 1 Picture 5 1 Picture 5 2 Singer Pause play Next song Previous song Art...

Page 42: ...he fingers the picture will be zoom in or double click the screen Note when you browse the pictures slide left or right to view more pictures Edit and set pictures When check the pictures in full scre...

Page 43: ...of camera Switch camera choose Menu key click switch front back camera as Picture 5 4 Picture 5 4 5 4 FM Radio Click in the main interface or desktop to enter into FM radio interface Radio button oper...

Page 44: ...o save the channel and the channel will be saved in channels list Note You need to insert earphone as antenna when using FM radio if no antenna your MID can t search any frequency band Open speaker Sa...

Page 45: ...ction 6 1Phone 1 Click Phone application procedure 2 Operate as Picture 6 1 Picture 6 1 6 2 Text Message 1 Enter into main menu choose application procedure 2 Click Edit new message Display phone numb...

Page 46: ...erface enter into the contact list as Picture 6 3 Picture 6 3 Search contact click button enter into search function Add contact click button enter into add contact interface Directly input phone numb...

Page 47: ...he main menu or desktop to enter the IE interface as Picture 7 1 Picture 7 1 Click address bar to input the website click start enter into related webpage then you can browse the website information a...

Page 48: ...Email Email application procedure contains email setting guide you can add the external POP3 OR IMAP email account of normal web email service provider For instance Yahoo Gmail Hotmail and 163 as Pict...

Page 49: ...the email account You can delete settled POP3 or IMAP email account from your MID Click 1 Click setting procedure application 2 Click Accounts 3 Press the account you want to delete 4 Click icon in ri...

Page 50: ...50 Picture 7 3 Click it and Add attachment...

Page 51: ...procedure enter into below interface as Picture 8 1 There are clock picture music and homepage buttons Picture 8 1 8 2 Calculator 1 Click 2 Enter into the basic board of calculator 3 Soft touch the n...

Page 52: ...r will copy cut delete rename the documents or the folder in the TF card it also will share the files install APK etc In the main menu or desktop click the document manager icon to enter into document...

Page 53: ...o enter into the interface as Picture 8 4 you can operate the file or folder Picture8 4 B Paste the copy or cut file choose the file you want to paste icon to enter into Picture 8 5 Picture8 5 C Share...

Page 54: ...new folder as reminder 8 4 Recorder In the main interface or desktop click recorder icon to enter into record interface click record key to start record Click Stop key to stop recording Click Play ke...

Page 55: ...55 Picture8 8...

Page 56: ...ocedure searched from internet to use on the system are all suffixed with apk 9 2 Uninstall Uninstall application procedure 1 Click setting icon in main interface 2 Click manage application procedure...

Page 57: ...the lightest or under charging MID may feel fever It is normal 4 Email can t be set or Registration of application procedure Ensure your internet is well connected Make sure your email setting way is...

Page 58: ...ures Reorient or relocate the receiving antenna Increase the separation between the equipment and receiver Connect the equipment into an outlet on a circuit different from that to which the receiver i...

Page 59: ...rted SAR levels evaluated as in compliance with the FCC RF exposure guidelines SAR information on this model phone is on file with the FCC and can be found under the Display Grant section of http www...

Reviews: