Landmark L3024UI1M-LH Owner'S Manual Download Page 11

11

tIp

If you powered the unit off, please wait at least five (5) minutes before powering it back on.

warnInG

Allow at least 24 hours for your refrigerator to run before storing your beverages. Whether your refrigerator can reach the actual set 
temperature depends on the ambient environmental conditions.

tIp

Close the door to determine if the light is currently in Constant Mode or Automatic Mode. In Constant Mode the lights will remain 
illuminated, and in Automatic Mode the lights will fade out once the door is closed.
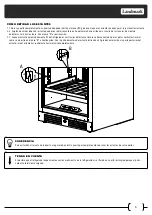
InterIOr lIGhtInG

autOMatIc lIGht MOde 

The internal lights will illuminate each time the door is opened and slowly fade out once the door is closed. This mode is controlled by the door 
switch located on the front of the unit. The switch enables the refrigerator to recognize when the door is open and when it is closed. Automatic 
light mode is suggested to mitigate energy consumption of your Landmark refrigerator.

dOOr ajar alarM

This refrigerator includes a door ajar alarm, which will sound if the door is open for more than three (3) minutes. Leaving the door open for 
extended periods of time will cause poor cooling performance and may shorten the life of the refrigerator. Keep the door closed as frequently as 
possible.

teMperature alarMs

If the interior temperature reaches higher than 73°F (23°C), "HI" is shown on the temperature display and the alarm will sound continuously after 
one hour. 
If the interior temperature reaches lower than 32°F (0°C), "LO" is shown on the temperature display and the alarm will sound continuously after 
fifteen minutes. 
If either of these situations occurs, please reference the troubleshooting section found in this manual or contact Landmark for support.

nOte

We run test every unit that we produce in our factory. Because of this, your model may default to any of the above settings out of the 
box. Simply cycle through the progression of settings until you reach your desired light setting. 

dIsplay lIGht MOde 

The internal lights will remain illuminated, regardless of whether the door is open or closed. Display mode allows you to showcase the contents of 
your refrigerator.

Summary of Contents for L3024UI1M-LH

Page 1: ...Owner s Manual 24 Inch Undercounter Single Zone Series Model Numbers L3024UI1...

Page 2: ...he unit if it makes strange sounds emits smells or smoke comes out of it and contact customer service Do not remove any part of the casing unless instructed to do so by an authorized technician You sh...

Page 3: ...enance 12 Interior Cleaning 12 Exterior Cleaning 12 Preparing Your Refrigerator for Storage 13 Troubleshooting 13 Specifications 14 Landmark Product Warranty 15 First time operating instructions Befor...

Page 4: ...unit and are needed to obtain warranty service You may also want to staple your receipt to this manual as it is the proof of your purchase and is also needed for service under your warranty Model Numb...

Page 5: ...less Steel Door Door Handle Front Vent Roll out Shelf Control Panel Leveling Legs Upper Door Hinge Lower Door Hinge Carbon Filter Door Switch Note The number of shelves in your refrigerator varies dep...

Page 6: ...llation requirements 3 If the electrical outlet for the refrigerator is behind the cabinet plug in the refrigerator 4 Push the refrigerator into position The refrigerator should be installed in accord...

Page 7: ...a three prong grounding plug To minimize possible shock hazard the cord must be plugged into a mating three pronged wall socket and grounded in accordance with the National Electrical Code and local...

Page 8: ...e able to open at least 90 degrees for the shelves to properly clear the door gasket 2 Identify the slots corresponding to your desired shelf height Ensure that all four 4 track slots left and right f...

Page 9: ...ator cabinet The rear shelf pegs will disengage from the rear vertical tracks as shown in step B below With the front of the shelf angled 20 degrees above the back of the shelf pull the shelf forward...

Page 10: ...ress and hold this button for two 2 seconds again and the unit will power off and the Run indicator light will turn off increase temperature Press this button to increase the temperature by one 1 degr...

Page 11: ...erator includes a door ajar alarm which will sound if the door is open for more than three 3 minutes Leaving the door open for extended periods of time will cause poor cooling performance and may shor...

Page 12: ...h pitched sound The internal evaporator fan will run frequently to create a consistent internal temperature environment Water running from the evaporator to the water bin may make a splashing sound As...

Page 13: ...t have the suggested ventilation Read and follow the Installation Clearance Requirements section The refrigerator does not turn on There is a power failure Ensure the refrigerator is plugged in and th...

Page 14: ...t properly The refrigerator is not level Make sure the refrigerator is on a level surface The door gasket is dirty Clean the door gasket The door gasket is not installed correctly Make sure the door g...

Page 15: ...se Labor service transportation and shipping charges for the removal and replacement of defective parts beyond the initial 36 month period Products that have been modified to perform outside of specif...

Page 16: ...landmarkappliances com 2019 Landmark 0419 1192810 Landmark Manual Version 1 0...

Page 17: ...Manual del propietario Refrigerador bajo mostrador de una sola zona de 24 pulgadas N mero L3024UI1...

Page 18: ...t conectada Desconecte la unidad de inmediato si hace ruidos extra os emite olores o sale humo de ella y comun quese con el servicio al cliente No retire ninguna pieza de la unidad salvo que se lo ind...

Page 19: ...nto 12 Limpieza interior 12 Limpieza exterior 12 C mo preparar su refrigerador para el almacenamiento 13 Resoluci n de problemas 13 Especificaciones 14 Garant a del producto de Landmark 15 Instruccion...

Page 20: ...servicio cubierto por la garant a Tambi n puede abrochar su recibo a este manual ya que es el comprobante de su compra y se necesita para obtener servicio cubierto por la garant a N mero de modelo N m...

Page 21: ...ija de la Puerta Ventilaci n frontal Estante Deslizable Panel de Control Pies Niveladores Bisagra Superior de la Puerta Bisagra Inferior de la Puerta Filtro de Carb n Activado Interruptor de la Puerta...

Page 22: ...cuentra detr s del gabinete con ctelo 4 Empuje el refrigerador hasta que llegue a su posici n El refrigerador se debe instalar conforme a los requisitos del c digo el ctrico local Tambi n se debe colo...

Page 23: ...exi n a tierra con tres clavijas Para minimizar una posible descarga el ctrica el cable debe estar conectado a un enchufe de pared de acoplamiento para tres clavijas y con conexi n a tierra conforme a...

Page 24: ...correctamente 2 Identifique las ranuras correspondientes a la altura deseada de su estante Aseg rese de que las cuatro 4 ranuras de pista izquierda y derecha delantera y trasera est n a la misma altu...

Page 25: ...dor Las clavijas del estante trasero se desconectar n de las pistas verticales traseras como se muestra en el paso B a continuaci n Con la parte delantera del estante inclinada a 20 grados en relaci n...

Page 26: ...la unidad est encendida y funcionando Mantenga presionado este bot n nuevamente durante dos segundos y la unidad se apagar al igual que la luz indicadora Run c mo aumentar la temperatura Presione este...

Page 27: ...erta permanece abierta durante m s de tres 3 minutos Dejando la puerta abierta por per odos de tiempo m s largos reducen el rendimiento de refrigeraci n y pueden limitar la utilidad del refrigerador M...

Page 28: ...ia puede emitir un ruido vibrante o agudo El ventilador interno funcionar con frecuencia para generar un ambiente con una temperatura interna constante Es posible que el agua que fluye desde el evapor...

Page 29: ...la ventilaci n sugerida Lea y siga la secci n Requisitos de espacio para la instalaci n El refrigerador no se enciende Se ha producido un corte de energ a Aseg rese de que el refrigerador est conectad...

Page 30: ...que el refrigerador est en una superficie nivelada La junta de la puerta est sucia Limpie la junta de la puerta La junta de la puerta no est correctamente instalada Aseg rese de que la junta de la pu...

Page 31: ...ra servicio de transporte gastos de env o relacionados al reemplazo de partes defectuosas m s all per odo inicial de 36 meses Productos que han sido modificados sin el permiso previo por escrito de La...

Page 32: ...landmarkappliances com 2019 Landmark 0419 1192810 Landmark Manual Version 1 0...

Reviews: