VER. 2, 10/22/2012
Assembly and Operating
Instructions for Model:
560200
!
PLEASE READ ALL RULES FOR SAFE
OPERATION AND FOOD SAFETY BEFORE USING.
Smoky Mountain Series
Vista Charcoal Grill
®
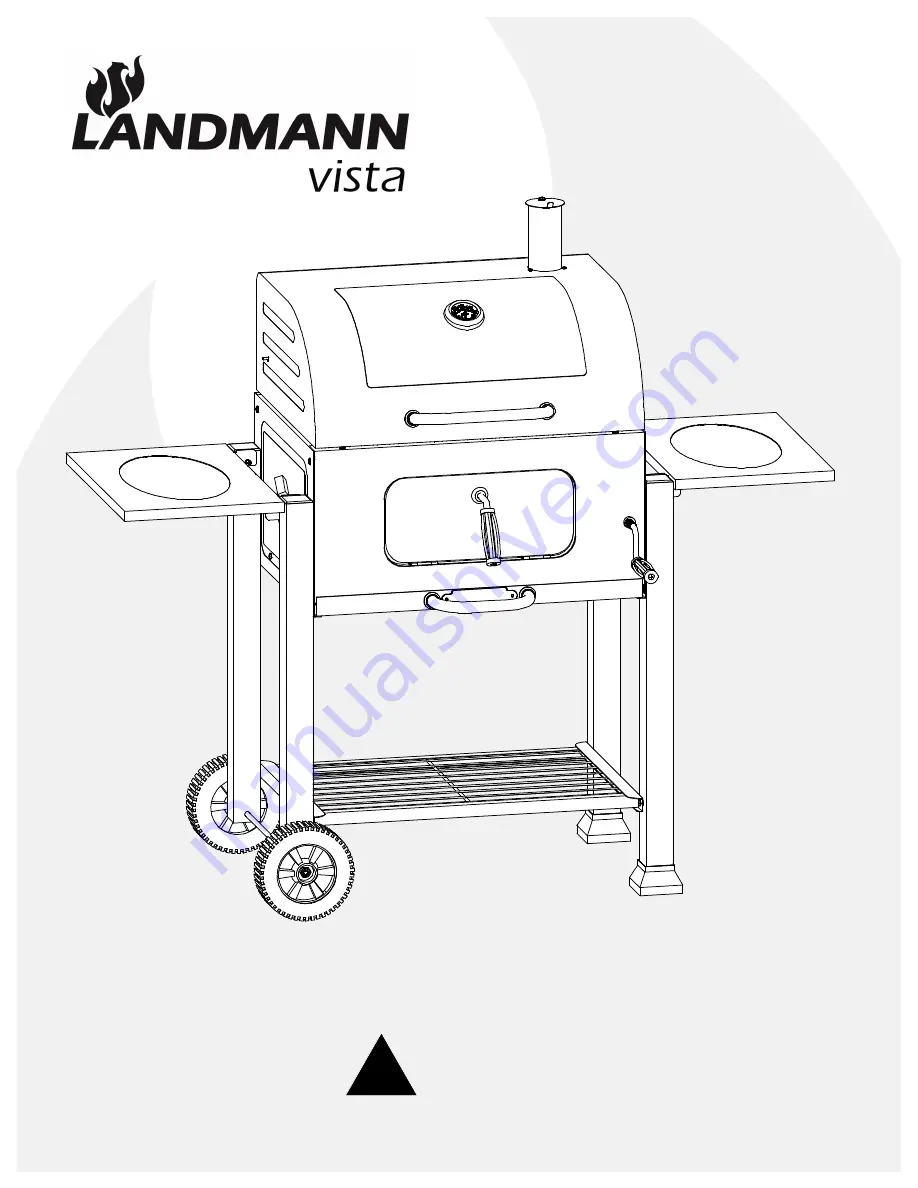
Page 1: ...VER 2 10 22 2012 Assembly and Operating Instructions for Model 560200 PLEASE READ ALL RULES FOR SAFE OPERATION AND FOOD SAFETY BEFORE USING Smoky Mountain Series Vista Charcoal Grill...
Page 2: ...AST IRON GRATES ON THE GROUND DO NOT LEAN OR PUSH DOWN ON THE SIDE SHELVES USE CAUTION AFTER THE FIRE HAS BEEN EXTINGUISHED SURFACES WILL REMAIN HOT FOR SOME TIME BE SURE ALL COALS ARE COLD BEFORE DIS...
Page 3: ...2 x 4 PAGE 3 BD 4 M6 x 35MM BOLT x 4 BE 4 M6 x 45MM BOLT x 4 BP 1 M5 x 28MM STUD BOLT x 1 BH 5 M6 HEXNUT x 5 BJ 2 M10 LOCKING HEXNUT x 2 x 2 x 3 BM 10 FLAT WASHER x 10 BN 10 LOCKING WASHER x 10 BG 8 M...
Page 4: ...PART LISTING PAGE 4 A 1 LID B 1 BACK PANEL C 1 LEFT PANEL D 1 RIGHT PANEL E 1 FRONT PANEL F 1 CHARCOAL PAN ASSEMBLY G 1 ASH TRAY H 1 BOTTOM SHELF J 2 SIDE SHELVES...
Page 5: ...PART LISTING PAGE 5 R 2 WHEELS S 1 WHEEL AXLE M 1 LEG FRONT LEFT N 1 LEG BACK LEFT L 1 LEG BACK RIGHT K 1 LEG FRONT RIGHT P 2 CAST IRON COOKING GRATES Q 1 WARMING GRATE...
Page 6: ...Y V 2 VENTS W 2 LEG FEET 1 CHARCOAL PAN ADJUSTMENT HANDLE ASSEMBLY X Y 1 CHARCOAL DOOR HANDLE ASSEMBLY Z 1 CHIMNEY CAP AB 1 ASH TRAY HANDLE AA 1 LID HANDLE AE 2 LID UPPER HINGES AF 2 LID LOWER HINGES...
Page 7: ...ighten bolts securely STEP 2 ASSEMBLE THE FRONT PANEL Align front panel E with the left and right panel threaded inserts Assemble using 4 M6 x 10MM bolts BC Tighten bolts securely STEP 3 ASSEMBLE THE...
Page 8: ...exnuts BJ Tighten until the axle threads reach the plastic on the locking hexnut STEP 4 ASSEMBLE THE BOTTOM SHELF Align the bottom shelf H with the leg threaded inserts and assemble using 4 M6 x 10MM...
Page 9: ...ooking chamber making sure the rod end and mechanism are up Align the assembly bars with the holes and assemble using 4 M6 x 10MM bolts BC See STEP 6 Assemble the mechanism by placing the bottom tab i...
Page 10: ...P 8 ASSEMBLE THE CHARCOAL DOOR HANDLE ASSEMBLY Assemble the charcoal door handle Y to the door as shown Place the finishing washer AD between the door and the handle on the outside The handle key AC w...
Page 11: ...es AF to the back panel Align with the holes threaded inserts and use 2 M6 x 45MM bolts BE 2 flat washers BM and 2 locking washers BN per side Do not tighten keep loose Next assemble the 2 lid upper h...
Page 12: ...de the lid through the hole Assemble with 3 M4 x 10MM bolts BQ and 3 M4 hexnuts BR Tighten bolts securely Place the chimney cap Z on the chimney and assemble using 1 M6 x 10MM bolt BC 1 flat washer BM...
Page 13: ...g grates with care as the cast iron grates can chip crack or break if hit or struck with a sharp object Do not drop the cast iron grates on the ground STEP 13 ASSEMBLE THE SIDE SHELVES Align side shel...
Page 14: ...DUCT TO THE STORE IF YOU HAVE QUESTIONS OR HAVE TROUBLE WITH ASSEMBLY PLEASE CALL 1 877 347 4557 FOR ASSISTANCE STEP 15 ASSEMBLE THE WARMING GRATE Assemble the warming grate Q to the cooking chamber b...
Page 15: ...for the desired temperature The type charcoal and the climate conditions can affect the grill temperature 9 Carefully wipe the cooking grate surfaces with vegetable oil to keep the food from sticking...
Page 16: ...l done Pork Turkey Chicken Poultry Medium rare Medium Well done Bison Medium rare Medium Well done Lamb Use a high quality meat thermometer with probe to measure the meat temperature Push probe into t...
Page 17: ...ed by Landmann USA Cartersville GA 30120 www landmann usa com Made in China 2012 Landmann USA PAGE 17 HOT SURFACES DURING USE HANDLES BECOME WARM TO HOT WITH EXTENDED USE SIDE SHELF 10 LBS MAX DO NOT...
Page 18: ...hemical exposure These warranties do not cover surface scratches or heat damage which is considered to be normal wear These warranties exclude liability for any indirect incidental consequential damag...