background image

FIRE PIT ASSEMBLY

INSTRUCTIONS

INSTRUCCIONES PARA EL

ARMADO DEL BRASERO


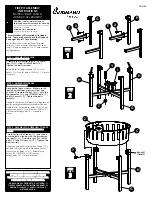
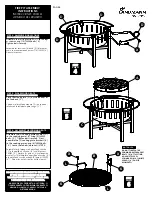
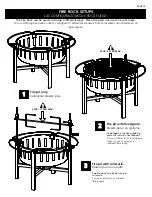
STEP 1:   ASSEMBLE THE LEGS

Assemble the (4) center legs [ E ] to the (4) 
legs [ G, H ] using (8) 12MM bolts [ X ].  
Tighten the bolts securely.

Ensamble las (4) patas centrales [ E ] a los (4) 
patas [ G, H ] con (8) pernos 12MM [ X ].   Apriete 
los pernos.

Assembly time:   40 minutes

El tiempo de la asamblea:   40 minutos

A Phillips or plain screwdriver and an 
adjustable wrench are needed for assembly.

Se necesita un destornillador Phillips o plano y una llave 
ajustable para el armado.

PASO 1:   ENSAMBLE LAS PATAS

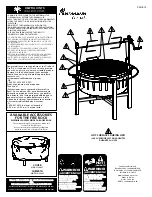
DO NOT RETURN PRODUCT TO THE STORE.

IF YOU HAVE QUESTIONS OR HAVE

TROUBLE WITH ASSEMBLY, PLEASE CALL

1-800-321-3473 FOR ASSISTANCE.

NO DEVUELVA EL PRODUCTO A LA TIENDA. SI

TIENE PREGUNTAS O PROBLEMAS DURANTE EL

ARMADO, LLAME AL 1-800-321-3473 PARA

OBTENER AYUDA.


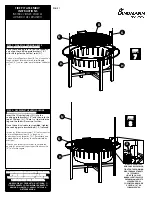
STEP 2:   ASSEMBLE THE BASE

Arrange the legs as shown.   Make sure the 
legs for vertical rods are across from one 
another.   Assemble the legs [ G, H ] with the 
leg connector [ J ] using (8) 50MM bolts [ Y ] 
and (8) hexnuts [ Z ].   Tighten the bolts 
securely.

Arregle las patas como se muestra.   Asegúrese de 
que las patas para la barras verticales están uno 
frente al otro.   Ensamble las patas [ G, H ] con el 
conector de pata [ J ] con (8) pernos 50MM [ Y ] 
y (8) tuercas hexagonales [ Z ].   Apriete los 
pernos.

PASO 2:   ENSAMBLE LA BASE


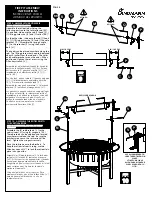
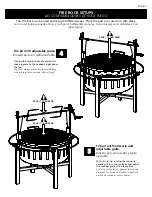
STEP 3:   ASSEMBLE THE FIREBOWL TO BASE

Carefully align the firebowl [ C ] and slide it 
onto the base aligning with the brackets on 
the legs [ G, H ].   Assemble with (16) 12MM 
bolts [ X ] and (16) hexnuts [ Z ].   Tighten the 
bolts securely.

Alinee con cuidado el recipiente de fuego [ C ] y 
deslícelo sobre la base de la alineación con los 
soportes en las patas [ G, H ].   Ensamble con 
pernos (16) 12MM [ X ] y (16) tuercas 
hexagonales [ Z ].   Apriete los pernos. 

PASO 3:   ENSAMBLE LAS RECIPIENTE PARA FUEGO A
LA BASE

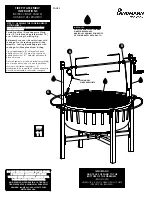
The instructions will assemble all included 
parts.   There are 5 ways to use the Fire Rock.  
See page 10 and 11 for all setups.

Las instrucciones se reunirán todas las piezas 
incluidas.   Hay 5 maneras de utilizar la Roca de 
Fuego.   Consulte la página 10 y 11 para todas las 
configuraciones.

G

H

Y

G

H

E

X

E

X

J

Z

H

X

C

Z

PAGE 5

2

STEP

PASO

1

STEP

PASO

3

STEP

PASO

BRACKET

SOPORTES

G

H

Summary of Contents for Fire Rock 23960

Page 1: ...tructions for Model 23960 Instrucciones de armado y uso para el modelo 23960 PLEASE READ ALL RULES FOR SAFE OPERATION AND HELPFUL HINTS BEFORE USING POR FAVOR LEA TODAS LAS REGLAS DE SEGURIDAD OPERACIONAL Y CONSEJOS ÚTILES ANTES DE USAR ...

Page 2: ...TURAS ARTÍCULOS INFLAMABLES Y VEHÍCULOS NUNCA USE DEBAJO DE RAMAS DE ÁRBOLES BAJAS ENREJADOS OBJETOS SALIENTES DE CUALQUIER CLASE INCLUIDOS PORCHES CUBIERTOS ADVERTENCIA NUNCA USE GASOLINA ALCOHOL NI LÍQUIDOS VOLÁTILES PARA ENCENDER O REAVIVAR FUEGOS PARA LOGRAR UNA MAYOR VIDA ÚTIL DEL PRODUCTO MANTENGA EL FUEGO A UN NIVEL RESPETABLE NO LO SOBRECARGUE EL BRASERO PARA EXTERIORES SOLO PUEDE SER UTIL...

Page 3: ... algunas piezas pueden tener bordes afilados LISTA DE PARTES 1 WOOD GRATE 1 LA REJILLA DE MADERA 1 COOKING GRATE 1 REJILLA PARA COCINAR B 1 FIREBOWL 1 RECIPIENTE PARA FUEGO C 4 RING SECTIONS 4 SECCIONES DEL ARO D 2 LEGS 2 PATAS 4 CENTER LEGS 4 PATAS CENTRALES 1 LEG CONNECTOR 1 CONECTOR PATA J 2 COOKING GRATE BRACKETS 2 CORCHETES DE PARRILLA DE COCCIÓN K 2 COOKING GRATE HANDLES 2 MANIJAS DE PARRILL...

Page 4: ... 1 PERNO DEL MANGO U 48 M6 x 12MM BOLT 48 M6 x 12MM PERNOS X 8 M6 x 50MM BOLT 8 M6 x 50MM PERNOS Y 24 M6 FLANGE HEXNUT Z 2 VERTICAL RODS 2 BARRAS VERTICALES 24 M6 TUERCAS HEXAGONALES DE BRIDA N S 1 COLLAR RR PAGE 4 When unpacking the fire pit from the carton make sure you find and become familiar with all the parts listed below Use caution as some parts may have sharp edges PARTS LIST Al desembala...

Page 5: ...r J using 8 50MM bolts Y and 8 hexnuts Z Tighten the bolts securely Arregle las patas como se muestra Asegúrese de que las patas para la barras verticales están uno frente al otro Ensamble las patas G H con el conector de pata J con 8 pernos 50MM Y y 8 tuercas hexagonales Z Apriete los pernos PASO 2 ENSAMBLE LA BASE STEP 3 ASSEMBLE THE FIREBOWL TO BASE Carefully align the firebowl C and slide it o...

Page 6: ...ODUCTO A LA TIENDA SI TIENE PREGUNTAS O PROBLEMAS DURANTE EL ARMADO LLAME AL 1 800 321 3473 PARA OBTENER AYUDA STEP 6 ASSEMBLE THE COOKING GRATE Assemble the 2 cooking grate handles L to the cooking grate B using 4 12MM bolts X Tighten bolts securely Next assemble the 2 cooking grate brackets K to the cooking grate using 4 12MM bolts X Leave these bolts loose until STEP 8 Ensamble las 2 mangos de ...

Page 7: ...SEMBLE THE VERTICAL RODS Insert the 2 vertical rods N into the cooking grate brackets K and then into the top of the legs H There is a stop inside the leg and the rod will insert no further Once the vertical rods are assembled tighten the cooking grate bracket bolts X securely Inserte los 2 barras verticales N en los soportes de la rejilla para cocinar K y luego en el parte superior de las patas H...

Page 8: ...cados cerca de 4 pulgadas de los extremos barra El cuello y el mango la rueda dentada están en el extremo Cuando se posiciona apriete con tornillos prisioneros la llave llave Allen V PASO 9 ENSAMBLE DEL ASADOR STEP 10 ASSEMBLE THE ROTISSERIE TO THE VERTICAL RODS Assemble the 2 rod brackets S to the vertical rods N using 4 wingnuts W These brackets can be adjusted and located anywhere suitable on t...

Page 9: ... cooking grate with cooking oil will keep food from sticking Tire cuidadosamente 2 de la cable de izado parrilla de cocción R para el ojo soporte de parrilla de cocción K Adjuntar utilizando la pinza de resorte Antes de cada uso escudo de las barras verticales con el aceite de cocina por lo que la parrilla de cocción se deslizarán suavemente El recubrimiento de la parrilla de cocción con aceite de...

Page 10: ...ro 1 2 3 Cook food on the fixed cooking grate that rests on the firebowl Cocine los alimentos en la rejilla para fuego fijo que se apoya en el recipiente para fuego Cook food on the freely turning rotisserie Cocine los alimentos en el asador libre girando 50LB 22 7KG MAX 25LB 11 3KG MAX PAGE 10 FIRE ROCK SETUPS LAS CONFIGURACIONES DE ROCA FUEGO Fire pit with fixed grate Brasero para con rejilla fi...

Page 11: ...ego se puede utilizar y configurar 5 diferentes maneras Coloca las piezas no utilizadas en un lugar seguro FIRE ROCK SETUPS LAS CONFIGURACIONES DE ROCA FUEGO Fire pit with adjustable grate Brasero para con rejilla ajustable With this setup turning the rotisserie handle will turn the rotisserie and adjust the cooking grate at the same time Con esta configuración girando la manivela del asador se en...

Page 12: ...o en China 2015 Landmann USA LA ADICIÓN DE 4 5 KGS DE ARENA EN LA PARTE INFERIOR DEL BRASERO EXTENDERÁ LA VIDA ÚTIL DEL BRASERO MANTENGA EL BRASERO PROTEGIDO DE LA LLUVIA Y DE LA INTEMPERIE GUARDE EL BRASERO EN UN LUGAR SECO PROTEGIDO DE LA INTEMPERIE NO PERMITA QUE EL BRASERO SE LLENE CON AGUA NO ARROJE CENIZAS EN LUGARES DONDE PUEDA INICIARSE UN INCENDIO DESECHE LAS CENIZAS EN UN RECEPTÁCULO ADE...

Reviews: