PAGE 9
Kepler 350 Pizza Kettle
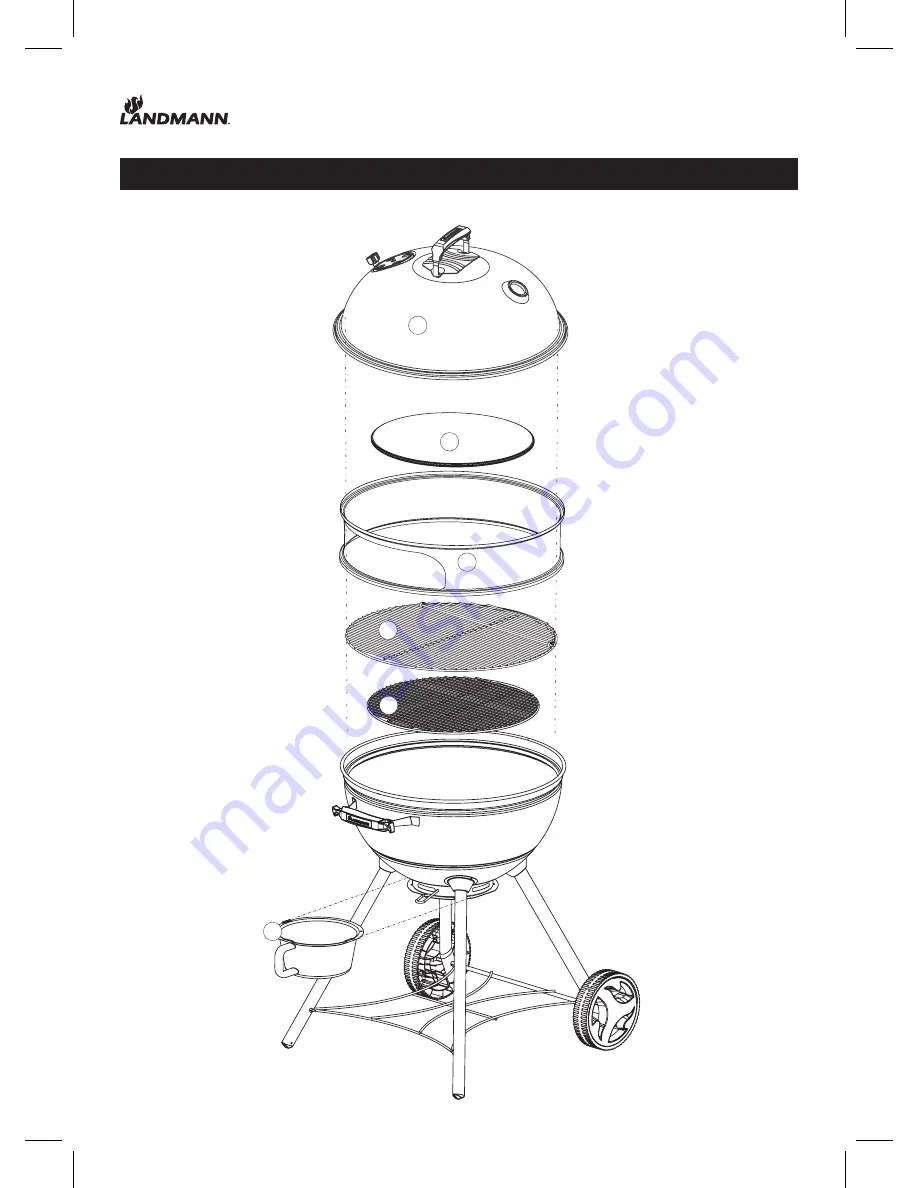
PIZZA KETTLE ASSEMBLY INSTRUCTIONS
11
9
16
4
7
8
STEP 7
Page 1: ...Kepler 350 Pizza Kettle Pizza Kettle Charcoal Grill Assembly and Operating Instructions for Model 525142 PLEASE READ ALL RULES FOR SAFE OPERATION AND FOOD SAFETY BEFORE USING VER 1 7 11 2016 ...
Page 2: ...USED MITTENS OR GLOVES WILL BE NEEDED TO REMOVE THE LID AS SURFACES WILL BE HOT MOST SURFACES OF THIS GRILL BECOME EXTREMELY HOT USE CAUTION DO NOT MOVE THE GRILL WHILE IT IS BEING USED DO NOT LEAVE UNATTENDED AT ANY TIME WHILE IN USE DO NOT USE IN WINDY CONDITIONS USE CAUTION WHEN OPENING THE LID AS HOT STEAM OR A FLARE UP COULD CAUSE BURNS BEFORE EACH USE MAKE SURE THE GRILL IS IN GOOD WORKING C...
Page 3: ...D 9 CHARCOAL GRID 10 FIREBOWL 12 WHEEL LEGS 1 LID HANDLE 5 LID HOOK 3 LID AIR VENT 2 LID HANDLE HEAT SHIELD 6 PIZZA PEEL 7 PIZZA STONE 8 PIZZA RING 8 PIZZA RING 11 ASH PAN Pre assemble to lid X2 A C D E F H x2 x6 x2 x2 x6 x6 x4 x2 ST 4 2x13 M 6x15 M 8 B G M 5 M 6 ...
Page 4: ...8 AIR VENT HANDLE 19 AIR VENT 22 WHEELS 14 THERMOMETER BASE 17 FIREBOWL HANDLE 23 WHEEL COVERS 21 BOTTOM GRID 20 FRONT LEGS 13 THERMOMETER 16 COOKING GRID B M6X15 6X E M8 2X F 6X C M5 2X H 4X A ST4 2X13 2X D M6 2X Kepler 200 400 600 G 6X 15 SCREW CARD X2 X2 X2 ...
Page 5: ...TS QTY 1 LID HANDLE 1 2 LID HANDLE HEAT SHIELD 1 3 LID AIR VENT Pre assemble to lid 1 4 LID 1 5 LID HOOK 1 6 PIZZA PEEL 1 7 PIZZA STONE 1 8 PIZZA RING 1 9 CHARCOAL GRID 1 10 FIREBOWL 1 11 ASH PAN 1 12 WHEEL LEGS 2 13 THERMOMETER 1 14 THERMOMETER BASE 1 15 SCREW CARD 1 16 COOKING GRID 1 17 FIREBOWL HANDLE 1 18 AIR VENT HANDLE 1 19 AIR VENT 1 20 FRONT LEGS 2 21 BOTTOM GRID 1 22 WHEELS 2 23 WHEEL COV...
Page 6: ...PAGE 6 Kepler 350 Pizza Kettle PIZZA KETTLE ASSEMBLY INSTRUCTIONS H 4X E M8 2X H H E H H E 1 3 m m 18 8 m m A ST4 2X13 2X A 10 STEP 1 STEP 3 STEP 2 ...
Page 7: ...CTIONS F 2X B M6X15 2X G 2X F 2X B M6X15 2X G 2X 20 2 20 0 SS304 mica plate G F SS304 mica plate G F B B SS304 mica plate 10 G F B SS304 mica plate G F B STEP 4 STEP 5 Install all leg screws loosely in steps 4 5 Once all 4 leg screws are installed then tighten ...
Page 8: ...LE ASSEMBLY INSTRUCTIONS STEP 6 B M6X15 2X D M6 2X C M5 2X F 2X G 2X 8 m m 1 0 m m G F 5 1 2 13 14 SS304 mica plate D G F SS304 mica plate D C STEP 6 B Supplemental Instructions for step 6 Please use the diagram below for correct lid assembly ...
Page 9: ...PAGE 9 Kepler 350 Pizza Kettle PIZZA KETTLE ASSEMBLY INSTRUCTIONS 11 9 16 4 7 8 STEP 7 ...
Page 10: ...PAGE 10 Kepler 350 Pizza Kettle PIZZA KETTLE ASSEMBLY INSTRUCTIONS 6 STEP 8 ...
Page 11: ...harcoal 3 5 lbs on the charcoal grate and light Make sure ash catcher vent is open full Leave cooking grate lid pizza ring off The coals should be gray after about 30 minutes Carefully push the gray coals to the backside of the firebowl using a metal spatula or some other tool The coals should be stacked slightly on the firebowl backside Make sure no coals are left on the front half of the charcoal ...
Page 12: ...the stone is critical and should be no further than 1 inch from the front edge Place the pizza ring and lid on the grill In this setup the stone will be heated from the bottom and from the top with the super heated air flowin over and out the pizza ring opening Once the lid is placed on the grill the temperature will quickly rise The temperature range for cooking pizza is 550 700 F The hotter the ...
Page 13: ...MINUTES THE PIZZA WILL BE DONE Add pizzas to the grill through the opening in the pizza ring Lightly flour the pizza peel so the pizza will slide off easier Scoup up the pizza with the peel and place it on the stone using a quick back and forth motion After a few minutes the pizza will need to be turned 180 degrees Use the pizza peel The hotter the fire the quicker it will cook If you have no experi...
Page 14: ...and cooking grate STEP 1 START THE CHARCOAL STEP 2 SETUP TO GRILL Remove the lid pizza ring and cooking grate Pour desired amount of charcoal 3 5 lbs on the charcoal grate and light Make sure ash catcher vent is open full Leave cooking grate lid pizza ring off The coals should be gray after about 30 minutes Place the cooking grate on the grill Place lid on grill and adjust lid vent as needed When ...
Page 15: ...and dispose of cooled ashes in proper receptacle The chrome plated and enamel surfaces can be cleaned with soap and water Clean only when the grill is cool to the touch After just one use the pizza stone will become darkened with spots and stains This is normal The appearance may look unsightly but it has no effect on the performance or taste of the food After each use clean the stone of loose foo...
Page 16: ...meter with probe to measure the meat temperature Push probe into the thickest part of the meat to get an accurate measurement The temperature gauge on the grill measures the air temperature of the grill cooking chamber not the food temperature 145 F 160 F 165 F 160 F 160 F 170 F 165 F 165 F 145 F 160 F 170 F 145 F 160 F 170 F 145 F 160 F 170 F Medium rare Medium Well done Steaks Roasts Fish Beef P...
Page 17: ...s on your purchase of the Pizza Kettle Charcoal Grill At Landmann USA we strive to provide you with an easy to use easy to assemble product However in the unlikely event your package should have a missing or defective part please contact us at customerservice landmann usa com OR 1 877 347 4557 M F 8 5 ET Proof of purchase may be required Thank you Please visit our website at www landmann usa com O...
Page 18: ...ust or heat damage which is considered to be normal wear These warranties exclude liability for any indirect incidental consequential damages or loss of property of any nature Do not return product or any parts to the store or ship to the manufacturer without written authorization Contact Customer Service at 1 877 3GRILLS 1 877 347 4557 or grills landmann usa com Any returned products or parts mus...