


Assembly Instructions
3
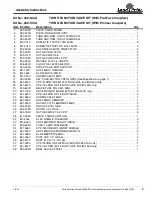
Third Function Valve Kit #380-340A Installation Instructions Manual No. 380-151M
7/8/20
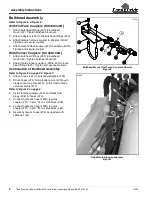
10. Attach 60 hoses (#16) to elbow (#29) in port “T”.
11. Attach 48" hose (#22) to elbow (#29) in port “P”.
12. Tighten 45o elbows (#29) to valve (#28).
13. Tighten hoses (#16 & #22) to elbows (#29).
14. Tighten elbow fitting (#15) to straight adapter (#14).
15. Tighten hose (#22) to elbow (#15).
16. Tighten fitting (#23 or #34) to tank port.
17. Tighten hose (#16) to fitting (#23 or #34).
18. Secure hoses (#16 & #22) as needed to the
underside of the tractor with cable ties (#5).
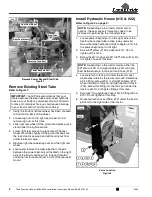
Prepare Tractor for Operation
1. Install right rear wheel and snug-up wheel lug nuts.
2. Jack axle up and remove jack stand.
3. Lower tractor down and tighten rear wheel lug nuts in
a crisscross pattern. Refer to tractor Operator's
Manual for proper torque value.
4. Remove chocks.
5. Check tractor hydraulic fluid level. If low, add
recommended hydraulic fluid. Refer to your tractor
Operator's Manual for recommended hydraulic fluid
and procedure for checking hydraulic fluid level.
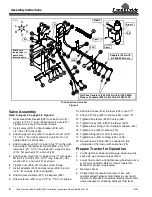
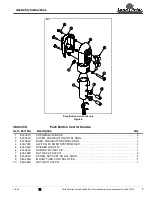
Valve Assembly
Refer to Figure 2 on page 2 & Figure 3:
1. Bolt valve offset bracket (#38) to valve mount (#1)
using 1/4"-20 x 1" bolts (#25) and whiz nuts (#27).
Tighten whiz nuts to the correct torque.
2. Install valve (#28) to offset bracket (#38) with
1/4"-20 x 7/8" bolts (#26).
3. Attach support strap (#13) to valve mount (#1) with
1/4"-20 x 1" bolt (#25) and whiz nut (#27). Do not
tighten whiz nut at this time.
4. Attach valve mount (#1) to lower hole “C” on the right-
hand side of the loader frame with M18-2.5 x 100
lower bolt (#7), 3-1/4" long tube (#3), support strap
(#13), flat washer (#11), and nut (#9).
5. Attach valve mount (#1) to upper hole “C” with upper
M18-2.5 x 100 bolt (#7), 3-1/2" long tube (#4), flat
washer (#11), and nut (#9) as shown.
6. Tighten nuts (#9 & #27) to the correct torque.
7.
Install adapters (#30) and dust caps (#35) to ports
“A” & “B” on valve (#28) and tighten.
8. Attach quick couplers (#21) to adapters (#30).
9. Attach elbows (#29) to ports “P” & “T”. Do not tighten.
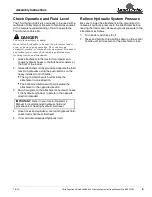
Third Function Valve Kit
Figure 3
U
D
B
F
R
L
73119
28
A-port
B-port
T-port
Attaches to
the positive (+)
post on the
tractor battery.
B
P-port
73116
24A
24B
Adapters (#20) with
Kit 380-340A only
A
Flat Face Couplers (#39 & #40) with Kit 380-340A
Pioneer Couplers (#39 & #40) with Kit 380-149A
Assembly Instructions