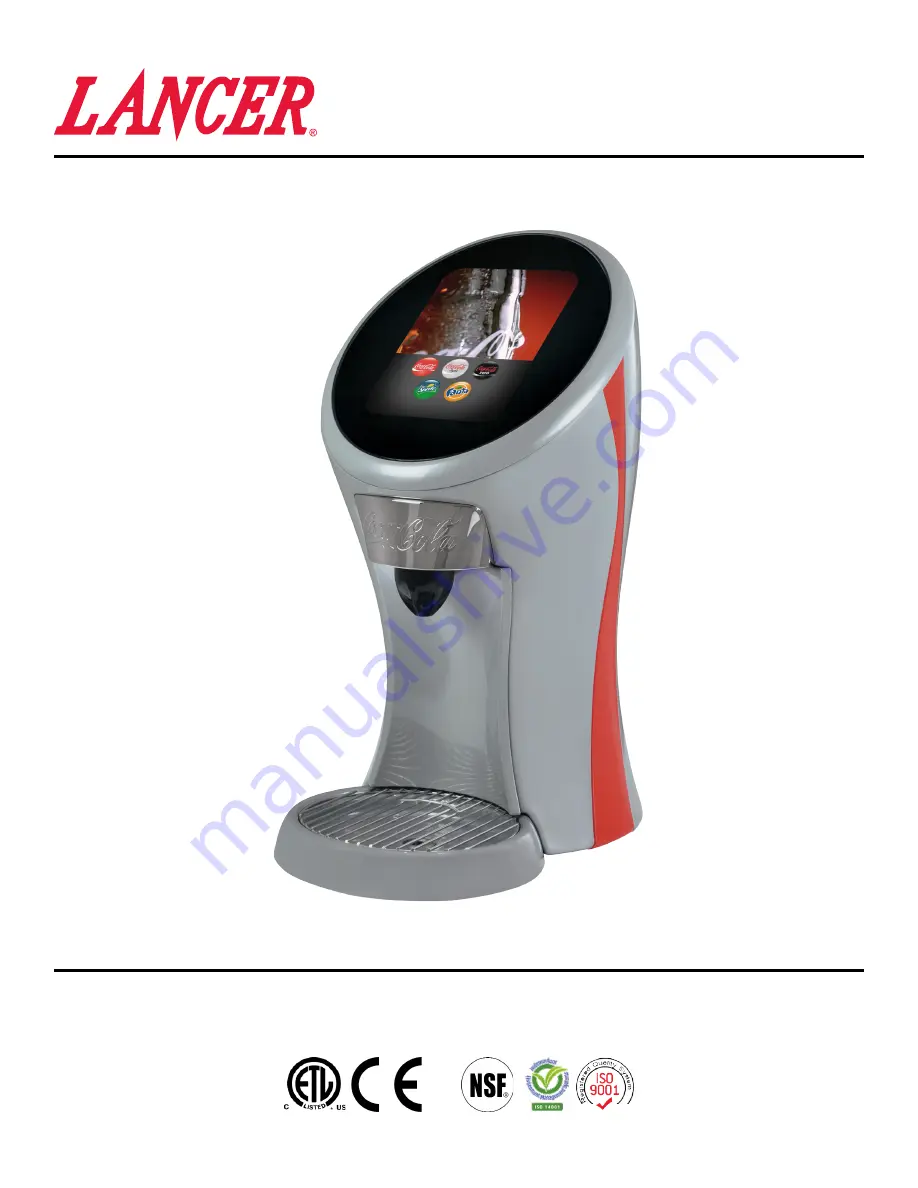
background image

Bridge Tower

“Lancer” is the registered trademark of Lancer © 2015 by Lancer, all rights reserved.

320

Lancer Corporation
6655 Lancer Blvd.
San Antonio, Texas 78219
800-729-1500

Technical Support/Warranty

800-729-1550

[email protected]

lancercorp.com

PN: 28-0941/01

Operation Manual

Summary of Contents for bridge tower

Page 1: ...rademark of Lancer 2015 by Lancer all rights reserved 320 Lancer Corporation 6655 Lancer Blvd San Antonio Texas 78219 800 729 1500 Technical Support Warranty 800 729 1550 custserv lancercorp com lancercorp com PN 28 0941 01 Operation Manual ...

Page 2: ...ting Brand Syrup Modules 13 15 Calibrating Flavor Modules 15 Scheduled Maintenance 16 Water Buttons 17 Portion Control and Lighting Features 17 Sold Out Feature 18 Brand Flavor Import 19 Video Screen Saver Import 19 Export Tower Settings 20 CLEANING AND SANITIZING 20 21 General Information 20 Cleaing and Sanitizing Solutions 20 Cleaning and Sanitizing Product Lines 21 Cleaning and Sanitizing Nozzl...

Page 3: ...should not be used as a substitute for unplugging the dispenser from the power source to service the unit Only qualified personnel should service internal components of electrical control housing WARNING Make sure that all water lines are tight and units are dry before making any electrical connections If this dispenser is installed in an area that is susceptible to 10 variation of the nominal lin...

Page 4: ... WATER SUPPLY Min Flowing Pressure 20 PSIG 0 137 MPA Max Static Pressure 50 PSI 0 345 MPA CARBON DIOXIDE CO2 SUPPLY Min Pressure 70 PSIG 0 483 MPA Max Pressure 80 PSIG 0 552 MPA FITTINGS Carb Water Inlet 9 5 mm 3 8 inch barb Carb Water Outlet 9 5 mm 3 8 inch barb Plain Water Inlet 9 5 mm 3 8 inch barb Brand Syrup Inlets 9 5 mm 3 8 inch barb Drain Fitting 15 9 mm 5 8 inch barb 4 325 mm 439 mm 610 m...

Page 5: ...O2 Regulator Low Pressure CO2 Regulator Manifold CO2 Supply Chain for CO2 Tank Beverage Dispenser Beverage Tubing Oetiker Clamp Fittings CONSIDER THE FOLLOWING BEFORE INSTALLATION Location of Water Supply Lines Location of Drain Location of Electrical Outlet Location of Heating and Air Conditioning Ducts Do you have enough space to install the dispenser Is countertop level Can the countertop suppo...

Page 6: ...tallation Inspect the counter location where the unit is to be installed Verify the selected counter is strong enough to safely support the weight of the installed unit after the cutout for the unit is made The ideal counter for installation should measure at least 25 mm 1 inch thick ATTENTION 3 Select a location for the remote chiller system or carbonator if nessesary syrup pumps CO2 tank product...

Page 7: ...he opening in the mounting plate counter top 5 Using the four 4 screws provided connect tighten tower to mounting plate counter top 6 Place gasket at the bottom of the drain then re attach drain fitting to drip tray removed in Step 2 A C E F G D B A Seal B Drip Tray C Mounting Plate D Counter E Upper Drain Fitting F Lower Drain Fitting G Washer 7 Install cup rest to drip tray 8 Route appropriate t...

Page 8: ...ve the nozzle by twisting clockwise and pulling down 3 Remove the splash plate by placing both hands at the bottom of the plate Simultaneously lift up and pull out on the splash plate until it pops off of the front panel The minimum flowing pressure to the valve must be 20 PSI 0 137 MPA A booster pump may be required for proper operation of the valve ATTENTION 4 Twist the key lock rod located behi...

Page 9: ...ater flows from the relief valve then close flip down reflief valve The dispenser must be properly electrically grounded to avoid serious injury or fatal electrical shock The power cord has a three prong grounded plug If a three hole grounded electrical outlet is not available use an approved method to ground the unit Follow all local electrical codes when making connections Each dispenser must ha...

Page 10: ...ated pin number to access the service menu Once the purge is activated it will continue to dispense product until it is deactivated To deactive the purge simply press the Purge button again Up to four modules can be purged at one time Once four modules are selected all other modules are greyed out and cannot be selected NOTE A Purge Tab B Up to 4 Purge Buttons Selected C Greyed Out Purge Button A ...

Page 11: ... module 5 Press the Configuration button to return to the Configuration menu 6 Repeat steps 3 and 4 for any other desired brand or flavor modules 7 From the Configuration menu press the Configure tab on the far left side of the screen A Configure Tab D Brand Ratio B Configure Button E Brand Water Type C Activated Module A B C D E 9 Select a new brand from the available Brands Library tabs on the l...

Page 12: ...liliters ml as the desired unit of measurement 5 Using the keypad enter a specific volume to be dispensed based on the size of the graduated cylinder being used to calibrate the carbonated water module The larger the volume dispensed the more accurate the results Use the example 150 ml 6 With the graduated cylinder placed in a position below the nozzle press the Start Purge button The unit will di...

Page 13: ...ned from when the brand was configured See page 12 Adding New Brand Flavor Module A Flow Rate Ratio C Start Purge Button B Timer Icon D Unit Icon A B C D 4 Set the Timer to the ON position and select seconds s as the desired unit of measurement 5 Using the keypad enter in a time of 4 seconds as the preset dispensing time 7 Examine the dispensed volume in the graduated cylinder If the dispensed vol...

Page 14: ... activate the brand syrup module by pressing and holding the Dispense button Release the button to deactivate the module and capture a sample Ratio Settings Table The table below shows the flow rate for the carbonated plain water modules and the volume of syrup dispensed after a 4 second pour for different ratio settings All at a finished drink flow rate of 44 ml sec Ratio 4 4 2 4 4 4 6 4 8 5 5 2 ...

Page 15: ...Examine the dispensed volume in the graduated cylinder If the dispensed volume does not match the value entered on the screen in step 5 remove the protective cap for the corresponding valve and use a screwdriver to adjust the carbonated water flow control See Plumbing Diagram on page 27 for reference A B C D Increase Decrease A Flow Control B Valve Retainer C Solenoid D Valve Body 7 Repeat steps 6...

Page 16: ...lution wipe off all of the unit s exterior surfaces and splash areas DO NOT USE ABRASIVE SOAPS OR STRONG DETERGENTS DO NOT USE AMMONIA BASED PRODUCTS WHEN CLEANING THE SCREEN OR SURROUNDING PLASTICS Replace the cup rest and nozzle Weekly Taste each product for off tastes If off taste occurs clean and sanitize the unit using the appropriate procedures outlined in the Cleaning and Sanitizing section...

Page 17: ...to return to the Service menu 7 From the Service menu press the Lighting button 8 Adjust the brightness of the screen as well as the brightness of the nozzle lights when the dispenser is idle or dispensing The water buttons on the Main Menu give the consumer customer the ability to pour plain or carbonated water without any syrup NOTE Water Buttons A Water Buttons Tab B Plain Carb Water Button C P...

Page 18: ...nu press the Sold Out button 2 Manually adjust specific brands to read Ready Out or Auto This feature will automatically shut off the pump for that specific brand when there is no product to be dispensed This feature only comes into effect when the corresponding brand is changed to Auto in the Sold Out menu NOTE A Sold Out Sensors Tab B Sold Out Sensors 1 10 C CO2 Low Pressure Indicator A B B C 3 ...

Page 19: ...e to access the Tower Brand Management Software Instruction Sheet Lancer Part Number 28 2855 IMPORTANT 4 From the Service Menu in the Update from USB section press the Brands button There will be a check mark next to the Brands button if the USB drive has the brand files in the correct place To upload new flavors to the Bridge Tower User Inter face create the flavor brand file and put into a folde...

Page 20: ... file must be in a mp4 format and the dimen sions of the video must be 768 px x 600 px for Self Serve mode and 768 px x 768 px for Crew Serve mode Multiple videos can be uploaded at one time just add the name of each video to the list txt file one filename per line There will be a check mark next to the Screen Saver Images button if the USB drive has the video and text files in the correct place N...

Page 21: ...by trained personnel Sanitary gloves are to be used during cleaning operations Applicable safety precautions must be observed Instruction warnings on the product being used must be followed ATTENTION Cleaning and Sanitizing Solutions Cleaning Solution Mix a mild non abrasive detergent e g Sodium Laureth Sulfate dish soap with clean potable water at a temperature of 32 C to 43 C 90 F to 110 F The m...

Page 22: ...and Sanitizing Product Lines 1 Disconnect product lines from BIB s or other product supply 2 Place product lines with BIB connectors in a bucket of warm water 3 Activate each valve to fill the lines with warm water and flush out product remaining in the lines 4 Prepare Cleaning Solution described above 5 Place product lines with BIB connectors into cleaning solution 6 Activate each valve until lin...

Page 23: ...toff on mounting block not fully open 4 Foreign debris in product flow control 5 Bad product pump 1 Adjust CO2 pressure to 80 PSI 0 550 MPA minimum 70 PSI 0 480 MPA for BIB pumps 2 Replace CO2 tank refill 3 Open shutoff fully 4 Remove product flow control form upper body and clean out any foreign material to ensure smooth free spool movement 5 Replace BIB pump Erratic ratio 1 Incoming water and or...

Page 24: ...ity ice 8 High beverage temperature 1 Correct prior to dispenser Consider larger dispenser or pre cooler 2 Adjust CO2 pressure downward but not less than 70 PSI 0 483 MPA 3 Re adjust and reset ratio Refer to Adjust Water Flow Rate Syrup Water Ratio Section 4 Remove and reinstall properly 5 Remove nozzle and clean injectors 6 Bleed air from BIB lines 7 Check quality of ice used in drink 8 Check ref...

Page 25: ...IB connector not on tight 2 BIB connector is stopped up 3 Kinks in syrup line 4 Bad BIB Pumps 1 Tighten BIB connector 2 Clean out or replace BIB connector 3 Straighten or replace line 4 Replace BIB pump BIB pump fails to restart when dispensing valve is closed 1 Leak in discharge line or fittings 2 Empty BIB 3 Air leak on inlet line or bag connector 1 Repair or replace discharge 2 Replace BIB 3 Re...

Page 26: ...01 05 3244 Dynamic Ribbon Right 04 1689 Screw M4 02 82 4895 Cladding Assy Back 03 05 3245 Dynamic Ribbon Left 04 1689 Screw M4 04 82 4896 Cladding Assy Front 05 05 3253 Drip Tray 06 05 3249 Bezel Front 04 1689 Screw M4 07 05 3252 Splash Plate 08 23 1674 Cup Rest 09 05 3373 Snapfit Panel Fastener Riblok 10 04 1687 Screw M6 ...

Page 27: ...39 Screw 4 20 X 250 PH PH Plastite 09 05 3393 Injector Syrup Low Flow Flex Nozzle 10 05 3392 Injector Blank Bonus Flavor 05 3287 Injector Bonus Flavor 11 05 1612 Fitting Water M F Nozzle 12 30 12139 Plate Nozzle 4 Point 04 1640 Screw M3 13 05 1385 Elbow 5 Dole X 2 Barb 14 54 0473 Outlet Assy Water 15 19 0262 Valve Assy LFCV 2 0 Syrup Inj 16 19 0266 Valve Assy LFCV 2 0 Syrup Blk 17 19 0267 Valve As...

Page 28: ...ption 01 52 3683 LED Strip Assy Ribbon Light 02 05 3368 Base LED Ribbon Touch Tower 03 82 4863 Screen Assy Bridge 04 64 5061 PCB Assy Valve Board 04 1640 Screw M3 05 64 5104 PCB Assy Pwer Brd Tower 04 1640 Screw M3 06 52 3661 Drip Tray Dual Light Assy 04 1640 Screw M3 ...

Page 29: ...e 2 S3 Syrup Line 3 S4 Syrup Line 4 S5 Syrup Line 5 S6 Syrup Line 6 S7 Syrup Line 7 S8 Syrup Line 8 S9 Syrup Line 9 S10 Syrup Line 10 PW Plain Water Line SD Soda Line RC Recirculation Line S1 S7 S3 S8 S4 SD PW S9 S5 RC S2 S10 S6 S1 SD PW S3 S4 S5 S6 S7 S8 S9 S10 S2 29 ...

Page 30: ...30 Unit Wiring Diagram ...

Page 31: ... 18 11 27 142 56 5 61 128 14 5 04 17 35 0 68 69 23 2 72 170 05 6 69 234 27 9 22 142 56 5 61 422 47 16 63 233 88 9 21 60 0 2 36 8 75 0 34 10X 96 64 3 82 15 56 0 61 19 35 0 76 111 43 4 39 92 69 3 65 43 84 4 73 27 61 1 09 31 ...

Page 32: ...Lancer Corp 800 729 1500 Technical Support Warranty 800 729 1550 custserv lancercorp com lancercorp com ...

Reviews: