


Section 13 - Service / Maintenance
40
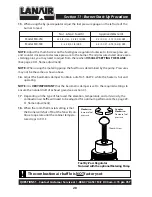
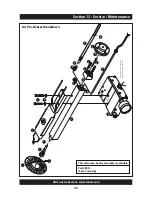
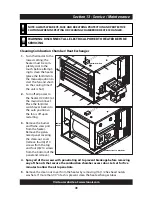
Air Pre-Heater Diaphragm Breakdown
1.
Remove the four hex cap screws
from the diaphragm assembly
2.
Disassemble and inspect diaphragm,
spring and o-ring .
3.
Thoroughly clean remaining parts.
4.
Re-assemble the diaphragm,
o-ring, spring and hex cap screws.
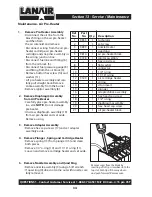
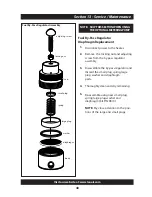
Air Pre-Heater Nozzle Cleaning /
Replacement
1.
Periodic cleaning of the nozzle
assembly may be required.
2.
Carefully remove nozzle from the air
pre-heater block.
3.
Disassemble the nozzle as shown
and clean thoroughly. Re-assemble
nozzle.
4.
Carefully remove the quad ring from
the block and inspect. Replace if nec-
essary.
5.
Insert clean/new quad ring into the
air pre-heater block.
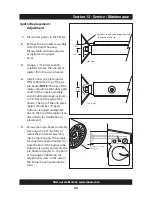
NOTE:
The quad
ring must be properly seated.
Failure to properly seat the quad
ring may result in leakage and
improper burner operation.
DO NOT
INSTALL QUAD RING ON THE NOZ-
ZLE.
6.
Lubricate pin/seat and re-install noz-
zle. Tighten gently.
!
Failure to properly seat the quad
ring may result in leakage and
improper burner operation. DO
NOT INSTALL QUAD RING ON
THE NOZZLE.
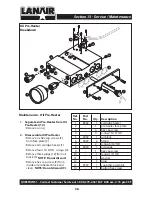
Air Pre-Heater Diaphragm Assembly
Air Pre-Heater Nozzle Assembly
Proper Quad Ring Position
diaphragm
fuel orifice
body
pin/seat
nozzle assembly
quad ring
piston
spring
hex cap
screws
o-ring
QUESTIONS?... Contact Customer Service at 1-888-370-6531 M-F 8:00 am- 4:15 pm CST


