4
Call 1-888-370-6531 for Technical Support
Minimum Clearance
–
Safe clearances to combustibles (Section 1.5) shall be adhered to.
Distance from Flammable Liquids
–
Do not create a fire or explosion hazard by using or placing flammable liquids
such as gasoline or solvents near the heater.
A flammable liquid is any liquid that has a
closed-cup flash point below 100°F (37.8°C), as determined by the test procedures and
apparatus set forth in 1.7.4 of NFPA 30.
POWER TO THE HEATER SHOULD BE SHUT OFF ANYTIME FLAMMABLE VAPORS
MAY BE PRESENT!
Access
- Position the heater where there is adequate clearance for operating and maintaining
the unit. Leave an unobstructed path for shop vehicles and equipment. Consider access
needed for service (heat exchanger cleaning, flue cleaning, removal of caps and baffle, burner
access, etc.).
Cabinet Orientation vs. Air Flow Direction
– Consider the workspace to be heated.
Consider proximity to windows, doors, etc.
Structural Requirements (Canada)
– In Canada, the structure in which the used oil burning
appliance is housed shall be no less than 4.6m (15ft) high at the point where the appliance is
situated and have a minimum length and width of 6m (20ft) and a minimum floor area of 37m
2
(400ft
2
). In addition, the installation including flue stack height requirements and distance from
property line shall be in accordance with the authorities having jurisdiction concerning
environmental quality as well as fuel, fire, and electrical safety and Table 7 in CSA B140.0-03
(clause 22.3.2).
Do not attach or install ductwork to the outlet of the heater cabinet.
2.3 Drain Valve Installation
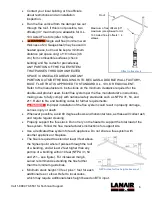
The drain valve and fittings are not installed at the factory to prevent damage during shipping.
Install the drain valve in the port on the side of the tank as shown in the figure. Use the thread
sealant provided. Do NOT use Teflon tape.
The drain valve is necessary for draining
water from the bottom of the tank. The drain valve is
shown in closed position in figure. The plug should be
installed in the drain valve to prevent spills if the valve is
accidentally opened.
Summary of Contents for MX 75
Page 2: ......
Page 41: ...8 Appendices 8 1 Wiring Diagram ...
Page 42: ......
Page 43: ...34 Call 1 888 370 6531 for Technical Support 8 2 Primary Control Instructions ...
Page 44: ...35 Call 1 888 370 6531 for Technical Support Not used with RES 75 kBTU h units ...
Page 45: ...36 Call 1 888 370 6531 for Technical Support No latch up with RES 75 kBTU h units ...
Page 46: ...37 Call 1 888 370 6531 for Technical Support ...
Page 54: ...45 Call 1 888 370 6531 for Technical Support 9 ...


