background image

12

GB

Detergent use

Any brand of powder, gel and tablet 
detergents that have been designed for 
household dishwashers, may be used.

Keep detergents in a cool and dry 
place and out of the reach of children.

Detergent must be added to the 
container before each use. 

Detergent overdose may cause 
scratches on your dishes and there 
may be traces of detergent left in your 
machine.

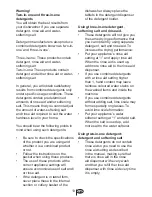
Three types of detergent are available

‡


Phosphate and containing 
chlorine.

‡


Phosphate containing no chlorine

‡


Neither containing phosphate nor 
chlorine

New compact powders are generally 
phosphate-free. As phosphates have 
water softening properties, we suggest 
you add salt to the salt container even 
if the hardness of your water is as low 
as a 6 clarke degrees.

In hard water areas if a phosphate free 
detergent is used, white marks on the 
dishes and glasses may be observed. 
It may be prevented by increasing the 
amount of detergent.

Detergents without chlorine have less 
bleaching effect. Coloured stains may 
not be completely removed. This may 
be prevented by increasing the amount 
of detergent, using a programme with 
a higher wash temperature or using a 
detergent with chlorine.

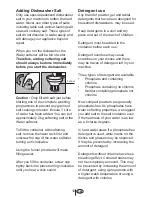
Adding Dishwasher Salt

Only use special pelletized dishwasher 
salt in your machine to soften the hard 
water. Never use other types of salts 
including table salt, animal feeding salt, 
sea salt, culinary salt. These types of 
salt do not dissolve in water easily and 
will damage your appliance beyond 
repair. 

When you run the dishwasher, the 
Water softener will be full of water. 

Therefore, adding softening salt 
should always be done immediately 
before you start the dishwasher. 

Caution :

 Only 

¿

ll with salt just before  

starting one of the complete washing 
programmes to prevent any grains of 
salt causing corrosion. Ensure 1 Litre 
of water has been added. You can put 
approximately 2 kg softening salt in the 
Water softener.

To 

¿

ll the container with softening 

salt, remove the lower rack 

¿

rst and 

unscrew the cap of the water softener 
turning anti clockwise.
 
Using the funnel provided will make 

¿

lling easier.

After you 

¿

ll the container, screw cap 

tightly back into place turning clockwise 
until you hear a click sound.

S

A

L

Z

T

UZ

S

AL

T

SE

L

Funnel

Summary of Contents for LAM8603

Page 1: ...User Guide LAM8603 Dishwasher ...

Page 2: ...nded purpose i e the washing of dishes in the home Failure to observe these instructions may invalidate your right to free service during the guarantee period Please keep these instructions in a safe place for your future reference If you have any questions or if you are not sure about any information contained in this booklet please contact us details are on the back cover Note Due to the quality...

Page 3: ... you start the washing programme The water in your dishwasher is not suitable for drinking for this reason do not allow your children near your machine when the front door is open Never allow your children to play on or sit on the front door when the front door is open After unpacking your machine keep the packing material out of children s reach Warning Long cutlery such as ladles and long knives...

Page 4: ...in order to be recycled or dismantled to minimize its impact on the environment For further information please contact your local or regional authorities Electronic products not included in the selective sorting process are potentially dangerous for the environment and human health due to the presence of hazardous substances Energy and water saving Scrape excess food from the dishes before loading...

Page 5: ...wash together Iron and cast iron objects can rust and stain other items Pay special attention to whether or not the item you wash in the dishwasher is dishwasher proof If in doubt contact the manufacturer of the item Do not overload your dishwasher or do not load items other than those mentioned in this manual ...

Page 6: ... 8 Warning 8 This appliance must be earthed 8 Important 9 Fitting a different plug 9 How to use 10 Water hardness regeneration settings 10 Water Hardness Level Adjustment Table 11 Adding Dishwasher Salt 12 Detergent use 12 Filling detergent dispenser 14 Rinse aid 15 Loading the dishwasher 16 Movable Cutlery Basket 17 Operating the dishwasher 18 Hot Air Drying 18 How to clean your machine 19 Upper ...

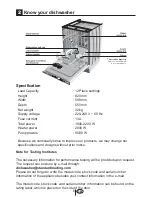
Page 7: ...to improve our products we may change our speci cations and designs without prior notice Note for Testing Institutes The necessary information for performance testing will be provided upon request The request can be done by e mail through dishwasher standardloading com Please do not forget to write the model code stock code and serial number information of the appliance besides your contact inform...

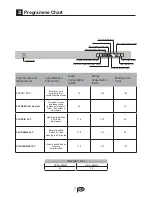
Page 8: ...tion Water Consumption Litres Energy Consumption Kwh Running Time min P1 ECO 50 C Most economic programme for normally soiled dishes 14 1 02 185 P2 PRE WASH No Heat Pre wash to rinse and loosen food residue awaiting full load then select a programme 4 2 14 P3 RAPID 35 C Lightly soiled dishes 30 minute programme 11 8 0 79 30 P4 NORMAL 60 C Normally soiled dishes A class cleaning in 58 minutes 11 8 ...

Page 9: ...ore you insert the plug into the wall socket make sure that the voltage and the frequency shown in the rating label corresponds to your electricity supply We recommend that this appliance be connected to the mains supply via a suitable switched and fused socket in a readily accessible position If the supply cord or the mains lead is damaged please do not replace it yourself The supply cord or the ...

Page 10: ... terminal in the plug marked E or with the symbol or coloured green and yellow or green 2 Connect the blue neutral wire to the terminal in the plug marked N or coloured black 3 Connect the brown live wire to the terminal in the plug marked L or coloured red With the alternative plugs a 13A fuse must be tted either in the plug or adaptor or in the main fuse box If in doubt contact a quali ed electr...

Page 11: ...n the level of water hardness will possibly be different It is essential to reset the water hardness in order to obtain optimum washing efficiency Test Strip Let the water flow from your tap for 1 minute Remove the test strip from its packing Fill a glass with tap water and dip the test strip into water for 1 second Take the test strip out of the water and shake it Hold for 1 minute Set the water ...

Page 12: ... for correct setting Select the water hardness level suitable to your machine from the Water Hardness Level Adjustment Table by pressing the Delayed Start Key Press Start Pause Cancel key for once to store the level you have selected Start Stop icon will light continuously when the new water hardness level is stored Press the On Off button to turn off your machine Hardness Level English Water Hard...

Page 13: ...tely removed This may be prevented by increasing the amount of detergent using a programme with a higher wash temperature or using a detergent with chlorine Adding Dishwasher Salt Only use special pelletized dishwasher salt in your machine to soften the hard water Never use other types of salts including table salt animal feeding salt sea salt culinary salt These types of salt do not dissolve in w...

Page 14: ...and or rinse aid If the detergent is in tablet form never place these in the internal section or cutlery basket of the dishwasher Always place the tablets in the detergent dispenser of the detergent holder Using three in one detergent softening salt and rinse aid These detergents will not give you the same drying performance that you can obtain by using separate detergent salt and rinse aid To inc...

Page 15: ...manufacturer directly You will nd contact details on the packet If you stop using this kind of detergent Ensure that the salt and rinse aid dispensers are full Put the water hardness setting at the highest level and run a wash cycle with the appliance empty After washing while empty return the water hardness setting to the correct level for your mains water hardness shown in the manual Put the rin...

Page 16: ...nd to increase the ef ciency of the washing and drying processes Therefore make sure that there is adequate amount of rinse aid in the rinse aid dispenser of your machine You can adjust the amount of rinse aid used during the wash programme by turning the rinse aid dispenser regulator C The dispenser regulator C may be set between levels 1 and 6 6 being the maximum amount of rinse aid usage Your m...

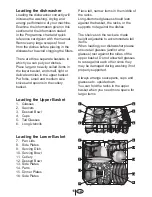
Page 17: ...e of the racks Long stemmed glasses should lean against the basket the racks or the supports not against the dishes The shelves on the rack are made height adjustable to accommodate tall items When loading your dishwasher please ensure tall glasses and or wine glasses rest against the sides of the upper basket Do not allow tall glasses to rest against each other since they may be damaged during wa...

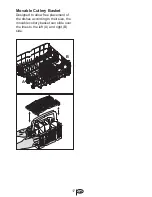
Page 18: ...17 GB A B Movable Cutlery Basket Designed to allow free placement of the dishes according to their size the movable cutlery basket can slide over the tines to the left A and right B side ...

Page 19: ...y mechanism ensures the machine immediately stops Water may be very hot so be careful Care must be taken if opening the door as steam and water will escape Press the on off button after the programme is completed The indicator lights will go off Unload the baskets we recommend to turn off the water tap when not in use Just after the dishwasher has started the selected programme if you nd that you ...

Page 20: ...he main lter off 7 Micro filter Coarse filter Main filter How to clean your machine Cleaning your machine at regular intervals ensures longer product life and reduces the risk of recurring problems Clean spray arms and in particular lters at least once a week Always unplug the appliance and turn off the water supply before cleaning To clean the door seal use a neutral detergent and a damp cloth To...

Page 21: ...ning of the filters will produce poor washing results Cleaning of the filters is vital to ensure correct operation of the machine Upper spray arm Turn the nut anti clockwise and remove both the nut and the spray arm Flush away food particles under running water Put the spray arm back on and screw on the nut turning clockwise until a clicking sound is heard Lower spray arm Remove the spray arm from...

Page 22: ...loading Follow instructions for use for proper loading procedures Place dishes so water spray reaches all soiled surfaces Do not overcrowd the baskets since this will block the water spray Insuf cient water ll Check mains water pressure Filter system needs cleaning Remove any accumulated or deposited foods Check and clean them periodically Oversudsing Prewashing with a liquid dishwashing detergent...

Page 23: ...riate programme Use of a rinse aid may also help Detergent cakes in detergent dispenser If using powder detergent there may be dampness in the dispenser Make sure dispenser is dry before adding powder detergent Start dishwasher immediately If using gel detergent the detergent may be left in dispenser too long before using Start dishwasher soon after adding gel detergent Do not allow detergent to d...

Page 24: ...nd operated in accordance with the manufacturer s instrucƟons and used for normal domesƟc purposes x This guarantee does not cover accidental damage misuse or alteraƟons which are likely to aīect the product x The guarantee is invalid if the product is tampered with or repaired by any unauthorised person The guarantee in no way aīects your statutory or legal rights What to do if you need to report...

Page 25: ......

Page 26: ...Printed in Turkey Part no 15 0117 01 00 Revision AA 10 14 v0 2 05 01 14 ...

Reviews: