background image

LAMONA 

Appliances

_ 16

Elbow installation

The pipework shall be fi tted in such a way that it 
cannot come into contact with a moveable part of 
the housing unit (e.g a drawer) and does not pass 
through any space  where it may become crushed or 
kinked or damaged in any way.
To prevent any potential damage to the hob  please 
carry out installation as following:

1. 

Assemble the parts in this order

• 

1/2 Male adapter

• 1/2 

Seal

• 

1/2 Female gas adaptor conical - cylindrical or 
cylindrical - cylindrical.

2.      Tighten the joints with the spanner,  
remembering to twist the pipes into position.

3. Attach fi tting C to the mains gas supply using a 
rigid copper pipe or fl exible steel pipe.

IMPORTANT: Carry out a fi nal check for leaks on the 
pipe connections using a soapy solution. NEVER 
USE A FLAME. Also make sure that the pipework 
cannot come into contact with a moving part of the 
cabinet (e.g a drawer) and that is not situated where 
it could be damaged.

WARNING: If gas can be smelt in the vicinity of this 
appliance turn off the gas supply to the appliance 
and call the engineer directly.

Do not search for a leak with a naked fl ame.

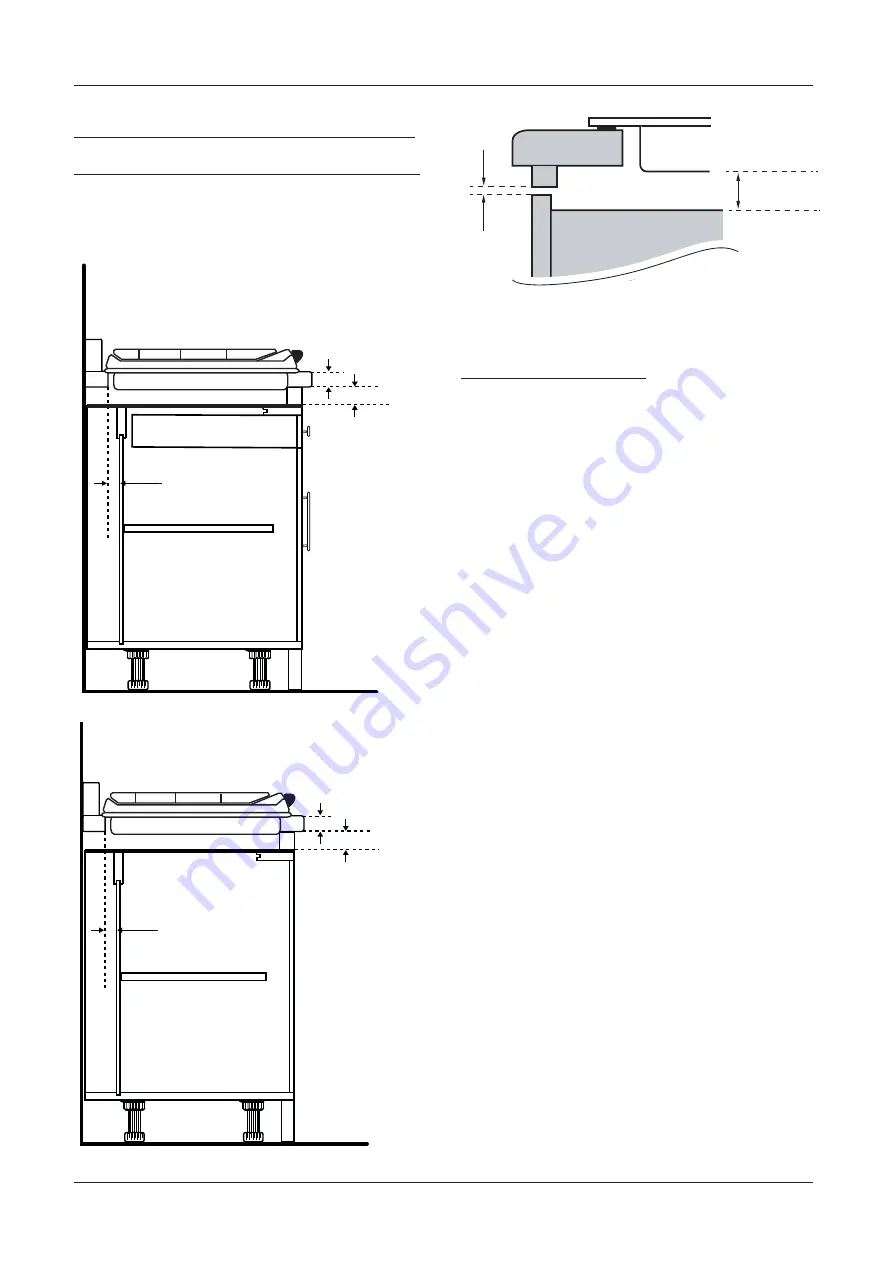
Installation above a kitchen unit 
with door & drawer                        

The panel installed below the hob must be easy to 
remove to allow easy access in case a technical 
intervention is necessary.

30mm

Min 15mm

60mm

30mm

Min 15mm

60mm

Worktop

15mm

oven or partition

Hob

5mm

Summary of Contents for LAM1550

Page 1: ...Gas On Glass Hob 5 Zone LAM1550 User Guide www howdens com appliance registration...

Page 2: ...See back page for product serial number...

Page 3: ...has a policy of continuous product development and reserves the right to change any products and specifications given in this manual The appliance is marked according to the European Directive 2012 19...

Page 4: ...tallation General information Room Ventilation Positioning Protecting the hob cut out How to clean glass surfaces Clearances and dimensions Installation above an oven Self adhesive seal Installation a...

Page 5: ...Cleaning and user maintenance must not be made by children without supervision This appli ance is not suitable for use on any type of boat offshore inland waterway canal boat or boat house caravans or...

Page 6: ...ve plastic utensils close to or on top of the hob Never leave any cook zone on without a pan covering it This causes potential a fire hazard Never heat up a sealed tin of food on the hob as it may exp...

Page 7: ...nected accordance with current instal lation regulations Particular attention shall be given to the relevant requirements regard ing ventilation The use of gas cooking appliance results in the product...

Page 8: ...smell gas leave the prop erty Warn the neighbours Call the fire brigade Use a telephone outside the house Do not re enter the proper ty until you are told it is safe to do so Carbon monoxide Glass war...

Page 9: ...in for more than 15 seconds release the control knob turn it into off position and try light the burner again after a minimum of 1 minute DANGER Risk of overheated oil When you heat the oil do not le...

Page 10: ...hotplate that overlap its edges WARNING Pots must not enter the control zone WARNING Make sure pot handles do not protrude over the cookertop and that pots are centrally positioned on the rings in or...

Page 11: ...me You can use wok burner for regular sauce pans as well but monitor flame strength The burner caps and heads must be repositioned correctly so that they sit squarely onto the hob as shown below This...

Page 12: ...piece of cloth dampened with cold water in a manner as not to leave any cleaning agent on it Dry with a soft and dry cloth Residues may cause damage on the glass ceramic surface when using the hob fo...

Page 13: ...s been taken to ensure this appliance has no burrs or sharp edges We recommend that you wear protective gloves when installing and moving this appliance This will prevent injury The hob should not be...

Page 14: ...the hob There must be a minimum clearance of 60mm between the rear edge of the hob and the rear wall This clearance must be maintained up to 650mm above the worktop unless otherwise stated in your ext...

Page 15: ...count Your appliance will be supplied and installed using the following installation method The two brackets are secured directly into the base of the hob in appropriate positions as shown User manual...

Page 16: ...fitting C to the mains gas supply using a rigid copper pipe or flexible steel pipe IMPORTANT Carry out a final check for leaks on the pipe connections using a soapy solution NEVER USE A FLAME Also mak...

Page 17: ...to the gas supply using semi rigid hoses please ensure that the maximum distance covered by the hose does not exceed two metres Cylindrical Conical Adapting the hob to different types of gas To adapt...

Page 18: ...roximately 3 to 4mm in length finally replace the control knob When the gas supply available is LPG The screw should be turned clockwise to adjust The normal length of a straight flame in the reduced...

Page 19: ...iance may not correspond with the coloured markings identifying the terminals in your spur box proceed as follows The wire which is coloured blue must be connected to the terminal which is marked with...

Page 20: ...d 1750 Rapid 2900 Middle Rear Right Rear Right Front 50 72 Auxiliary 1000 Middle Front General Gas Power Category 12 4kW G 20 20 mbar natural gas G 30 28 30 mbar LPG Installation Class 1 Voltage Frequ...

Page 21: ...switched on Control the fuse If the fuse is released more than one time refer to a qualified electrician Dirty spark electrode Clean electrode using fine sand paper or file Burner cap and crown are p...

Page 22: ...ns which are likely to affect the product The guarantee is invalid if the product is tampered with or repaired by any unauthorised person The guarantee in no way affects your statutory or legal rights...

Page 23: ......

Page 24: ...Product serial number Place sticker here Issue v3 180618 185 9279 49 R AB 18 06 2018...

Reviews: