background image

Copyright © 2021 Laia · www.laiatech.com   

 All rights reserved 

2. Application Instruction

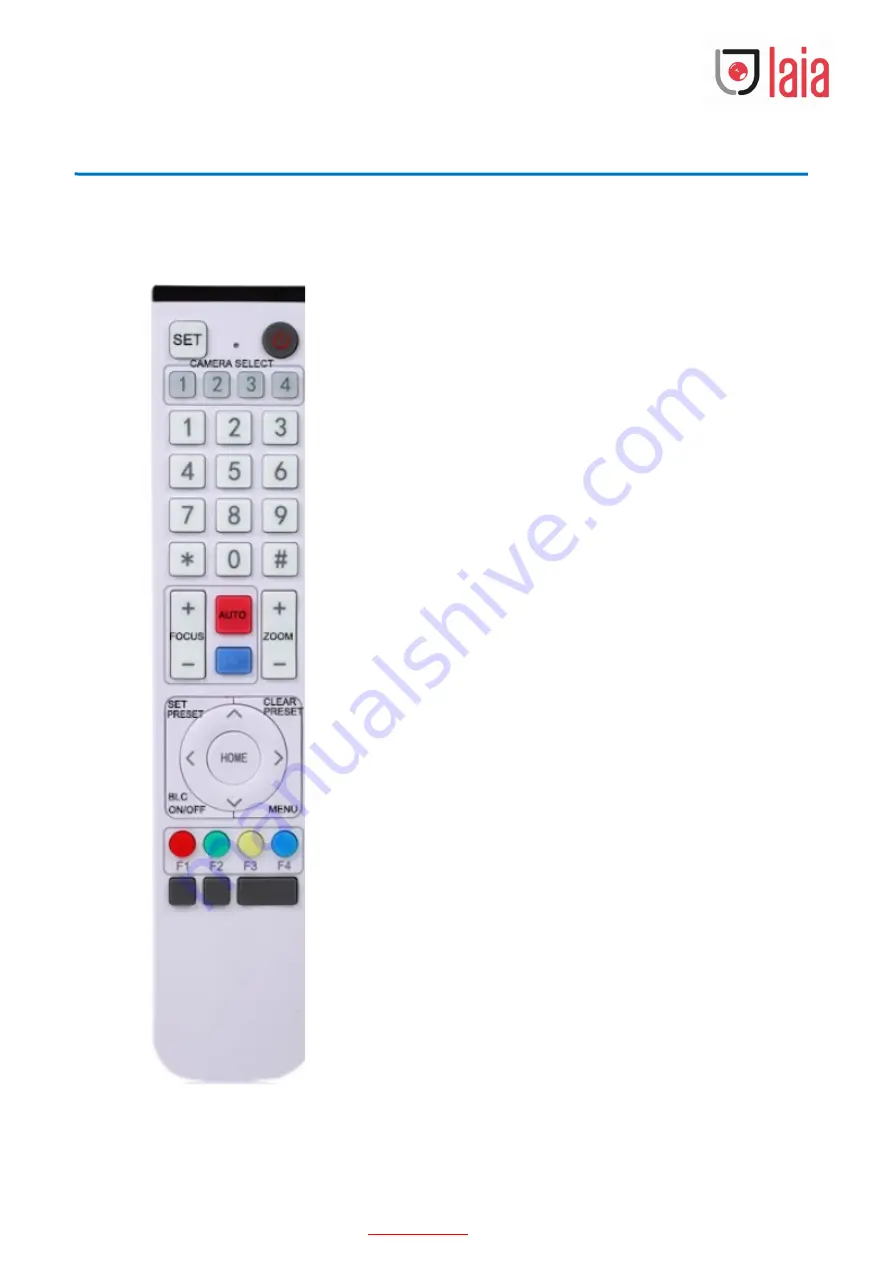
2.1 Remote Controller 

2.1.1 Keys Instruction 

1. Standby Key

After 3s long press, the camera will be in standby mode. Long press 3s again, the 

camera will self-test again and back to HOME position. Note: If preset 0 is set, there 

is no operation within 12s, camera head will automatically point to the specified preset 

0 position. 

2. Camera Address Selection

Select the camera address

3. Number Key

Set or call 0-9 presets

2. *, # Key

Key combination use

Long Press 5s “SET” + “

*

” at the same time, the WR controller is light on, releases

hands. Power on the camera again, it will successfully paired with WR controller. 

Long Press 5s “SET” + “

*

” at the same time, the WR controller is light on, releases

hands. Power on the camera again, it will cancel to paired with WR controller. 

5. Focus Control Key

Auto Focus: Enter into auto focus mode.
Manual Focus: The camera focus mode is manual
Switch the camera focus mode to manual focus by pressing [focus +] or [focus -] to 

adjust. 

6. Zoom Control Key

Zoom

: Lens near

Zoom

: Lens far

Summary of Contents for CUTE 4K AI 2021

Page 1: ...CUTE 4K AI 2021 User Manual V1 0...

Page 2: ...AIN FEATURES 5 1 4 TECHNICAL SPECIFICATIONS 6 1 5 INTERFACE INSTRUCTION 7 2 5 1 External Interface 7 2 APPLICATION INSTRUCTION 8 3 1 REMOTE CONTROLLER 8 3 1 1 Keys Instruction 8 3 1 2 Applications 9 3...

Page 3: ...ation and use of this product must strictly comply with local electrical safety standards 3 Handle with Care Avoid damage to product caused by heavy pressure strong vibration or immersion during trans...

Page 4: ...ch com All rights reserved 6 Magnetic Interference Electromagnetic fields at specific frequencies may affect the image This product is Class A It may cause radio interference in household application...

Page 5: ...2 Bracket 4 Tripod fixing hole 6 USB 3 0 output interface 1 2 Camera Operation 1 Product Installation Fix the device on LCD screen top of computer directly put it on desk or on tripod mounting 2 Conn...

Page 6: ...roduct Overview 1 1 Dimensions Figure 2 2 Camera Dimensions 1 2 Accessories Check and confirm all accessories are provided as listed in sheet 2 1 Sheet 2 1 Product accessories Accessories User manual...

Page 7: ...tion EPTZ EPTZ and 4X digital Zoom Built in pickup Includes 2 built in pickups all round pickup Antique noise suppression algorithm ensures your voice be perfect The effective pickup distance is up to...

Page 8: ...640 480P 30fps 25fps 320 172P 30fps 25fps etc Min Illumination 0 1Lux F1 8 AGC ON Lens f 2 72mm Aperture F2 5 Digital zoom 4X DNR 2D 3D DNR Ultra low illumination On off White Balance Auto Manual One...

Page 9: ...5V Input Current 1A Max Power consumption 5W Max Store Temperature 10 60 Store Humidity 20 90 Working Temperature 10 50 Working Humidity 20 80 Dimension W H D 222mm 93 25mm 56 5mm Weight Around 0 53kg...

Page 10: ...ion Select the camera address 3 Number Key Set or call 0 9 presets 2 Key Key combination use Long Press 5s SET at the same time the WR controller is light on releases hands Power on the camera again i...

Page 11: ...to the previous menu 11 Address Setting F1 Camera Address No 1 F2 Camera Address No 2 F3 Camera Address No 3 F4 Camera Address No 4 12 Key Combination Functions 1 Clear all presets 2 6 Restore factory...

Page 12: ...HOME Press and hold the up down left right key the pan tilt will keep running from slow to fast until it runs to the endpoint the pan tilt running stops as soon as the key is released 3 Presets 1 Pres...

Page 13: ...ng in or zooming out and stops as soon as the key is released 5 Focus Control Focus near Press focus key Valid only in manual focus mode Focus far Press focus key Valid only in manual focus mode Auto...

Page 14: ...sing scroll arrow to point at or highlight the selected items 1 Language Setting press key to select Language 2 Image Style Setting press key to select style 3 Exposure Setting Move the pointer to EXP...

Page 15: ...options only available in Auto Iris priority Brightness priority modes Gain Limit 0 15 only available in Auto Iris priority Brightness priority mode WDR Off 1 8 Shutter Priority 1 25 1 30 1 50 1 60 1...

Page 16: ...lable in Manual mode Red Gain 0 255 only available in Manual mode Blue Gain 0 255 only available in Manual mode Saturation 60 70 80 90 100 110 120 130 140 150 160 170 180 190 200 Hue 0 14 AWB Sensitiv...

Page 17: ...ve the pointer to FOCUS in the Menu click the HOME and enter the FOCUS as follows Focus Mode Auto manual one push AF Zone Up middle down overall AF Sensitivity High middle low 7 Noise Reduction Settin...

Page 18: ...Framing Setting Move the pointer to Auto Framing in the Menu click keys to set ON OFF 8 1 Sensitivity The camera framing speed can be adjusted 9 Dual Stream Setting Move the pointer to Dual Stream in...

Page 19: ...mat and color style won t be restored Note If the address of former remoter is not 1 but another one from 2 3 4 the corresponding camera address will restore to 1 when all parameters or system paramet...

Page 20: ...do self check after restarted c Restart PC d Check whether the camera is well recognized by PC 2 No image sometimes a Check the USB cable quality and whether connected well 3 Image dithering when zoo...

Page 21: ...one is allowed to imitate copy or translate this manual without the company s permission This manual contains no guarantee standpoint expression or other implies in any form Product specification and...

Reviews: