Double Drum Sander 37 x 2
40
Selecting Drum Abrasives
It is important to select the proper grit of abrasives for the type of sanding being performed to achieve maximum
sanding results. As with any sanding operation, first begin sanding with a coarser grit, depending on the roughness
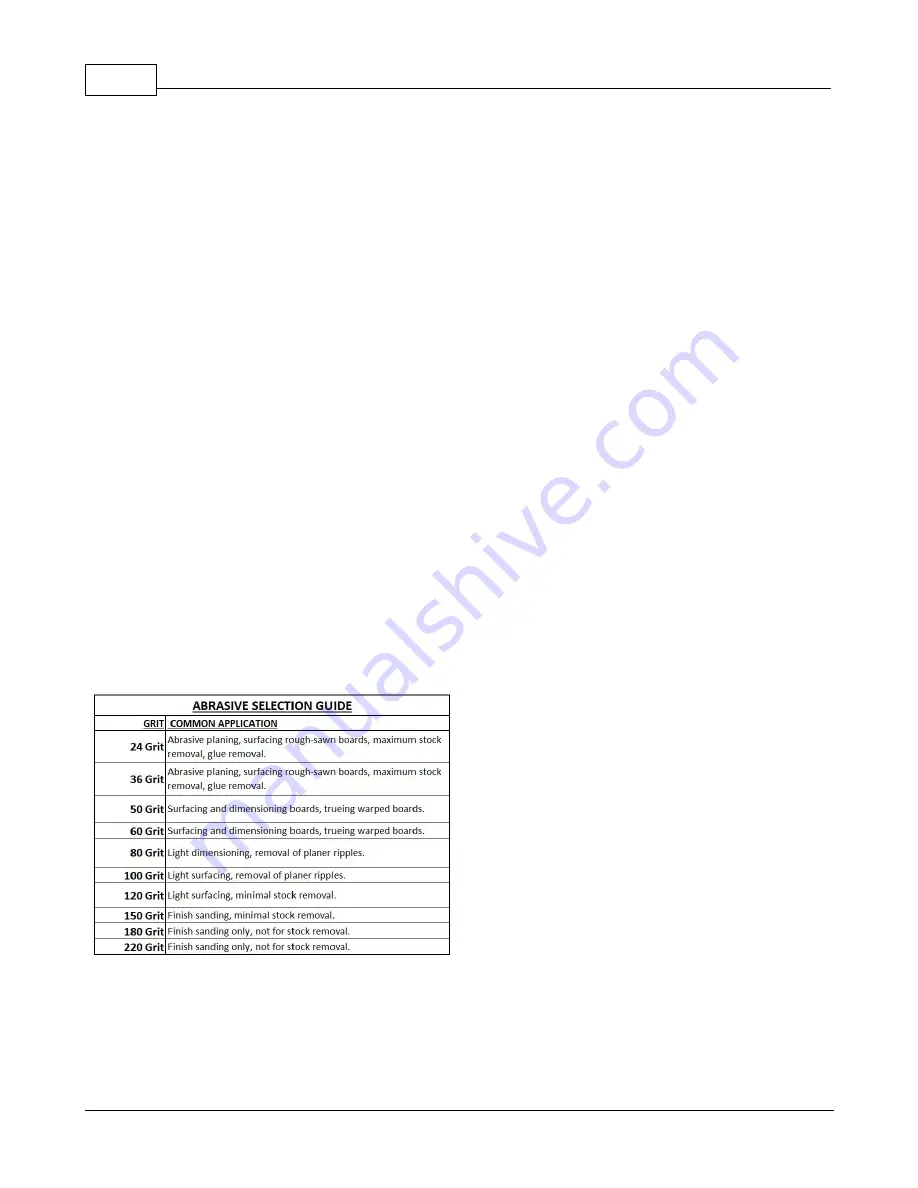
of the stock or the amount of stock to be removed. Then progressively work toward finer grits. The chart below
shows the general uses for the various grits.
Selecting Abrasive Grits-
The amount of stock to be removed is a major consideration when choosing the grit
grade to start with. Grits 24, 36, 50, and 60 are primarily designed for stock removal. Grits 24 and 36 will remove
the most material in one pass, whether you are doing abrasive planing, cleaning up glued panels, or flattening
stock. Grits from 100 through 220 are primarily finishing grits designed to remove the scratch pattern from the
previous grit used. For best results, never skip more than one grit grade when progressing through a sanding
sequence.
For fine work, such as furniture, try not to skip any grit grades during the sanding process. In general, premium
quality abrasives such as abrasives will produce a better finish with a less noticeable scratch pattern.
Caution:
Grits that are too fine can sometimes burnish the wood and leave a glossy surface which will not accept
stains evenly. This will vary by type of wood. Oak, for example, is susceptible to burnishing because of its open
pores.
Selecting Grit Combinations-
The chart shown on
page 36
is a general guide to consult when selecting grits to
use on dual drum machines and setting the rear drum. This chart is also provided under the dust cover on the
SUPERMAX
for quick reference. The first column suggests grits for the
Primary (Front) Drum
of Dual Drum
Models, while the second column suggests a corresponding grit to use on the
Second (Rear) Drum
. The third
column suggests depth settings to try on the rear drum, depending on the grit used. The setting values are based
on a “0” reading when the drum contacts the work piece but still can be rotated by hand.
Note that the grits and settings are starting suggestions only. Other combinations and settings are possible,
depending on your circumstances. It is a good idea to keep records of the combinations you use and their results.
Keeping these records handy will help you select the best combinations of grits for future work.
Summary of Contents for 37 x 2
Page 2: ......
Page 17: ...General Information 17 Castings...
Page 18: ...Double Drum Sander 37 x 2 18 Supermax Specifications...
Page 19: ...General Information 19 Supermax Accessory Supply Check List...
Page 47: ...Mainteance 47...
Page 54: ...Double Drum Sander 37 x 2 54...
Page 56: ...Double Drum Sander 37 x 2 56 Drumhead Assembly Exploded View...
Page 57: ...Drumhead Parts List 57 Drumhead Parts List...
Page 58: ...Double Drum Sander 37 x 2 58...
Page 59: ...Conveyor Exploded View 59 Conveyor Exploded View...
Page 60: ...Double Drum Sander 37 x 2 60 Conveyor Parts List...
Page 61: ...Conveyor Parts List 61...
Page 62: ...Double Drum Sander 37 x 2 62 Exploded Diagrams...
Page 63: ...Parts Lists 63 Parts Lists...
Page 77: ...Disassembly Procedure 77...
Page 79: ...Warranties 79 Warranties Laguna Tools Warranty...
Page 80: ...Double Drum Sander 37 x 2 80 Modifications RMA Policy Laguna Tools Packaging RMA Procedure...
Page 81: ...Warranties 81...


