background image

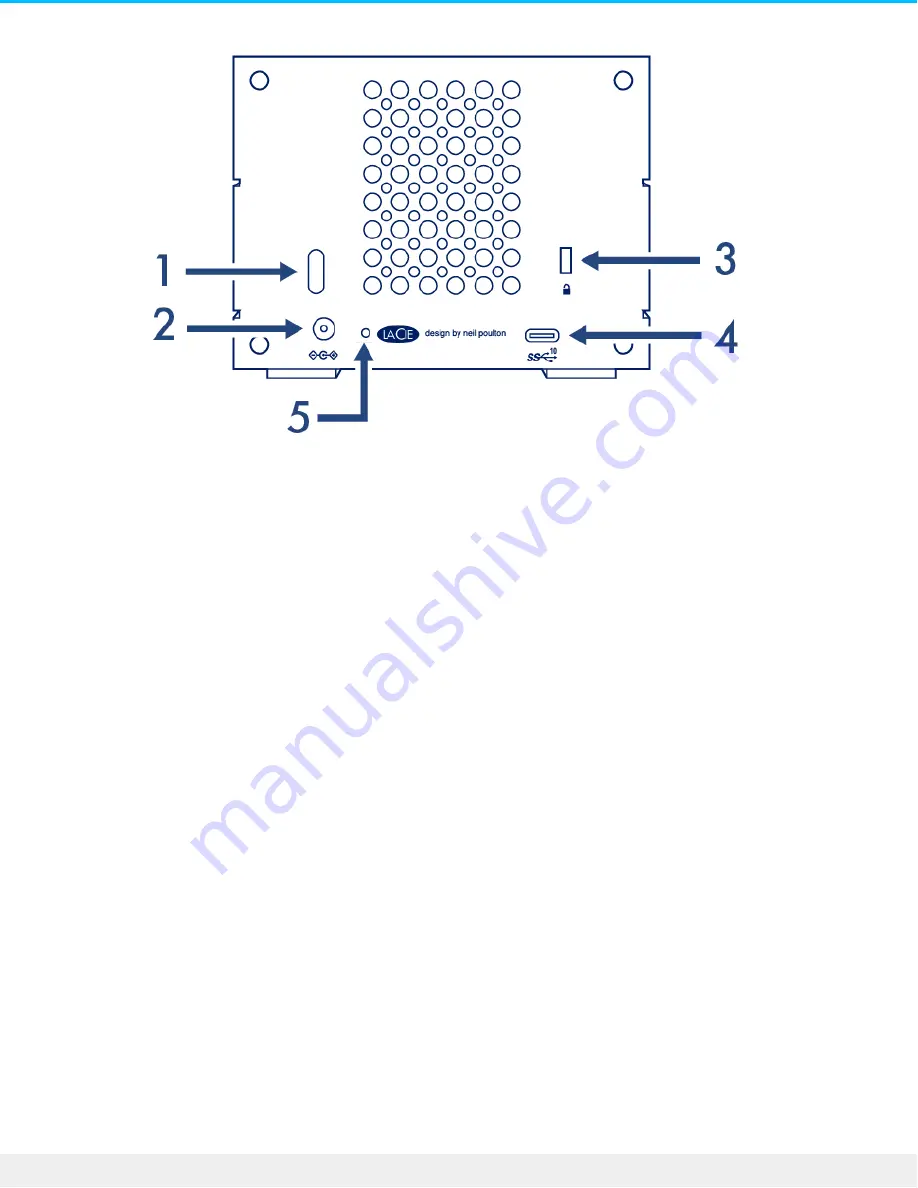
1. 

Power button

—Use this button to power the device off and on. The button is also used confirm key actions

during RAID configuration. See 

Operation

.

2. 

Power input

—Use this port to connect the power cable. Only use the power cable included with your LaCie

2big RAID. Attaching third-party or other LaCie power cables with incorrect voltage can damage the device.

See

Operation

.

3. 

Kensington™ lock port

—Use this port to physically lock the 2big RAID to a desk or rack.

4. 

USB 3.1 (Gen 2) port

—Use the included USB cable to connect 2big RAID’s USB 3.1 port to your

computer’s USB-C or Thunderbolt 3 port. Alternatively, you can use the included USB-C to USB-A (USB

3.0/USB 2.0) cable. Transfer rates vary by the connection type. See 

Cables and Connectors

.

5. 

Firmware update button

—From time to time, LaCie may release firmware updates that address

compatibility issues and enhance 2big RAID. Both Toolkit and LaCie RAID Manager may alert you to new

available firmware updates; firmware updates are also posted to your product support page. When following

the firmware update instructions, you will be prompted to use a thin, rigid wire (such as the end of a

paperclip) to push the button within the recessed space. Only press this button when following instructions

to update the USB firmware.

9

2big RAID

3/22/19

Summary of Contents for 2big RAID

Page 1: ...ID User Manual Click here to access an up to date online version of this document You will also find the most recent content as well as expandable illustrations easier navigation and search capability...

Page 2: ...cted Connect thepower supply Connect theUSB cable Set up LaCie2big RAID Storageformat Disconnecting thehard drive 6 Operation Power on Enclosure dimensions Enclosure weight Electrical Environmental Fr...

Page 3: ...ual formatting 10 Safely Remove LaCie 2big RAID From Your Computer Mac Windows 11 Frequently Asked Questions All users Mac Windows Short push and RAID synchronization How to choose the file system for...

Page 4: ...12 Regulatory Compliance China RoHS Taiwan RoHS Problem The hard drive icon doesn t appear in Computer 39 40 40 41...

Page 5: ...power supply Quick Install Guide Storage and RAID management You can use Toolkit to set up 2big RAID create backup plans and more See the Toolkit user manual for details Advanced RAID configurations...

Page 6: ......

Page 7: ...Length 217 Enclosure weight Capacity Weight kg 4TB 2 4 8TB 2 8 16TB 2 9 Electrical Power supply 36W 12V 3A Environmental Use only the power supply provided with your LaCie 2big RAID Power supplies fro...

Page 8: ...ws Front 1 Status LED The LED indicates that the device is powered on and provides status signals See Status LEDs 2 Swappable hard drive trays Hard drive trays can be removed to replace failed hard dr...

Page 9: ...to your computer s USB C or Thunderbolt 3 port Alternatively you can use the included USB C to USB A USB 3 0 USB 2 0 cable Transfer rates vary by the connection type See Cables and Connectors 5 Firmw...

Page 10: ...aving mode Fast blinking blue Device starting up or shutting down Blinking red and blue RAID initialization or synchronization Blinking red 1 second interval Temperature warning Solid red Temperature...

Page 11: ......

Page 12: ...USB 2 0 up to 480Mb s SuperSpeed USB 3 0 up to 5Gb s USB 3 1 Gen 1 up to 5Gb s USB 3 1 Gen 2 up to 10Gb s Thunderbolt 3 up to 40Gb s You can connect your device to any USB C or USB A port but transfer...

Page 13: ...the USB C to USB Type A cable to connect 2big RAID to a USB A USB 3 0 or USB 2 0 port on your computer 2big RAID Computer Transfer rates with USB A connections have the potential to reach the followin...

Page 14: ...SuperSpeed USB 3 0 up to 5Gb s Hi Speed USB 2 0 up to 480Mb s 14 2big RAID 3 22 19...

Page 15: ...r cable in the order listed below 1 2big RAID power input 2 A live power outlet Connect the USB cable Use only the power supply provided with your 2big RAID Power supplies from third party devices and...

Page 16: ...ble to connect 2big RAID USB C to USB C For optimal transfer rates use the USB C to USB C cable to connect 2big RAID to a USB C port USB 3 1 or Thunderbolt 3 on your computer USB C to USB A Use the US...

Page 17: ...lus plans and more Learn more about Toolkit Toolkit provides useful tools that let you easily Set up your drives for performance or protection Sync your computer data with 2big RAID Archive edited and...

Page 18: ...uch as File Explorer or Finder open LaCie 2big RAID and launch Start Here Mac or Start Here Win Register your device Enter your information and click Register Download Toolkit Click the Download butto...

Page 19: ...Click on the Seagate Toolkit Installer to launch the application Click on the SeagateToolkit exe file to launch the application Storage format LaCie 2big RAID is configured RAID 0 for full storage ca...

Page 20: ...e file system for your operating system Choose one of the following methods to optimize your drive Use Toolkit to optimize disk format See Optimize in the Toolkit user manual for details Manually form...

Page 21: ...he steps below to turn the device off 1 Make certain that the device s volumes are not being accessed 2 Eject the device s volumes from your computer s operating system 3 Disconnect the device from yo...

Page 22: ...time to spin down USB hard drives To exit power saving mode Entering power saving mode Exiting power saving mode The host computer placed the product into power saving mode due to inactivity Access th...

Page 23: ...pates heat from the hard drives keeping them safe and prolonging their life Since LaCie s unique design draws heat away from the internal hard drives the external casing may be warm to the touch after...

Page 24: ...24 2big RAID 3 22 19...

Page 25: ...in faster transfers and more storage since the full capacity of both drives can be used to store unique data However RAID 0 lacks a very important feature data protection If a hard drive fails all dat...

Page 26: ...ere changed from their factory settings Comprehensive RAID management If you ve made changes to your RAID configuration or Toolkit is already installed you can manage RAID levels and formatting using...

Page 27: ...drive If a failed hard drive is under warranty make certain to contact LaCie support to receive a replacement disk It s not necessary to power down the device to replace a single hard drive 1 Locate...

Page 28: ...ard drive with a full disk tray skip to Step 4 Continue here if you are replacing the hard drive using the same disk tray Using a Phillips head screwdriver carefully unfasten all four screws from thei...

Page 29: ...acing up gently place the hard disk within the disk tray Ensure the SATA connector is on the left The four screw slots should align with the disk s four screw holes 4 Using a Phillips head screwdriver...

Page 30: ...isk tray into the empty disk slot Gently push the disk tray handle until you feel it snap into place When replacing hard drives that are members of an active RAID array the hard drive LEDs blink red a...

Page 31: ...inside the chassis are NOT hot swappable and are NOT serviceable at any location outside of LaCie approved service centers Removing the cover voids your product s warranty Additionally removing repla...

Page 32: ...RAID with Time Machine APFS Apple File System An Apple file system optimized for solid state drives SSDs and flash based storage systems While you can format your hard disk drive HDD in APFS performa...

Page 33: ...ended for modern operating systems and computers Toolkit Optimize Toolkit provides a quick and simple means of initially optimizing the drive for best performance Learn more Toolkit Optimize Manual fo...

Page 34: ...indow locate your LaCie device 4 The partition must be available to format If it is currently formatted right click on the partition and then choose Delete 5 To create a new partition right click on t...

Page 35: ...der window 1 Open a Finder window 2 On the sidebar go to Devices and locate the drive you want to eject Click the eject symbol to the right of the drive name 3 Once the device disappears from the side...

Page 36: ...icons arrow in the system tray to display all icons in the notification area 3 In the list of devices choose the device you want to eject Windows displays a notification when it is safe to remove the...

Page 37: ...hard drive is connected to a Hi Speed 2 0 port or hub the inferior performance is normal LaCie 2big RAID performance will improve when it is connected to a USB 3 1 port or a SuperSpeed USB 3 0 port O...

Page 38: ...ters consider reformatting the drive to NTFS Windows users or HFS Mac users See Optional Formatting and Partitioning Q Did you get an error message telling you that the drive has been disconnected whe...

Page 39: ...ly unplug it and then reconnect it The entry that changes is your LaCie hard drive Q Is your hard drive listed next to an unusual icon A Windows Device Manager usually provides information about failu...

Page 40: ...nt Methods for the Restriction of the Use of Hazardous Substances in Electrical and Electronic Products To comply with China RoHS 2 we determined this product s Environmental Protection Use Period EPU...

Page 41: ...d chemical substances in electrical and electronic equipment Beginning on January 1 2018 Seagate products must comply with the Marking of presence requirements in Section 5 of CNS 15663 This product i...

Page 42: ...42 2big RAID 3 22 19...

Reviews: